
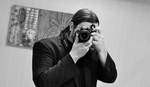
When I first picked up a DSLR and got a taste of artificial lighting, I loved shooting in darkness. I felt like I could control light a lot easier without having to fight the ambiance of a location or sun. Using an array of speedlights, I would light the location and subject how I wanted. Sometimes, that included putting speedlights in lamps or mounting them in the background. Eventually, that style took a sharp 180 degree turn, now I love using natural light in my favor to create a dramatic portrait.
Being a self-taught photographer, I always matured from my mistakes, but never quite knew how to pull off the look I wanted. The more I advanced as a photographer, the more I was asked to shoot in extravagant locations. But, no matter where I shot I would struggle with using strobe and still maintain the ambiance of the location, so naturally I would setup multiple background lights. That is until I learned one simple rule: shutter only controls ambient light and aperture controls artificial light(and ambient). It was like a light bulb that went off. It is a mild statement that may seem like an amateur standard to advance photographers, but it was a game changer for my photography. Simply drag the shutter until you find the proper balance of ambient light within the "mood" of the flash. In other words, shutter won't alter the flash. Make sense?
 Shutter only controls ambient light and aperture controls artificial light(and ambient)
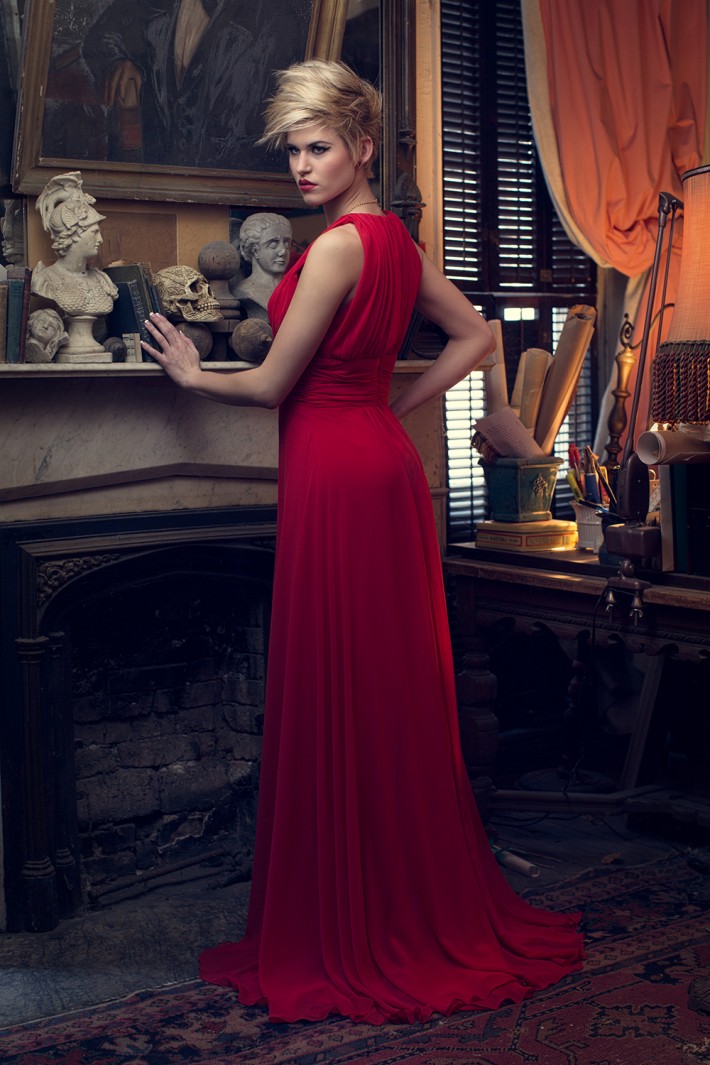
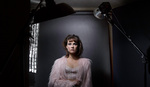
No need for background lights to light up a location, I would just use the natural ambiance of the location and then incorporate artificial light on the subject. This is where that whole “one light-mimicking daylight” comes into play. Photographers like Joey L, Miller Mobley and the great Annie Leibovitz are known for placing a strobe where the sun or light sources would actually be. Follow the steps below and I guarantee you’ll capture the shot.
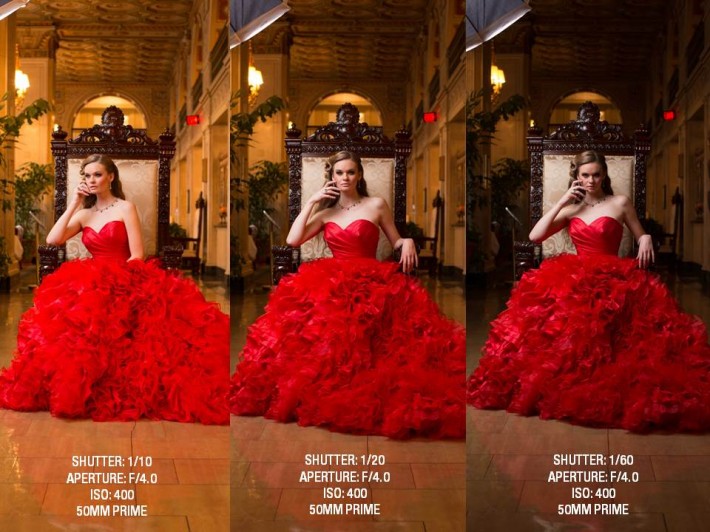
- Use a tripod. If you’re shooting indoors, depending on the amount of ambient light, you’ll have to drag the shutter to have a good balance of light between your strobe and ambiance coming from lamps and/or window light. In order to avoid annoying subtle motion blur and maintain sharpness, when I'm shooting on-location indoors, I always shoot with a tripod. I recommend a brand called 3 Legged Thing, a versatile tripod system that can transform from 7 feet overhead to 5 inches off the deck.
- Setup your shot. Pay attention to the natural light in the building or on set. Then, see where the sun is falling and place a strobe where the sun may hypothetically be shining from where your camera sits. Also, observe what light sources you are dealing with, you may have some conflicts including fluorescent, tungsten or even LED(from TV’s or large screens). For instance, if sunlight were to shine through a window where would it fall on the subjects face?
- Pre-light. This is very important. Instead of wasting the time of your talent, have an assistant or even yourself(with a remote) stand in for testing. It can really take the wind out of a subject's sails if you leave them hanging while you are chimping, then moving light, chimping, then moving light. It also saves a whole lot of time. As much as photographers hate being in front of the camera, it's a necessary evil to keep the morale of the shoot high and the timeline on target.
- Lock in proper white balance. From my experience, playing with a custom Kelvin white balance and trying to balance 2 or 3 different light sources gives me a headache, even more so in post processing. Place your white balance on “Daylight.” It will look warm, but will be consistent and can easily be processed correctly in Adobe Lightroom or Adobe Photoshop.
- Find the sweet spot. With any strobe or modifier there tends to be a sweet spot at the proper power. In my case, I’m shooting with a Profoto D1 modified with a Photek Softligher II. The light has to be extremely close to the subject’s face and with a good assistant or boom, I angle the light for a nice soft 45 degree “Rembrandt” style technique. I tend to use the strobe at its lowest power so I can open up my aperture for more shallow depth of field or “bokeh”.
- Use ISO. With such powerful low noise-high ISO DSLR cameras now available, you can push that ISO to 800 and sit comfortably with practically zero noise. So, if that shutter is over a second, then bring the ISO up for a faster shutter and less chance for motion blur. But, ISO affects the flash too, so balance the exposure by closing the aperture or decreasing the power of the flash.
- Structure your subject. Make sure to let your model or subject know your intention beforehand. If you’re pulling your shutter below 1/60 then they’ll need to remain as still as possible to reduce the amount of motion blur, which can easily become a nightmare in post processing.
- Tether. There is nothing worse than importing your images, seeing them at full resolution, and realizing you screwed up. That is why I recommend tethering using a laptop via Adobe Lightroom or a device like CamRanger to make sure you’re getting what you need. A company called Tether Tools has created an amazing line of tethering gadgets to make your life easier on location.
 |
 |
 |
 |
Even though most shoots are on a strict schedule, remember to take your time and be patient. It’s always important to get it right in camera, and to accomplish that you must pay attention to details, especially when shooting at slower shutter speeds. Furthermore, when mimicking daylight with a strobe, it’s all about balance, so before bringing this technique to your next client project… grab a friend or model, hit a cool location and test this approach to find the right balance for you and your work.
Thanks for reading and if you like what you see here, stay glued via Facebook or my blog.


Great article Clay. Been thinking recently about simple and effective ways to recreate natural light, so this hit my buttons today.
Awesome! Thanks Dave!
Great article. I was up against this yesterday and found this technique quite useful (though, as you mentioned, paying attention to detail and making sure everything is sharp is key). Next time I intend to look more closely at the differences between leaving the modeling light on or at lower power settings to control my shadows/fill.
Thanks Adam! Good shooting my friend!
Good stuff Clay!
Beautiful shots and great article. Thanks Clay!
Thanks Bert!
I really enjoyed this article, very good information. paying very very close attention to detail trumps all, it can make or break a photo
Thanks Sean! You're definitely right!
Quote :"Shutter controls ambient light and aperture controls artificial light."
If the term "artificial light" refers to speedlights ... I guess it's fair to say that it's the power setting on the speedlight that is in charge of the amount of light made available to the camera.
shuter controls ambient light , aperture controls ambient + artificial and iso ambient +artificial
and whwn you synk over 1/200 , 1/250 you lose 3 stops and start graduali to lose power of the artificial light depending on the tipe of light speedlight or studio strobe
Correct but, as the article states, don't forget that your ISO comes in to play in regards to the light from your flash or strobe and the camera. In other words, ISO 800 will allow more artificial light to be available to the camera versus ISO 200.
If you're shooting with off-camera flash and you don't have the gear to remotely control the power of that flash then understanding the relationship between shutter, aperture, and ISO will offer you a way to control the output of the artificial light remotely without having to leave the camera.
A great post, indeed! As an architectural and interiors photographer, I put this into practice everyday; messaging my exposures between the shutter speed, aperture, and ISO to achieve a well-balanced image. Great article, Clay!
Much appreciated my friend!
Decent article, however there is a common mistake, aperture ALSO controls the ambient. If you open up a stop with your aperture, not only will you get a stop more of your artificial light source, you will also get a stop more of the ambient. If it's dimly lit, the noticeable difference in the ambient may not be much, but it doesn't mean that you aren't getting more of the ambient into your camera as well as the strobe. The only scenario where aperture would only control your artificial light would be in a lights out studio setting where you had no ambient light.
Cheers,
-Jason
Jason, thanks for the feedback! My intention was to make it simple for people to understand, but you're right. It's a constant balancing act that is no east feat. The post has been updated.
Hope I didn't come across as rude, still think you had a good article Clay, just wanted to clear up a point or two in case anyone got confused. And you're right, it is a delicate balancing act indeed.
Cheers,
-Jason
Also, this part is misleading....
"Use ISO. With such powerful low noise-high ISO DSLR
cameras now available, you can push that ISO to 800 and sit comfortably
with practically zero noise. So, if that shutter is over a second, then
bring the ISO up for a faster shutter and less chance for motion blur.
But, ISO affects the flash too, so balance the exposure by closing the
aperture."
If you are at say f4.0 for your shot and at ISO 200, and 1/2 for your shutter and want to get a faster shutter speed, if you do what you say and bump the ISO to 800 (2 stops of light) and then counter the strobe by closing down to f8 (two stops of light), and then cut your shutter to 1/8th (2 stops of light), then you effectively haven't done anything to help the ambient light. Closing your aperture two stops cuts out two stops of ambient light as well. You'd actually have to let your shutter drag longer in that scenario to make up for the loss of ambient you cut with the aperture.
The correct thing to do in this scenario would be to bump ISO to 800 (2 stops), take shutter to 1/8th, and then bump the power down on your strobe two stops of light to counteract the increase in ISO. This would give you the same exposure you started with but with a faster shutter speed, which was your target result.
Agreed.
i tried to break it down into two possible situations for photographers. If u change shutter speed OR if u change aperture /iso
1) If u change to a new shutter speed by say 1 stop --
To balance ambient change either aperture or Iso by 1 stop. But in doing so (changing either aperture or iso ) we have disturbed our flash exposure. So balance that by adjusting flash power by 1 stop.
2) If u change either aperture or Iso by 1stop --
To balance ambient : In case u changed aperture by 1 stop balance that by changing ISO with 1 stop.
To balance flash: already balanced when we balanced ambient! Nothing to do.
Cheers
how can i apply it to stock images..we need very low iso 100 or 200 not more..
If you want to drag the shutter at low ISOs for stock, then you need a tripod. That way you can shoot at say 1/2 second if needed for ISO 100 and still have a sharp image.
I don;t understand this :( I keep reading the intro and I fear it assumes more than I know and I know quite a bit. I guess the discussion should go into how to add the artificial light instead of what is used as an artificial light
I'm sorry you don't understand the article. All in all, It's simply about bringing up ambient light in your portraits by dragging that shutter! Cheers!
I work in the medical field and we call things like "dragging the shutter" without any explanation "doctor speak". It assumes the listener knows the jargon.
Yeah "dragging the shutter" can be confusing.
What Clay means is leaving the all the settings the same except for the shutter speed, like the example above. Start with a lower shutter or go high or higher shutter and go lower. His example he started at 1/20 then went to 1/60 of a second. On a Canon or Nikon this is adjusted by the dial right where the button on the camera where you take a picture is.
Best way to do this is to keep your camera in manual (M) mode and adjust each function separately. However you can even do it in program (P) mode with some cameras.
Thanks for the article :) My habit is to underexpose the background by a stop or 2 so it looks dark and moody. With this are you exposing the background completely normally or still down half a stop or 1/3 of a stop?
Also how do you then avoid over exposing the face when you bring in the strobe? Do you find a shadowed area so the strobe brings the exposure back to the ambient?
Thanks :)
Mike
Thanks Mike! It's all about finding a balance to your liking! If you like underexposing the background, then go for it! It's all about your vision for the photography! To avoid over-exposure on the subjects face just work the aperture or power on the strobe until its properly exposed. Remember, shutter only controls the ambient light and does not effect the strobe! Cheers!
This is one of my favorite type of articles. Mastering photography is not about the gear that you have, but the craft of mastering all kinds of lights that you have available and introduced during the shoot. Keep up the good work and I hope to read more articles like this in the near future! Thanks again.
Thanks Rafael!
HI Clay
This is one of those areas where there is so much misunderstanding its amazing. Until you start to understand that strobe power and aperture control exposure by your strobe and ambient exposure is controlled by shutter and aperture (ISO does affect both). However; when mixing the two light sources your aperture defaults to controlling your strobe as your now mixing two light sources and need to control exposure for both sources (ambient light source/"continuous" light source and Strobe) and realize your vision. It was one of the first things people tried to teach me yet its taken some time to even start to understand it (I'm slower than most) and still working at it.
In this article written by one of your Fstopper colleagues I thought that Julia's reference to photographer Oleg Titayev's visual demonstration of continuous light vs strobe exposure is a great resource to really see visually how the two light sources play against/with each other and what you do to control the exposure when mixing these two different sources of light generation: http://fstoppers.com/shooting-with-mixed-studio-lighting
To your point the pallet of your ability to creatively control a scene and better leverage all your tools and techniques really gets added to when your utilizing the one light source that's already present whether to remove, bring in partially, or create artistic effects.
Good post.
I'm worried about shake with a lower shutter speed. With the flash from the strobe work to freeze the image or should I use a tripod when trying this?
Joshua, to avoid motion blur, use a tripod! On location, I'm always using a tripod.
The one question I have is with slow shutter speeds, what about movement of the subject - Yes, the strobe will freeze the person, but then there is the long shutter speeds for the ambient light and if if the subject ( a person ) moves during a 1/20 or 1/5th of a sec. will that not be recorded as a blur of the person vis-a-vis the background which would be lit by the ambient light ?
Thanks for the great article Clay. (I need a bigger fill.)
Really enjoyed this article Clay. A lot of useful information. I do have a question though, How do you work around fluorescent or tungsten mixing in with the flash? would you gel your flash heads to whichever type of ambient light you are working with? or is there a a more simple way? Thanks