
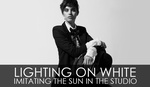
Lighting isn't easy, a world-class-perfectly-lit studio portrait happens with a lot of instinct and experience. A strong grasp of lighting comes with experimentation and practice. Those that know my aesthetic know I'm a huge fan of one light photography. With that said, every image I produce I try and maintain the look of one light, even though it very well be lit with six lights. If I'm shooting for a hair, the hair needs to be well lit. If I'm shooting for makeup, the light needs to fill the face and really show detail. The same applies to product photography or fashion. I always give the client what they need, but always retain my dramatic lighting style.
Don't expect perfect results right out the gate, there are sweet spots with every modifier, which takes time to find. Sometime within the past year I found the right instinct to pull off high quality studio imagery, but it required a lot of patience and practice. Find your frame, build the lighting foundation that add to it subtlety.
SUBJECT
Before I even touch a light stand, I start with the subject and mood. I analyze the subject or model, I look at face shape and distinct features. Usually, the creative director and I will hunt through hundreds of inspirational images until we land on a photograph that captures a faint sense of how the lighting should look. The same applies for wardrobe, makeup, hair and overall mood. The idea is always hashed out beforehand and the idea will always determine the modifier I use for my key light.
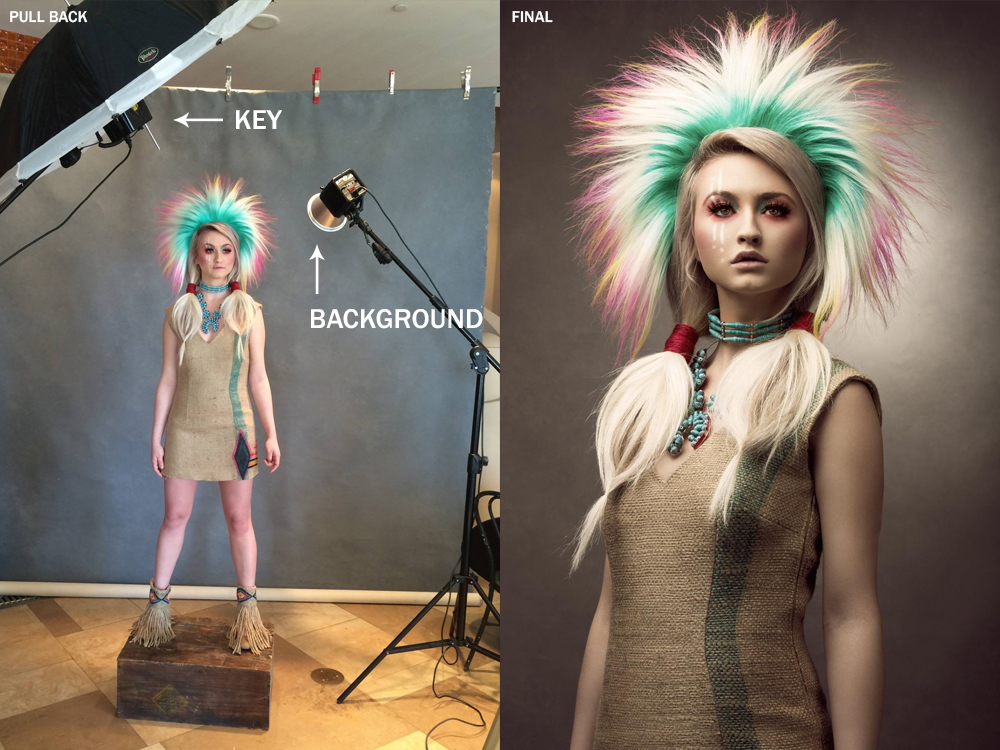
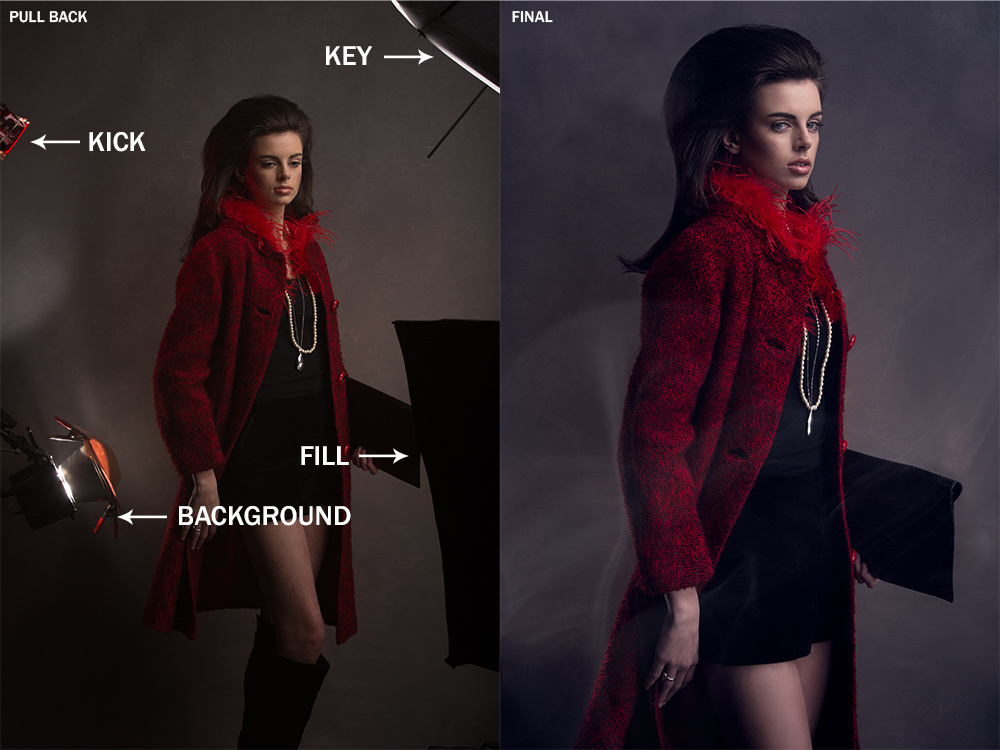
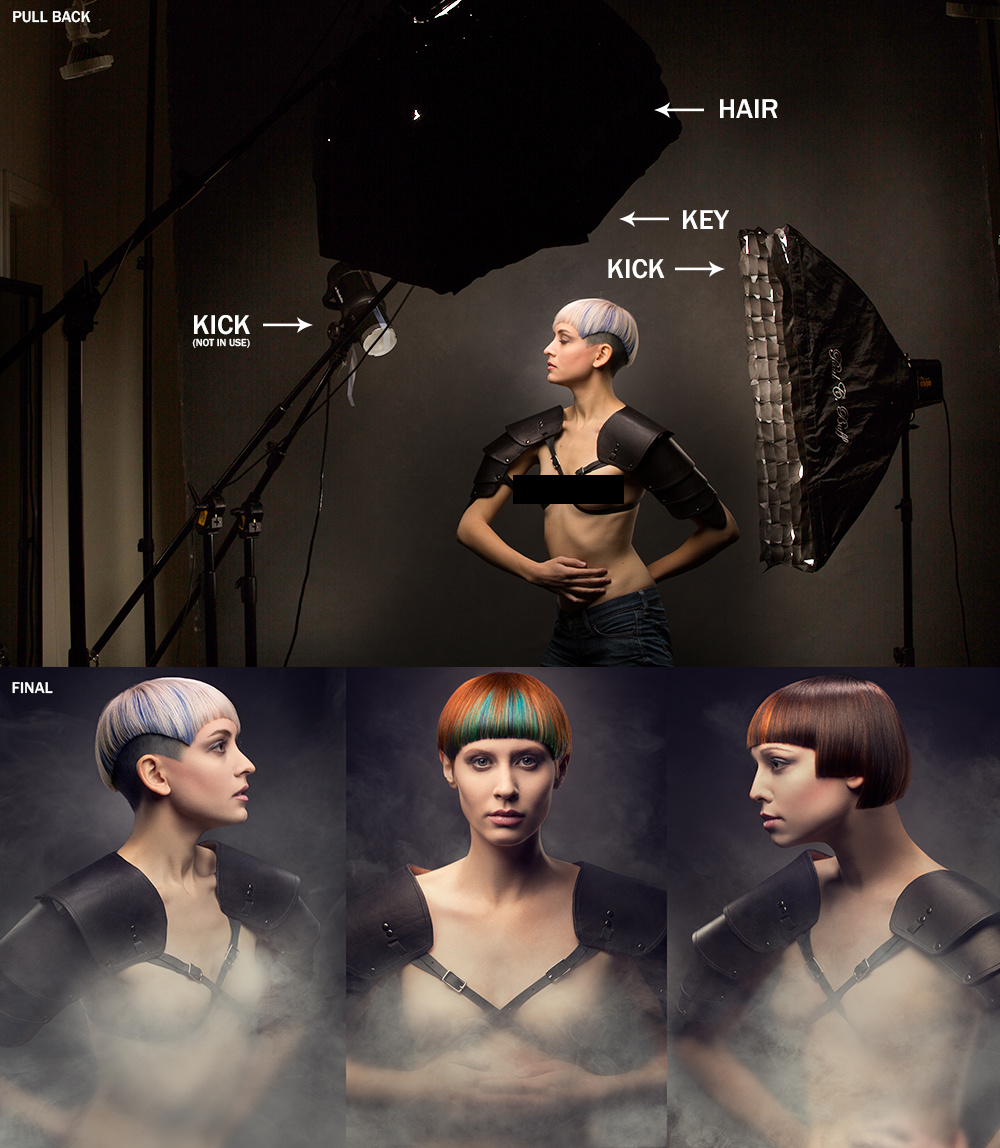
KEY
A crucial step to my lighting setup starts at the foundation, just one light. A play to my style, I usually prefer to use a soft light source such as a Photek Softlighter II, Octobox or Beauty Dish w/ Sock. Depending on the modification, a good starting point for a key light is always half power. Once the key light is adjusted to the mood and locked in, the rest comes easy. The goal now is to create subtle contrast and contour with light.

KICK
Time and time again, I see photographs which go completely overboard with lighting; blown highlights, inferior rim lighting or simply a wrong choice in modification. It’s all about the subtleties and maintaining a realistic aesthetic. So, keep the strobes or speedlights at low power and compensate as you build. Once the key is place the goal now is to create contrast, which can be done several ways, the most effective way is the place a light off camera (opposite of your key) behind the subject, which creates a highlight on subject’s cheek, neck and body. When creating a portrait, I usually go to a Stripbox with a grid on the opposite end of the key light. For beauty work, I may place two Stripboxes behind the subject for a greater specular highlighting.

BACKGROUND
Now that there is some subject separation and contrast from the background, it’s time to create depth and dimension. If you’re shooting on a bright color or white background you may not even need a background light. However, if I'm shooting on a dark background, I always love to add a bit of pop in the background. That pop can come from a light with a 20° or 30° grid and/or gel. On some occasions, I've even doubled up on grids with gaff tape for even more focused light. A speedlight can also come in handy for a background light because of its ability to fire at such low power. Remember, it’s all about the subtleties.
FILL
Similar to a blown highlight, when a shadow goes black it’s tough to pull up in exposure without a gross amount of noise. To avoid that issue, I’ve found a fill light to be an important piece to the puzzle. Many photographers place a large light source directly behind them at a very low power, but I like to fill in only certain areas that require it. By setting a softly modified light source or a piece of white foam core next to those strong shadows, you can reduce the contrast and provide more playing room in post processing. Many photographers use fill under the chin for beauty or fill opposite of the key light for less shadow density. Although this isn't a pivotal point of light, it can definitely help out when you need it most. A fill light should not be forgotten while working with light.

HAIR
This is probably the most underrated light in the entire game of photography. A hair light can not only create contrast, but if done correctly and really change the dynamic of your image. Unfortunately, it’s easy to go too hard and wrong with a hair light. You’ll need a solid boom stand to hold a hair light, I recommend the Avenger Combination Boom or if you're on a budget the Manfrotto Combination Boom. But, don’t forget the sandbags!
Now that the key, kick, background and fill lighting is in place, adding a hair light can really add an "extra side of pop with a cherry on top." The hair light is placed above the subject and slightly behind so it does not hit the face, only the hair. Start with the lowest power and tune it in from there. Place a grid on the light to focus the light only on the top of the subject’s head. Pay close attention to highlights, as they can go way too hot and blow out with just a small touch of the aperture.

This might seem like too much to many of you, but those extra little steps can make a world of difference. Lighting can be overwhelming, but these additional lights are playing a very subtle role. However, without them the image may lose interest. With that said, next time you have some creative time in the studio, start small and build, you never know what unique light you may find beyond “the key”.


So sad that the Softlighter isn't sold in the EU. Would love to get one, love the quality of ligth it produces. Anyone know of any alternatives in the EU?
That is a shame! I know Profoto makes a brolly umbrella that is very similar. Or the Westcott Apollo Orb produces a similar light!
ProFoto umbrellas are amazing, but really expensive. Westcott isn't sold in the EU either. The Soflighter is nice and cheap, 95$ for a 60". The ProFoto 65" silver umbrella is 350$, and the Giants are even more expensive. (5 foot silver Giant is 1 500$)
There are several webstores in The Netherlands where you can order Westcott. Drop me a linbe, if you want more info.
Would love some more info.
I have also ordered a Walimew 180cm silver umbrella incl. white coat. This is only €90,-
Don't know about the quality yet, but what I have heard it should be fine. And you can buy it all over the EU.
I may have found a real good alternative here, locally. A couple of months ago I bought a Phottix Para-Pro 101cm Silver umbrella. They also make it in 152cm and 182cm, those also have a diffuser. Sadly, no diffuser for the 101. I have to mention that these umbrellas are built like tanks, 16 fiber rods. (152cm + diffuser is 80€ and 182cm with diffuser is 108€)
Try cameratools.nl or cameranu.nl
It's great to know that there is a place to get Westcott in the EU. The only bad thing is that everything costs about twice as much here. I guess I just need to go to the US on a nice little vacation :D
I'm coming to Vienna late august through beginning of oct. If it's close, I can get one for you and you can pay me back when we meet... :)
Im from Estonia, Tallinn. Vienna is on the other side of Europe for me :D Sadly.
Living in the EU, you can still buy the Softlighter via f.ex. B&H or Adorama. Unfortunately the 60" is out of stuck at the moment. But I am planning to buy one, when it's back in stock :) And I live in Denmark.
Well, the shipping is gonna cost quite a bit and also the taxes. The softlighter is amazingly cheap in the US. Well, everything is. Even the Hasselblads and Phase Ones (Denmark ftw), although they are European companies.
Great article Clay! Thanks again for posting such helpful advice.
Thanks for reading Catharine! You're very welcome!
Solid article Clay! Those Softlighter's are the business. I think I have 5 of them. :P
Thanks Peter! I love them I've owned 3 myself. If only we could purchase stock in Photek, right!?
This is a great article!
I like to employ the KISS method (Keep It Simple Stupid) when it comes to lighting but after seeing some of your set ups here it's given me lot to think about which might help me take my work to the next level.
Cheers.
\m/
That is awesome, thanks Matt! I love the KISS method, but sometimes I just need that added pop, but I always maintain the simple look. Give it a shot!
Great read! You keep tight control on your lighting ratios and your directionality is fantastic.
Thanks Matt! I really appreciate you reading and the kind comment!
another perfect article. I knew it was one of yours just from the front page thumbnails ;)
Thank you as always Dani! Really appreciate the support my man!
Excellent and informative post as always Clay. Thanks for sharing.
Thanks brother! I loved your article this week, as always!
Very informative, thanks for this really nice article!
Thanks!
this is such an amazing article! what background is it that your using?
Thank you Pixie! It's a hand painted canvas from Oliphant Studio in NYC.
Nice article, Clay. Very useful!
Thank you so much for reading Sergey!
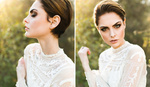
Clay, this is great thank you for sharing. I love the light and your highly skilled approach to it - absolutely learnt a lot from this. But I'm worried about the dude in the bottom photo, he appears to have been hit in the head by a retouching club as he's nothing like the guy in the set up pic (yes I retouch heaps too, but to my eye this doesn't look real enough - it's got the look of the portrait pro plug-in or something. Sorry.
BUT, the lesson was brilliant, do appreciate that - thanks!
Mark, thanks for reading and I appreciate the feedback! That was professionally re-touched, we wanted a very clean look and the skin retained it's texture. I think it's beautifully re-touched, but photography is also subjective, one may see it differently then I do! Thanks again, cheers!
Hey Clay, thanks for the insight. I really appreciate the point about being subtle. I have tended to be too heaven handed with the multiple lighting set ups in the past, it all ends up being far too bright flat and blown out. Great post once again!!!
Thanks for reading Mark! Keep it subtle and build from there, you got this man!
Cheers Clay, something I definitely need to work on. Bookmarked!
And great shots, too :))
Thanks Bob! Really appreciate that!
Thank you so very much for this article Clay!
Thanks for reading Lucien!
This is full of great information. Thanks for the awesome article!
Thank you for reading Josh! Much appreciated!
Love your articles/style! Looking forward to the next one!
Thank you Ernst! That is awesome of you to say.
This is a wonderful article with clear examples. I love how this shows you how to "build" a lighting setup from a very simple yet effective starting place. I'm dying to try some of these.
Thank you for checking it out Jason! Looking forward to seeing what you do with the information!
Great article! Thanks for sharing! Having been out of school and in the world of accounting for 10 years, this is the kind of stuff I like to read as a refresher. I can fumble my way through learning digital photography but studio lighting was something I never paid much attention to as a student because I thought I'd never use it (hah!).
Thank you Jennifer! Just work at it and the good results will come!
always an inspiration
Thank you Simon! I try! :)
Great article, but now you may have made me want to buy just ONE MORE light lol
Thanks for the tips! I love articles like this!