
I'm James Robertson, a new addition to the Fstoppers writer staff and a full time commercial photographer/studio owner for the past year. I've joined the team to bring content to the readers who may find themselves either ready to jump into the professional world, or have already and are looking for tips to make life easier. I thought it would be good to start with an article that will give everyone some tips on simplifying the work load that comes with the industry through organization and planning ahead.
There's a lot of content to cover, but I'm going to stick to the basics for this post that will apply to most areas of professional photography like editing, hiring, meetings, and shoot preparation.
Staff and Third Party Services - As a general rule in business - do everything you're good at, and outsource the rest. Some photographers have found a ton of success without ever editing a photo by hiring professional editors, and many of us have hair and makeup teams on speed dial (or in our contacts at least, do people still use speed dial?). I have no real steps for this one, but you're likely going to need an accountant, some assistants for operating equipment or as 2nd shooters, and a lawyer on retainer if you can afford it. If you need to hire a 3rd party for a specific job, inform your client and make sure they have room for the bill in their budget, this shouldn't come out of your pocket unless they're your regular team and you've already accounted for them in your job quote. Social media, as well as local business conventions and organizations can be a great way to network and find professionals to work with.
Marketing & Meetings - As a freelancer, when I'm not working under a contract I'm looking for one. Every business and potential client has a different schedule and operates in a different way, and it's hard to form a regular schedule and routine around this. Nevertheless, I have a few tricks which help me remember everything and manage my schedule.
1) Market face-to-face - If you're confident in the work you offer and want to make a great first impression while saving money, go out and meet your clients face to face. I like to designate one day per week to this and enjoy it as a nice change of pace, as for me this means walking into a local business, talking with the owner and leaving them with my business card - for people in the portrait and wedding industries it may be handing out promotional material to couples in the park, or attending local trade-shows. There's a definite positive connection that can be made in these meetings that's lost in email and over the phone - just make sure you don't trespass or interfere with someone's work.
2) Find a convenient local venue - When you're trying to win over a client it never hurts to buy them lunch or coffee for a first meeting. Having a conveniently located (for your market) cafe or restaurant to suggest will not only reflect well on you for being prepared, but it supports local business and can help you build a great relationship with the staff/owners which may lead to future work/discounts.
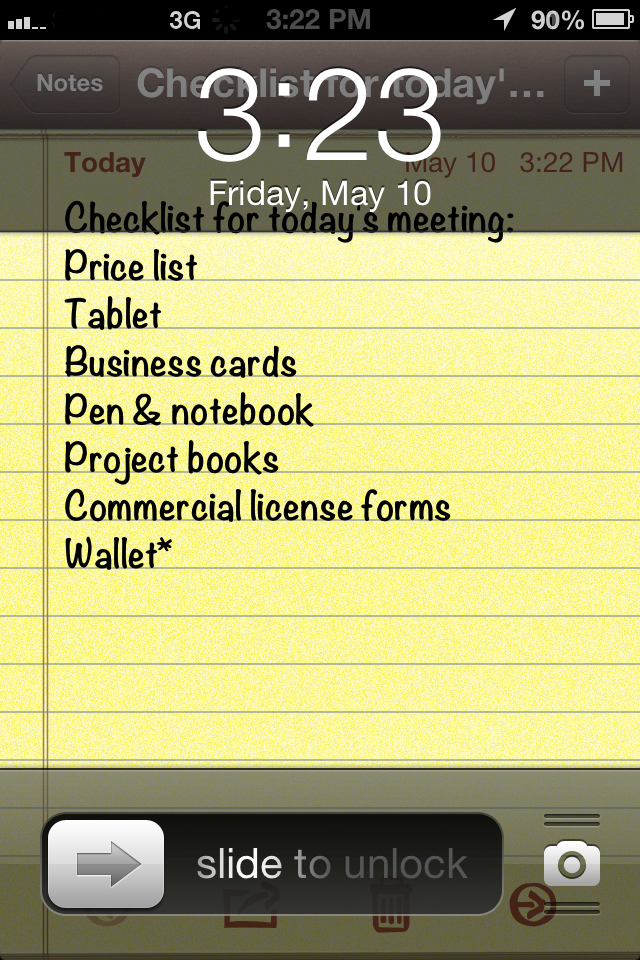
3) Have info ready - Hopefully if you're already operating a business part time or full time, you have some contracts which go over things like liability, rights, etc. Whenever meeting with potential clients (even if just meeting for the first time) I always have my contracts, pricing, method to view my portfolio (ipad, laptop, print book, whatever works for you) and business cards with me.
If you're starting out and are having trouble knowing which forms you need and how to make sure you're covering your bases, I've been following a great startup called "Docracy" which is a crowd-sourced collection of legal documents submitted by users for free download/use. They may not have the document you need, and some on there may not apply directly to your situation or local laws, but it's a good place to start.
4) Do your research - Everyone's got their lives on a social network, whether it's Facebook, LinkedIn, Twitter, whatever. Knowing some basic details about the person or company you're meeting with is a huge asset in keeping a conversation going and building a good rapport with the person who you're trying to get to write you a check. One experience comes to mind personally where I found out via. Facebook that a potential client of mine went to a school in a nearby town that my Dad taught at 20+ years ago, I was then able to establish in our lunch meeting that he had taught her which provided a great filler conversation before jumping into business which ultimately led to a signed contract with the company and money in the bank.
Shoot Preparation - More often than not it seems my clients are pressed for time and don't want to hang out all day, no matter how awesome I am. In order to keep their visits short and productive, I have a simple system to make sure everyone's on the same page, and cut down on time for setup and breakdown of equipment.
1) Plan it all out - Chase Jarvis's producer, Megan wrote a great blog post in December about what you need to plan out for a commercial contract, so instead of me repeating everything I'll just let you read it here. Some of it - like having a list of contacts for those involved and pre-scouted locations will carry over to other fields like wedding and event photography, but it's important that you know exactly what you need to have, where you need to be, and what you need to do for the specific job you're shooting before you take a dime from your client. Everyone should be given a copy of the info they need so there's no confusion, and if you're not sure who's job it is to have this all prepared then just assume it's you.
2) Be Early - I had to learn this the hard way a couple times, but figure out when the client wants to shoot, determine how long you'll need to set up, then multiply that time by 1.5 and show up with your team that early (if you're shooting in your client's property, make sure you let them know you're coming early). It's always when you're pressed for time that you find out you forgot batteries or your memory card wallet and have to drive back to get it, and it's a lot better for your business image to sit around unpaid for half an hour with everything ready to go ahead of time than to waste your client's time when you're billing them. Hair/Makeup should also arrive early as everyone should ideally be ready to step in front of the camera at your determined start time, if possible.
3) Keep gear packed - The best way to keep stress levels down on the day of the shoot is to have everything ready to go from the last shoot. This may seem obvious but it's really easy to get lazy and say "screw it" after a 5 hour shoot and toss everything in a pile, but you'll hate yourself for doing this later and once you have a routine down, it doesn't take much longer to do it properly in the first place. Of course, everyone has different gear so it's hard for me to put together a guide for this, but my basic checklist includes formatting cards and putting them in my card wallet, charging batteries (and putting them back in the cameras/flashes), and winding up cords so they don't tangle.
4) Know your location - Shooting outside? Where will the sun be, what might cast shadows? Maybe you're in an office with glass windows and lights right outside, you'll probably need to flag those, you might need to bring a couple. There's endless possibilities for things in your environment that will mess up your shots if you aren't prepared, and you could end up spending many more hours fixing these things in post if you don't have to re-shoot all together.
Editing - The most time consuming part of my work day always comes down to editing. In my business I use Adobe CC and these programs will be the ones I focus on for this article, however many of these tips will translate over to other software.
1) Learn your keyboard shortcuts! - When I was going to school for graphic design we were given a test of 60 keyboard shortcuts that we had to memorize for Adobe InDesign. At the time I dreaded writing the test as my memory is terrible and I just had a general hatred for InDesign, however now that I'm working with Photoshop and Lightroom, I'm finding that knowing the shortcuts for most of my regular tools and methods saves me a great deal of time. For me, sitting down and trying to memorize a list of shortcuts and their actions is the worst way to do this, and I've found that the method that works best for me is the same way someone would normally teach themselves an instrument; whenever I don't know the shortcut I need I look it up (most of the time it's listed next to the selection or while hovering over the tool) then I use it. Normally this will be a tool or option that I'll be using throughout the job since the particular editing style is normally consistent throughout the photos of a single contract, so I end up using it quite a bit in a short amount of time and before long it's muscle memory and I couldn't even tell you what buttons I'm pressing, I just naturally do it.
2) Simplify Everything - While I never use presets for raw editing in Lightroom, I automate everything I can in Photoshop and it literally saves me hours when I need to run the same processes for multiple photos, it's also really easy.
Step one: Open images for editing in Photoshop.
Step two: Open the "Actions" window (window>actions) or select it from the toolbar if available.
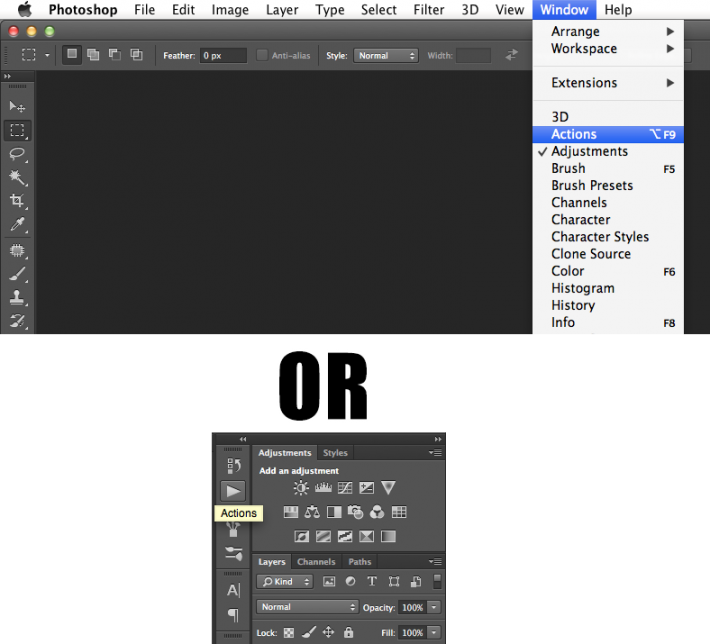


Step six: Hit stop, & done.
3) Find a file organization system that works for you - Everyone I talk to has a different way that works for them, but you need to find a file organization system and stick to it. Some love Lightroom's Library/Collection system, and others who shoot landscapes or wildlife may prefer to take advantage of Aperture's "organize by GPS location" feature. Some may just like to create their own folders and do it manually, but it's essential that you're able to find and reference a photo you've taken in the past if the client comes back to you and says they lost it or want something changed. It's also in your best interest to invest in a backup system and keep multiple copies of everything on different drives so you're not screwed if something crashes.
File Prep & Delivery - Before I shoot a single photo I always ask my clients three things - Who am I giving the photos to, in what format, and how are they being displayed? This will determine what resolution and colour profile I need to set for the images before they get them, and tell me who I need to consult about the method of delivery.
1) Resolution and Colour - One of my regular clients is a local ad agency/web developing studio who regularly needs photos of products, people, and places for business websites and promotional material, and a lot of times all they need is something for a 1000px banner on a home page - sending them 30 full res 16 bit TIFF's is a waste of their time, and my time when I can simply keep the full res in my backups and send them lower resolution sRGB jpegs. Other times they're running print material and I need to get in touch with their printer to find out what DPI and colour profile they're running everything at, otherwise nothing will display properly. I find the best way to prepare my files is to use the Export menu in Lightroom 4, which provides me with options for metadata, image dimensions, file naming, colour profiles, and resolution all in one screen and applies these photos to every image I select at once, instead of manually entering all the details for every photo.

3) Prints - I very, very rarely deal with prints for anything but portfolio display, but it's essential to know and understand the required colour profile and DPI (you can get this information from your print shop) in order for everything to display properly in the final product. I'm not going to go in depth in this article about those topics as they're something you should know before you ever consider yourself ready for the professional level, but there's a ton of information online if you want to learn more. In terms of finding a printer/print shop, I've found that locally my city's photo club had a number of members who did professional printing, matting, and framing on the side - it's always better for your image if you can support local, but if not again a bit of online research will bring up a ton of print shops and reviews for you to determine which one best suits your needs.
It's impossible for me to cover everything for everyone, but if you think I missed something important or know another way to tackle a problem I've addressed, please let me know in the comments!


Great, love this.
Congrats on joining the team James! Really excited to see you on here as you are incredibly talented and your first post is very detailed. Some pretty basic info but very important none the less. Thanks for the post!!
Yep, trying to stick to the basics for my first few articles here, this site was such a huge resource for me when I was starting out I want to make sure that I can give that back to others. Appreciate the kind words!
Yea for sure man! Its been a HUGE tool for me starting out the past year. Keep up the great work and a great additon to the great team here.
I would add to shoot preparation "Charge all batteries Camera, Triggers, Flashes etc the night before! and take spares!"
I touched on that under "Keep your gear packed", but I'll revise it because you're absolutely right, it can't be overlooked. I've definitely had the embarrassment of having to tell a client I had to run and get some batteries.. only happened once but it shouldn't have at all.
Welcome as a writer and great first article, really extremely useful subject.
Lets take bets on how many writers Fstoppers will have by the end of the year.. I say 100. ;) Great post!
i swear by wetransfer. its so easy and straight forward for my clients
Nice article.
Just wanted to point out that Dropbox can share links to files, even a gallery folder (which conveniently also has a download all as zip button on top).
And people who don't have Dropbox, can use the links.
Excellent content, thank you for the post my friend!!
best decision i ever made while shooting professionally was to hire an editor.
spend money, but open up time to make more. i look at what i pay my editor vs what i could make in the amount of time it would take me to edit. i also look at the amount of free time it opens up for me and my kids to spend time together. i do think when starting off you need to edit our own stuff, but once you are established, having someone do the bulk of your wedding images is well worth it.
You should show them how to do a batch Actions in photoshop
You forgot to mention how to actually get the business off the ground including getting a business license, marketing etc.. Most of the info you provided is common knowledge you can find on the net that other professional photographers have already said.
Help me out then, what information would be useful to you? It's my goal to help as many people as I can at different levels in their photography interest but it's impossible for me to know what everyone wants. If I get some good questions I'll be happy to write a part two or focus on a different subject for a future original article.
I would be pretty interested in talking about branding. Some questions:
As a photographer, should you hire someone like a designer or logo house to create a logo/brand/color palette for your company?
Using that branding, should you be DIY on on your web portfolio or hire someone?
How effective is branding through Facebook (business page), Twitter, Pinterest? Are there certain genres of photography that suit certain social media than others? (Wedding photogs and Pinterest comes to mind).
Should a photographer separate out their personal Twitter account from a business account? Does that go against policy terms of the site?
Hmm, I may do a branding post on it's own as it's a big part about what I promote with my business as a whole, but I'll answer your questions here as well.
I would recommend it for those with limited experience or no formal training in the design industry (I've seen all too many business owners think that they can do it by themselves and end up with some pretty cringy stuff). I have some college training and many years experience with design myself, though so I do my promotions and advertisements myself.
This is really up to what you have time for, there are some awesome templates out there that you can throw into a wordpress site for $50 and end up with a great looking product, in fact that's what I did for my site. I'm a commercial shooter though, and my contracts are very different from someone who shoots large events, sports, stock, or fine art who may benefit from some kind of e-commerce system for print and digital orders in which case I would go with one of the industry-specific, subscription based developers like livebooks, smugmug, zenfolio, whatever fits their needs. At the same time someone just starting out may be fine with a simple 500px Awesome account and one of their templates just to show off their stuff and have a web presence.
Personally I've never had much interaction with any of the Facebook ads I've run, however that really varies by your target market and area as I've had some tell me that they get quite a bit of interest and business from it (usually sports and event photographers who cater to larger demographics in the general public). Funny enough I think the only social network I've ever gotten any work directly from is LinkedIn, regardless of the site's reputation.
I don't believe Twitter has any rules against (nor could they enforce them) multiple accounts, I know I've had a couple for various companies I was representing in the past. I don't tweet much but I could imagine it would be nice to have a private account that you can use for personal life interests instead of always having to cater to your business audience.
That's the response James! It's a lot to think about :)
I think that this is really so helpful, thanks a lot!!
Hmm. I hoped this article would include some business side stuff.
Care to elaborate? What issues could you use some information on? I'll be happy to include it in a future article. Thanks for reading!
Finances, taxes, and marketing. This article is fine for getting your image quailty and professionalism up but it's not going to put food on the table.
Like I said, outsource what you don't know or don't have time for. I don't manage this stuff, so I couldn't write about it.
Ah, guess I missed that in the article. I am a DIY/hands on kind of worker so I don't outsource much.
Very nice!
Thank you for the fantastic article!
Very Good Article , cant wait to Read more from you
I love your articles James, Kudos hommie : )