
Hey, friends! I recently shot in a natural light studio and thought I would share some tips on indoor natural light for those of you who are interested. Enjoy!
I know, Ben Sasso not shooting outside? What the hell is happening in the world? Don't worry, we'll all be okay! I know I preach consistency pretty often, but consistency runs the risk of becoming stale if you don't experiment a bit. This was shot a while back when I set up a full day of studio work for the sake of playing and experimenting!
 Whenever I post indoor work on my Facebook, the main questions I get are about indoor lighting; so, I thought I'd beat you to it and talk a bit about my setup! I'm a huge fan of simple and an even bigger fan of keeping things natural. I shot these with all natural light in a huge all white studio with concrete floors. The beauty of shooting in places like that is that as long as you have a decent amount of windows, the light bounces everywhere, leaving you with a soft and luminous light filling the studio. Of course, that sounds great, but it can also create a few issues with your images coming out too flat or light bouncing in a weird way, depending on which way you are shooting.
When I shoot indoors, I still use natural light, but that doesn't mean I just show up and shoot the light as it falls. Instead of bringing in extra lighting, I bring in reflectors and fabric to alter the light that I already have. Most of you who know my work can probably tell that I really love soft light and I work to keep hard shadows off of whomever I'm shooting. This means when I shoot indoors, I either need to shoot frontlit (with the indirect window light hitting my model straight on), shoot backlit (which means that my subject's face is in even, shaded light), or shoot side-lit, but modify the light a bit to keep it even. I wrote a tip for each lighting scenario below to help you push your work forward and to make it a bit easier the next time you shot indoors!
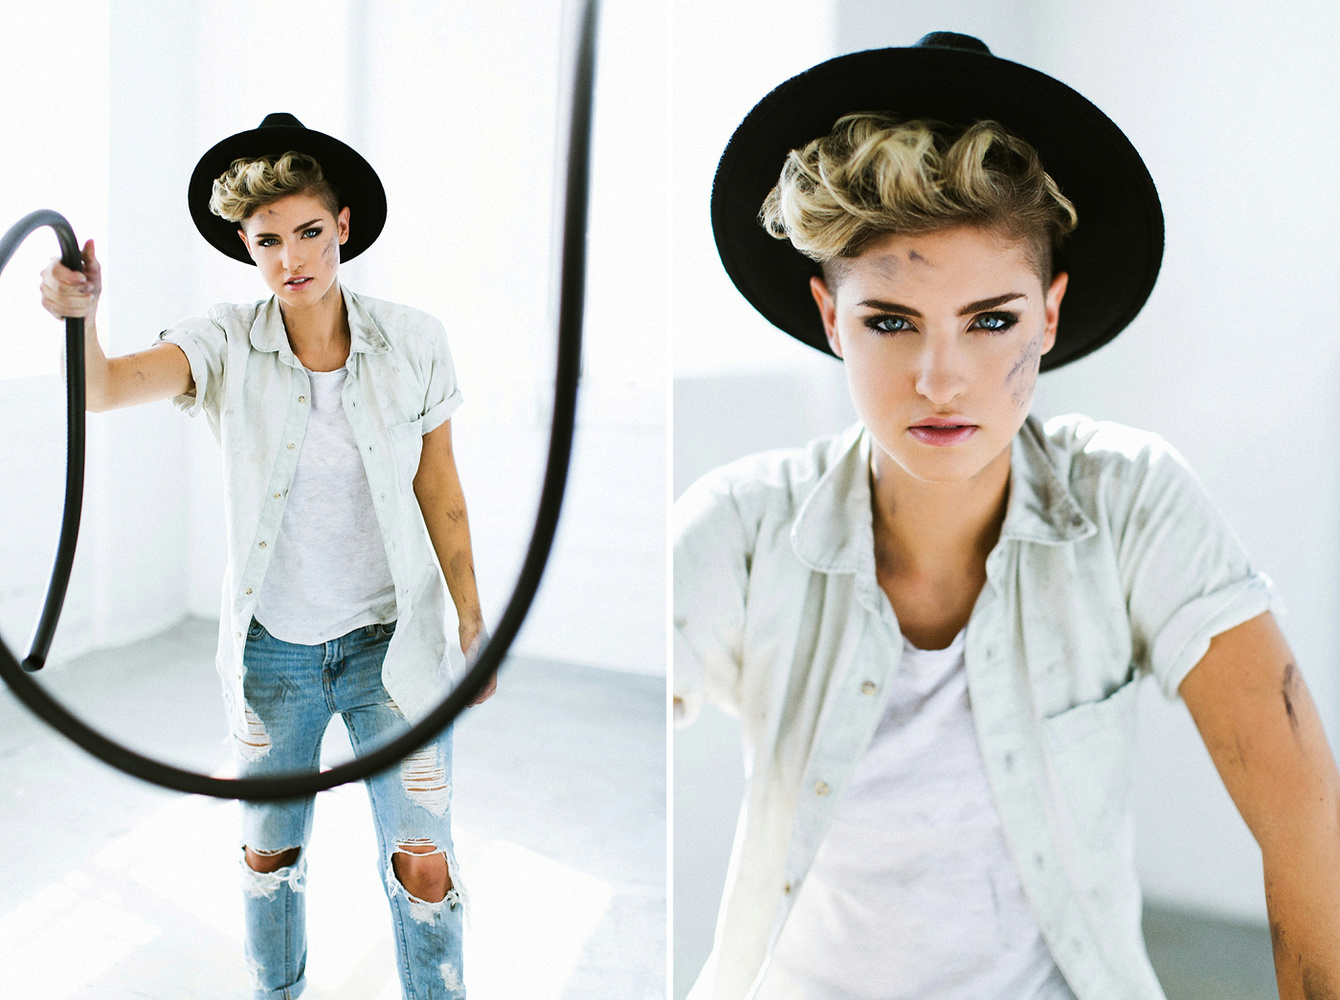
Catchlight
Backlighting is my goto (but you already knew that). This tip works both indoors and outdoors, but I typically use it more for indoor backlit situations. It's all about the eyes. In my Editing and Consistency class, I give a ton of tips for bringing out a subject's eyes and making them pop, because the truth is that no matter what else is happening in an image, your viewer will look at the eyes first. It's just basic animal instinct. Even your cat won't look at your leg; it will look right into your eyes. It's how we connect, and we should make that connection and first impression as strong as possible.
For those of you who saw the term "catchlight" up above and thought this, a catchlight is that little glint in a model's eyes. The purpose of a catchlight is to create a bright highlight in your subject's eyes, which makes them seem more alive and gives them a bit more pop. In backlit situations, this is especially crucial, because the model's entire face is in shade, which can leave the eyes looking flat and dull. When I'm shooting outside, I add little catchlights by wearing a light or white shirt. It's that simple. The white reflects the sun back into their eyes and creates that little glint. For these shots inside, I had a reflector right behind me bouncing light from the window behind her to create the glint. Another killer thing about adding in that catchlight is that it also lightens up the iris of the eye, which means you see more of the actual eye color.

Those bright blue eyes and the little watery glint is the beauty of the catchlight. With indirect sunlight coming in from the window behind her, I used a reflector just to my right to bounce some of that light back into her eyes.
Ghost Story Face
I grew up camping and holding flashlights under my face while I told ghost stories. If you've ever seen someone do that, you know why people do it to bring out the mood in a ghost story; it just looks creepy. There's no way around it. Shooting inside with huge windows and bright floors will run the risk of giving you what I'll now be calling "Ghost Story Face" (yes, you can use that term; you're welcome). Ghost Story Face is what happens when you're shooting inside with your subject facing the window (frontlit) and the light comes in the window, bounces off the floor, and shines up into your subject's face. It lights the bottom of their chin and under their nose, and it takes away the bone structure that light typically defines. Luckily, there's an easy way to fix it! When I shoot inside, I always bring a black sheet along and this is exactly why. If you're shooting with your subject facing the window, place the black fabric on the ground between the window and the model. The black will absorb the light that was bouncing up and you will be left with a soft light that comes from the top and center instead of the bottom. Peace out, Ghost Story Face.

Shot with the Canon 5D Mark III and 50mm f/1.2L
These two frames were shot with her back to a wall and the light coming in from a window to her front and right. Light is a puzzle to me. You show up, see how it's falling, and then play with the pieces to make it work how you want it to. That bit of black fabric on the ground in front of her to stop the light from bouncing up under her was just the trick I needed to keep the light looking soft and natural while still defining her bone structure in the manner I wanted. Without that fabric on the ground, the shadows under her chin and cheekbones would've been flooded with light and her bone structure would have been completely flattened out.
Bouncing Light
This tip is the most basic, by far. Unless you're going for the more dramatic, hard-light look (I'm not), a reflector is your new best friend. With indirect light coming in from one side or the other, a hard shadow is cast across the opposite side of your subject. Placing a reflector on that side bounces the indirect light back into the shadows and leaves you with that soft, even, flattering light. Moving your reflector closer or farther from your subject will control how much light is bounced back in. I told you it was basic.

Shot with the Canon 5D Mark III and 50mm f/1.2L
This is image is lit by the window to her right and a reflector to her left. Boom: soft directional light and a luminous image. Simplicity is my friend when I shoot indoors and it doesn't get much simpler than a single reflector.
Diffusing Light
For those of you who have no idea what a diffuser is, it's anything that softens light. Most of the time, they come in the form of translucent white fabrics. Imagine you have a window that the sun is shining directly through, leaving you with a hard, stark light. Putting a diffuser over that window turns that hard light into soft, even, glowing light. For the look that I love, this is perfect! I’m all about soft light because it matches my style and is extremely flattering for skin. Not only does hard light lead to more saturated skin tones, it also brings out the rough blemishes in skin. Diffusers can help eliminate both of those problems! I personally use Scrim Jim diffusers, but in a pinch (or on a budget), you can use a thin white sheet too.

Shot with the Canon 5D Mark III and 50mm f/1.2L
With pretty strong window light coming into the left of the frame, I used a diffuser over the window to help soften and spread the light. Since the room I was shooting in was white, that light bounced around inside to help fill in any harsh shadows (white rooms are my happy place). If you look on the floor in the picture on the right, you can actually see how I had the diffuser blocking the hard light that would have hit her, but still allowing some hard light onto the floor behind her.

I hope this was helpful for some of you! If you want to dig in more, check out my Free Lighting Class, sponsored by my friends at Rangefinder Magazine! As you improve, we all improve.

Ben, I always admire your straightforwardly, honest approach (craftsmanship vs digital trickery) and confidently, graceful results.
Keep up the vision.
Sean
That's so nice, thank you!
Thanks for this post. Well done and helpful. One comment, and I've said this many times here on fstoppers, but I wish articles like this would include unretouched images along with the final pix. Your final pix are beautiful, but it would really helpful to see them straight out of the camera too. That way we could really see what you're talking about.
Thanks for the kind words! The light is the same either way but if you'd like to see some unretouched work, feel free to see my before/after post on my blog!
Excellant article Ben!!
Thanks Michael!
Lots of great tips i've never heard before- thanks so much for this article!
Glad to hear that!
This was far the best articles I have read on Fstoppers recently. I love it, great style Ben!
Thanks! I appreciate it.
great stuff man!
Thanks Jason!
Excellent portraits, thanks for the tips.
Thank you, Jack!
Love the images, techniques, and open sharing. We are in this together.
You absolutely made my day! I love natural light. I love soft lighting on people. I prefer keeping lighting as simple as possible and you just covered it all. I have shot with different types of lighting and I always seem to be dissatisfied. I was feeling that my style is just too simple and maybe I'm not a good enough photographer or I'm not pushing myself enough because all that additional fancy lighting is just not my thing. You made me feel that, "It's ok. I CAN get amazing images doing what I"m doing." Thank you. I feel like I have a weight off my shoulders.