
If you have seen Peter Lik's work in person then you understand that it's impossible to put into words the look and quality of his prints. Peter's photography (and his post production) is fantastic, but what really makes his work stand out is his printing and presentation. If his images were printed on standard photo paper at a standard size, his work would not have the same "wow" factor.
Right before a trip to Italy I went back into Peter's studio for a little inspiration. After studying his work and speaking with a sales rep about his printing process I decided to shoot, print, and frame a shot in Italy for the absolute cheapest price without losing the "wow" factor that Peter's work has. This is how I did it.
https://player.vimeo.com/video/28601516
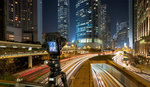
Today it is so easy to stitch images together that you could shoot a picture like this with practically any camera with manual control and the more images you take, the more megapixels the final prodcut will be. Don't think that you have to have some ultra expensive camera to get quality images. I went to Italy with only 1 camera (D7000) and 1 lens (Sigma 17-50mm). If I had brought a longer lens I could have zoomed in more and taken even more pictures for a higher megapixel image but I was so far away (and I could only zoom to 50mm) so only 3 images fit. 3, 16mp images combined into one made for one ultra sharp image though.

The metallic print from BayPhoto.com really did look like it was printed on metal and it definitely has that "backlit" look that people say Lik's work has. The print in the video can not come close to the way that it actually looks in person. As I said at the end of the video, this paper looks fantastic but it is so reflective it has to be perfectly flat to look it's best. I would highly suggest bringing your print to a professional, getting them to mount it on gatorboard and then using the mirror for something else (it actually is a really nice mirror).
I hope you guys enjoyed this video. It is very different than our other stuff but we thought we would give it a try. We are really ramping up our video production and in the near future we hope to bring you an original video each week.
Here is the Youtube version of the same video:
https://www.youtube.com/embed/FILxBHWR-GQ


I totally agree with you. In this video was simply showing you the absolute cheapest way to do it but I would highly suggest mounting it on gatorboard for an extra $60.
Didn't you tell me you looked at getting a piece of glass and that it would cost hundreds of dollars?
Yes, I got a quote on museum quality glass for something 7feet wide and they said it would cost $12,000, yes 12k.
For anyone interested in a 24" X 36" size print on Kodak Metallic paper the cost is only $30 at Adoramapix
http://www.adoramapix.com/app/products/prints
Love the video Lee I have 2 of Peter Lik books and have seen both his galleries in Vegas and was very inspired by his work. With all our work on digital now quality prints like Lik does are just amazing to see in person.
Yeah but that print size is too small. I don't even see Adorama offering anything past 24 inches but surely they do. Bayphoto's comparable 24x36 is $44 so maybe Adorama can beat it if they infact do prints that large.
I found a better option $43 for 30 X 60 Metallic print
http://www.elcocolor.net/index.php/Poster-Special.html
Great idea and great video Lee!
Okay, I guess I missed something. I really want to do this. Where did you get the plexiglass from? The stuff I see at the hardware store is SUPER thick!
I decided against the plexi because it was so expensive. I'm not convinced that this paper needs glass in front of it.
Just curious and maybe I missed something. Is there any reason you didn't use the mirror side versus having to clean the backside of the mirror? I would think the mirror side would have provided a smooth surface, no ripples or would not require any major cleaning? I can not wait to try this and thanks again for a great find and sharing!
it was beveled
Thanks Lee makes sense...again great video and technique I am a HUGE fan of Peter as well!
Hi Lee,
Thanks for the cool video !!! Love the Bed Bath and Beyond bit !!! There is a company in Canada that I use called http://www.colorificimaging.com/ they offer a process called Acrylic Transmounting. You can have it done for about $35 (Can) a square foot. It looks amazing. I also use a metallic inkjet paper made by red river paper
http://www.redrivercatalog.com/browse/66lb-polar-pearl-metallic-inkjet-p...
this paper is amazing !!! (for smaller LIK like photos)
the $35 a square foot includes a lightjet print on metallic paper I think (might have to check with them)
not cheap but looks great. They print up to 48″ wide x 120″.
Great job on your picture, again the Bed Bath and Beyond is pure genius.
Thanks for sharing.
Dude i tried there web site . but could not find custom Metallic Print mentioned any where on web site. can you help. provide link to web page where you ordered it.
got it dude sorry to bother
Love you Lee! thanks for the great videos :-)
when you headed back to nyc?
yeah i talked with bayphoto.com and they said it was $69 for the print plus 15% more for metallic prints. At first they said it was $90, boy did I complain...I told them about "Lee Morris" getting a price for $60. They commented that they appreciated the nice comments about them but our prices stand...grrr..So off to find another print price for a 30x60 size....
It may be 90 if you get color retouching as well. To get the print for 60 + 15% for metallic, use the Bay Roes "light" software to order
I have been using metallic paper for years. One thing I learned about metallic paper, it should be mounted before being framed. It about a week or two, a metallic print will warp and wrinkle, regardless if it was stretched and taped throughout unto a board. The larger the print, the faster it will warp. If you don't, you will realize that it will be an expensive mistake later on. Make sure that the back of the print is completely covered in adhesive before being mounted to a board or foam core. Metallic print should always be matted before framing so that it won't touch the glass. If a metallic print is pressed on glass, in about a day or two, some parts of the print will be permanently bonded to the glass and there's now way of taking it off without ruining the photo. I noticed that metallic print don't stick to plexiglass.
Also, I usually print my metallic pictures with borders because that is where I hold them. It is very, very hard to remove fingerprints on metallic prints.
Metallic prints are also great for pictures that has subjects that are made of metal (bullets, guns, skyscrapers, etc.), the photo will look almost 3-dimensional.
thanks for lovley information....
I haven´t seen a peter lik print... and i also haven´t seen the kodak metallic paper from Bayphoto...
So, any difference between them ???
wow great video lee, shame it doesnt help lil old me in the UK,
the picture also made this great, awesome image, i think it would make a great desktop background too :)
purely inspirational
hi Lee, Thank you so much for all that free information, it will really help me to get started on a large print for my own living room wall,and it is brilliant to be able to see how it's done first hand, well done on making a lovely frame and wow again, the picture looks absolutely Brilliant. kind regards, Brian Geoghegan Ireland.
Great tutorial I love the metallic prints!
Thank you for sharing this, I am going to try BayPhoto for sure. I have a quick question regarding some settings for saving the image before uploading to the BayPhoto ROES software: Did you import from Camera Raw into Photoshop, and if so, do you recall your workflow settings in order to get the maximum quality when saving the image as a jpeg for the ROES software?
Lee shot this image in jpeg....I think the tiff files were too large for bay photos servers. Large jpeg looks great
Darn it, got an old mirror with a nice frame (I liked the frame) but having difficulty getting the last "mirror" layer of. The grey layer came off real easy then there was some kind of copper colored layer, which needed another coating of paint remover...then from what I can see is a sliver layer which just won't budge. Might have to get some wet'n'dry to it.
There's some nice old framed mirrors that are cheap, so hopefully will find a solution to this last layer issue.
Any ideas?
Forget the previous post, I just realised after watching it again that Lee didn't actually remove any of the reflective surface of mirror itself but mounted the photo over the top of the mirror.
Lik does not print on metallic paper. He prints on Fujiflex Supergloss which is another animal. Try a dye infused metal print; even better than Supergloss, doesn't scratch like acrylic and is dead flat no mounting required.
Read about the process here http://douglasdolde.com/process.html
Hey Lee, very interesting video. A question though...
I've always understood that you should never mount a print directly on glass. You should either use a mount or a spacer to create a small air gap between the print and glass. This is to ensure print longevity. Do you know if Metallic paper has different qualities that allows for it to be mounted in this way?
I really glad I came and saw this post and watched video, definitely will look into this, seems you can really add impact to your image.
I think that it's a shame, to mount such a big print in such a bad way. The finished product looks all wavy. And I truly don't understand the extreme prices mentioned for a pro mount. I get stuff like this mounted at a pro shop 30 times every year and this size would be around 200-250 US mounted on 3 mm aluminium and laminated with either shiny or matt finish.
This post isnt really useful, since you dont tell us where you purchase this item, you dont tell us how large it is, and dont tell us what it is (paper bonded to metal? printed directly to metal?). Thank you for saying very little, but believing your comment was important. If it didnt contribute, it shouldn't have been typed.
I believe what others are saying is true... lik uses Fuji crystal paper, fuji flex supergloss, the effect is more a lighting and black/dark wall effect, than anything else. looks very nice though when he mounts them in his galleries though, very nice.
Lik doesn't print on Kodak Metallic paper. He exclusively uses Fuji Crystal Archive. For the images that have that backlit effect, he uses Fuji's equivalent of Kodak Metallic paper, which is Fuji Pearl. It's highly reflective like the Kodak Metallic, but it's not as chromey/cold. It's a warm metallic that's a bit softer. Bay Photo is one of the few labs that actually offers this paper too.
Thank you for sharing your hard work. Great idea, and a really stunning result!
Peter Lik's post-production? As any well trained sales associate at a Peter Lik gallery would tell you, Mr. Lik does NOT do any sort of post production. The images you see framed on the wall are exactly how they come out when he takes them :-) (true story)
BTW, I'm pretty sure Lik's lab in Las Vegas, which supplies his prints worldwide to galleries and customers alike uses lightjet printing on Fuji Crystal Archive paper (C-print), not Kodak Metallic.
Its actually printed on the Fuji Flex (Supergloss) and not any type of Fuji or Kodak Metallic paper.
delete
Does anyone know what kind of lights Lik uses in his studios? They look highly specialized and I believe the lighting is 20-30% of the effect. I recently visited Lik Waikiki and his work is inspiring. It led me to this terrific post.
Thanks a million Lee!
How did you get the shot of the Xacto knife going down? Was the camera on a slider next to your hand?
Yep, camera on a slider
I recently went to his gallery, and it seems like he is using a new print method - images have the same qualities but appear to be floating between pieces of acrylic. William Carr appears to use something similar called Euroflex? Can anyone comment?
Perhaps you should have learned SOMETHING about framing and archival materials first. If I put my mind to it, I am sure I could have come up with a worse way to do this, but it would take some thought.
Nice work Lee! Thanks for sharing. I started to make my own frames recently. If you own the correct tools, it's super cheap! Go BIG!
http://www.cycyr.com
Great video...
I saw peter likk's pic and correct me if im worng, but the paper has som 3d texture.
Does bayphoto do an international shipment?
Nice work Lee, looks great! Lik uses an acrylic face mount process. I'm not entirely sure the exact details of how his work is done - the patented diasec way where silicon is used or the more common and likely the only way it's done in the States using optimount. We have producing these Peter Lik "like" presentations on acrylic for the past 5 years out of Seattle. The acrylic has unique properties in that light is refracted within the acrylic to really illuminate the image and bring out the colors. It gives the piece the pop and WOW factor that is truly stunning particularly at very large scale. Add metallic paper to the mix and its enhanced even further. Someone commented on lighting being a big factor. That is true as well. With the right lighting the piece will almost look backlit. Anyway, we work with pro photographers all the time. You can see our work here (there is a video but some of the process has changed) and feel free to ask any questions. http://blog.bumblejax.com/acrylicplexi-prints-photo-mounting/
Great... Im about to have one of my shots printed as a thank you gift... and am desperate to try this approach.... thank you
Yeah um, I think I'm kind of screwed now. Just ordered the 30x60 from BayPhoto and Bed Bath and Beyond has no idea what the hell I'm talking about. All other frames cost around 200+ (eating way into my profits) -____-