
Having a makeup artist when shooting is a luxury for some photographers. While it is a must-have on a beauty or fashion set, when doing more simple portraiture it is not always easy to justify the cost for one. The biggest problem I find myself with when not having a makeup artist on set is people with oily skin are going to shine under strobe lighting. A simple makeup brush and some setting powder can do the trick, but sometimes we don’t even have that with us. So I am going to show you a way to quickly correct that using Photoshop.
Diminish Strong Highlights In Post-Production
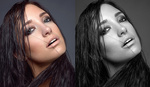
The technique I am going to show you is very easy to use and set up. It only takes a few seconds to get the hang of it and get great results. Though keep in mind this technique is not meant to be used when doing beauty retouching. I hope if you have a beauty picture to retouch a makeup artist will have taken care of the problem before you get into Photoshop! Here is a before/after example where I used the technique on the cheeks of my model to show you the difference:

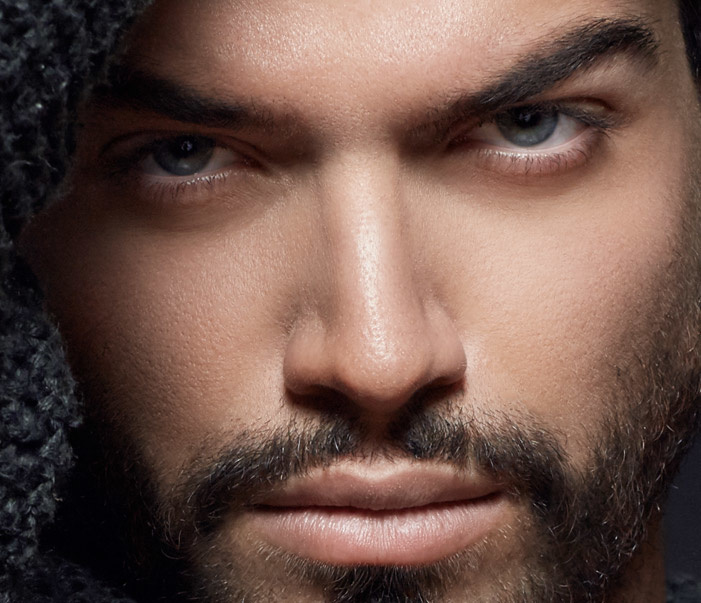
As you can see, it is subtle. If you can't see it, look at his left cheek (right of the picture) where it is most visible. It diminishes the brightest highlights on the skin and in turn gives the impression that the skin is slightly more matte, as if we had powdered our model’s skin.
How to Create Digital Setting Powder
To get a similar result, start by creating a merged layer of everything you have done so far in your file (cmd/ctrl+a to select the whole image, then cmd/ctrl+shift+c to copy and cmd/ctrl+v to paste). Once your new layer is created, go to Filter > Blur > Gaussian Blur and chose a radius that will only keep the color of the skin but no texture.
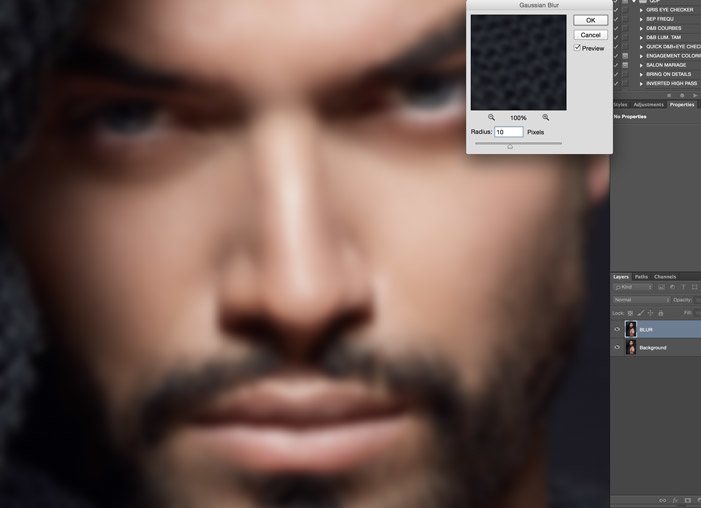
If you are used to frequency separation, you should be familiar with those first steps as they are very similar. Now that your layer only has color, your strongest highlights should have have disappeared. Then we are going to use the blending options of our blurred layer to get the texture of our image back. To open up the Layer Style window, right click on your blurred layer and chose Blending Options. At the bottom of the window, you should have two sliders.
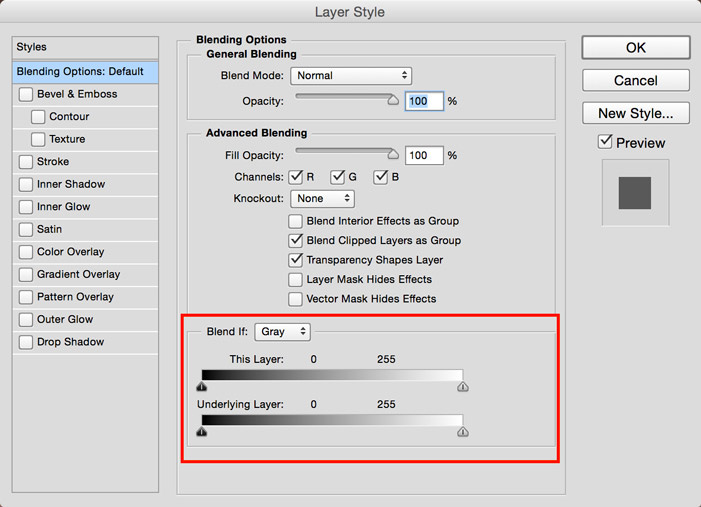
As our highlights are whites, we want the black and mid-tones of our image to be left alone. So we just have to slide the black cursor to the right so that our layer doesn't affect anything but the highlights. To make the adjustment more subtle, alt+click on the cursor in order to separate it. By separating the cursor, we are now able to fade our adjustment in order to get a more natural result. I usually drag the first half all the way to the right and then play around with the other half to get somewhere that lets my texture show, but still "masks" the highlights I want to hide.

Finally, create a mask filled with black, and then paint with white to make the adjustment appear only where you want it to.
As you can see, it is kind of a dirty trick. I am not a big fan of Gaussian blur for cleaning the skin, but in this case it works quite well as we only make it visible on very small surfaces. On tight portraits, this technique might not be the best and I would rather use the method Michael Woloszynowicz presented in a previous article, but on larger crops it usually does the trick if used parsimoniously.


Good thinkin. You can also turn those three steps of creating a new merged layer into just one by using cmd+option+shift+e ;)
Cmd+alt+shift+e actually doesn't work on a locked (background) layer, hence the 3 steps I described as they work no matter what layer is active.
Wouldn't you just cmd+j to duplicate the layer if all you have is a background layer? I guess the moral of the story is there several ways to do any one task in Photoshop, haha. You're right to describe in the article the one that works universally though.
cmd+opt+shift+n, then e....will create a new layer and stamp visible on it. Works on any starting point.
Yes, then cmd+j would be way shorter. But writing the "universal" way/shortcut in the article was also shorter :P And true also that this is yet another proof that Photoshop offers different ways for doing one thing.
Or you could just buy the powder, watch 10 minutes of tutorials on YouTube and learn how to apply powder.
Every time you decide to fix it in post, you're actually increasing the amount of time and work you have to do. You're just pushing it off. And the quality is almost never as good as just doing it right on set.
Think of it like a payday loan. If you absolutely must, then do it. But it's not a good habit.
PRO TIP: Ask your makeup artist which powder they recommend, so you don't buy some garbage that will cake up on the male model and make his skin look worse...
I actually recently started doing makeup as well on some photo shoots, so I know it should be done in camera. I'm all for getting it in right in camera. Though I know some people that do very simple portraiture don't know any makeup artist and that could find this trick helpful ;) Hence "emulate setting powder" and not "replace setting powder". Retouching will never replace a great makeup in my opinion.
By the way Mac Prep+Prime Transparent Powder (http://www.maccosmetics.com/product/9863/17325/Cult-Classics/Prep-Prime/...) works great to avoid using this kind of trick in Photoshop and is very easy to use. But I'll probably do another article with a few basic makeup products every portrait photographer should have in his bag if that can be helpful.
Very nice Article and a interesting technique. Will try this next time!
There is another way to achieve this without loosing the Skin Details. OK, there will be a million ways but maybe someone just didn't knew this one. You Invert your Layer, use Gaussian Blur with an Amount between 1 and 2.5 (as you are inverted, it acts like sharpen) and than you use the High Pass Filter with a high amount somewhere between 40 and 80 depending on the Image. Now brush this on the skin with a light brush around 20-30%. You will see that the Texture of the Skin is still intact but very flattering. This technique is not at all mine, as far as I know it's something Calvin Hollywood and Natalia Taffarel use or invented. Just wanted to let the comment readers know. The more techniques are known the better...just my opinion :)
The technique you describe is close to the one Michael Woloszynowicz present in the video I linked at the end of my article ;) I also prefer to use that. The technique in my article is meant to be as quick and easy to use (more for beginners I'd say).