
If you’re a commercial or fashion photographer, eventually you’ll run into a client who will ask to have their product, model, etc. to be placed on a perfectly white background. This method is very popular in the e-commerce and print industries for many brands, sellers and catalogs. But some techniques in post production cause some headaches and are also time consuming. So what exactly is the best and quickest workflow to get that perfect white background for your client?
Over the past couple of years, I’ve experimented with many methods on how to consistently achieve this in post processing. Before we get to the foolproof workflow of making a white background in Photoshop, here are a couple of conventional post-processing methods that I’ve found after digging to find an answer on the web over the years.
Clipping Using The Pen Tool
Clipping by using the pen tool is a very effective way to achieve a white background. The process involves basically tracing around the edges of your product, cutting it out and placing your image on top of a white layer. Although this method is very accurate, it is very time consuming especially if you have a large batch to get out to clients. Another downside is when part of the product is sharp and other parts are blurred because of depth of field; once the product is cutout, there’s a chance the product will look unnatural around the edges.
Pros: Accurate
Cons: Time consuming; cutting out both sharp and blurred areas looks unnatural
Adjustment Brush Using Auto Mask
This is also another popular method, especially for Lightroom users. What is done here is the adjustment brush is selected and the adjustments panel is shown in your “Develop” box on the right. From there you can either raise the exposure to make the background white. The brush is set to auto mask so the brush can decipher the contrasted edges of your subject and your white background. From there you just simply paint around the edges.
While this is a very quick and easy process, it’s very hit or miss if the auto mask brush can accurately mask out of the edges perfectly. For that reason, this wouldn’t be the go-to method to achieve a perfectly white background.
Pros: Quick and easy process
Cons: Auto mask feature does not work consistently
The Best and Quickest Method
Okay, so now that we’ve gone through a couple of popular methods that you may or may not of tried, I’m going to show you my workflow. Which I've found personally to be the best and quickest way to get that consistent white background.
This technique was found by complete accident, I actually picked up the most important step (see Step Five) from photographer and retoucher, Michael Woloszynowicz, when he was explaining how he color grades for his portraits. After watching him use this technique, a light went off in my head and immediately tried it for product photography to see if it would work, along with a few additional steps that I added on to create my own workflow. It did work, and it has every time consistently since then. On top of that, it is hands down the fastest, most accurate method I have found. The best part of this technique is that it retains the shadow and gives you that natural, professional look we all strive for.
I made a video for you to see my workflow and explain this process. I also have this tutorial written out step by step for you below. And also make sure to share your results after trying this technique with your photo in the comments section below!

Pros: Quick and easy process, very accurate and consistent
Cons: N/A
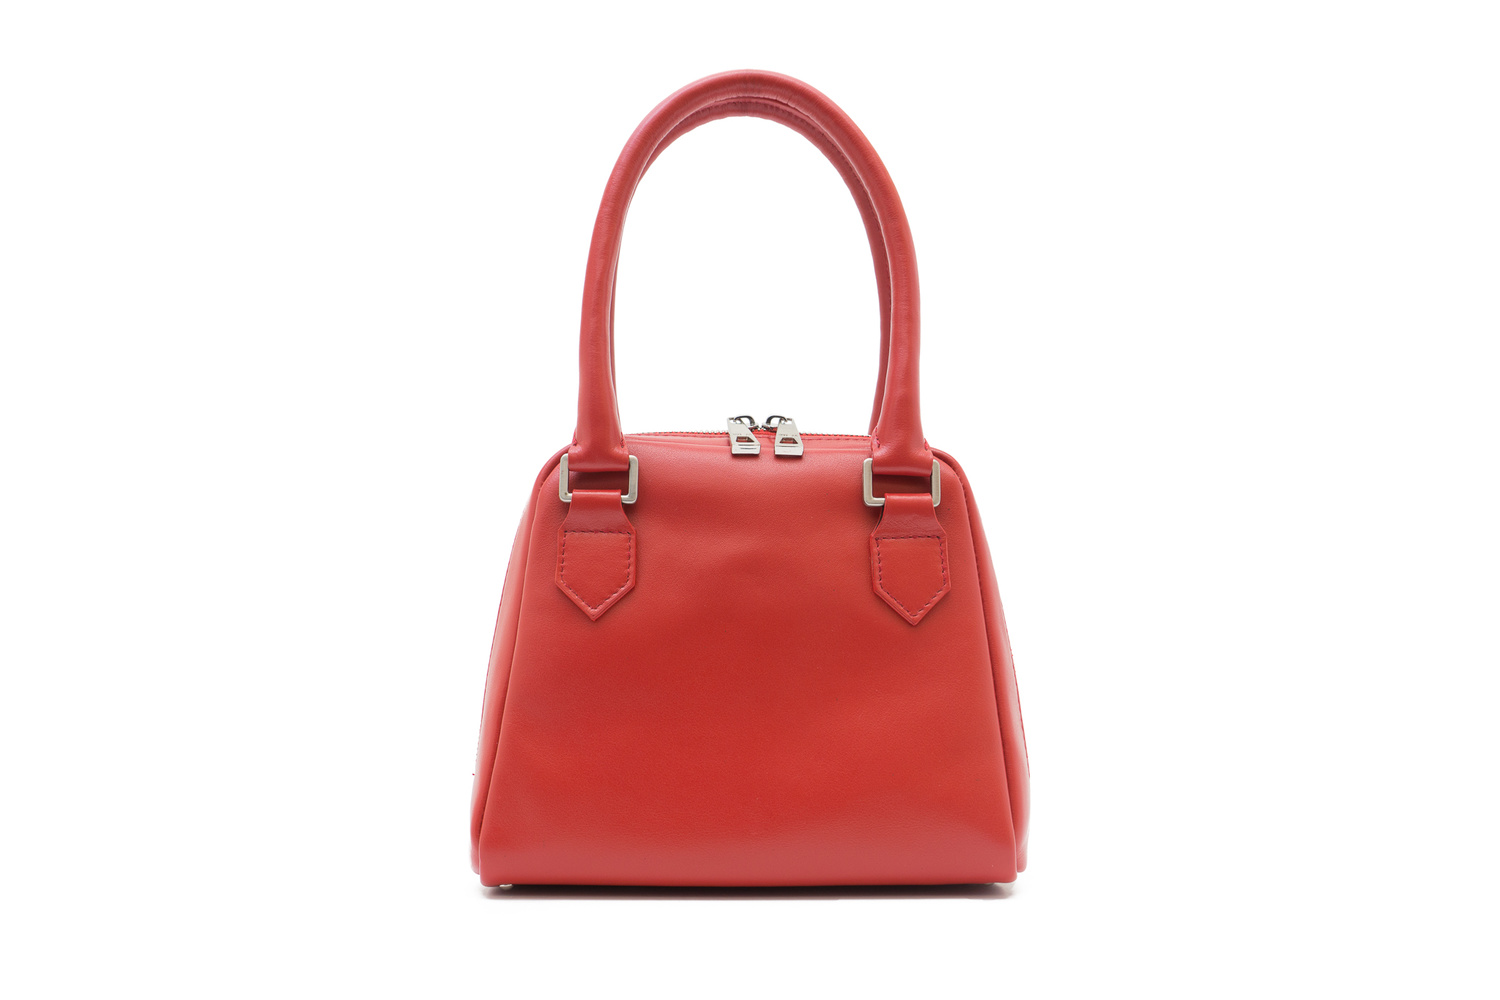
A good photographer friend of mine, Minh, was nice enough to let me use on of his model fashion shots on a white seamless for demonstration. The workflow did a great job retaining detail as you can see.


Step One: Place Your Subject on a White Background
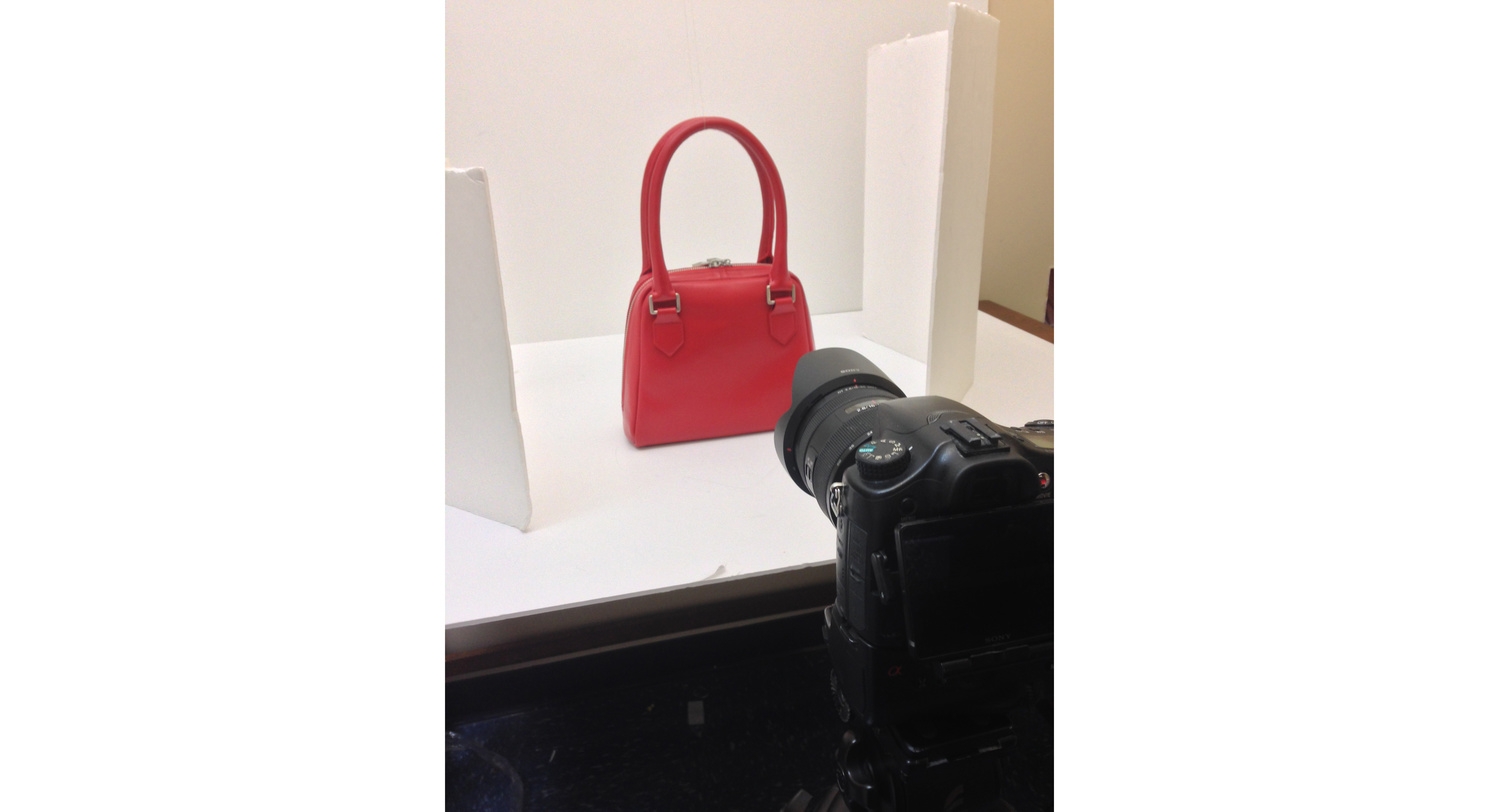
It is important to have your product or model placed on a generically white background. This is a good starting point so we when we go into post, we won’t have difficulty separating the two. For this demonstration, I simply placed this handbag on top of a white poster board and another poster behind it. I also had two white v-flats on each side. A light box would also be suitable for this.
Step Two: Open Image into Photoshop; Make Necessary RAW File Adjustments
Before we really get started, we always make sure the color balance is correct and everything is squared away. Make any other adjustments you feel necessary for your subject to pop in the final image.
Step Three: Select Color Range
In this step we will select our background by opening “Color Range” feature in Photoshop:
Select > Color Range
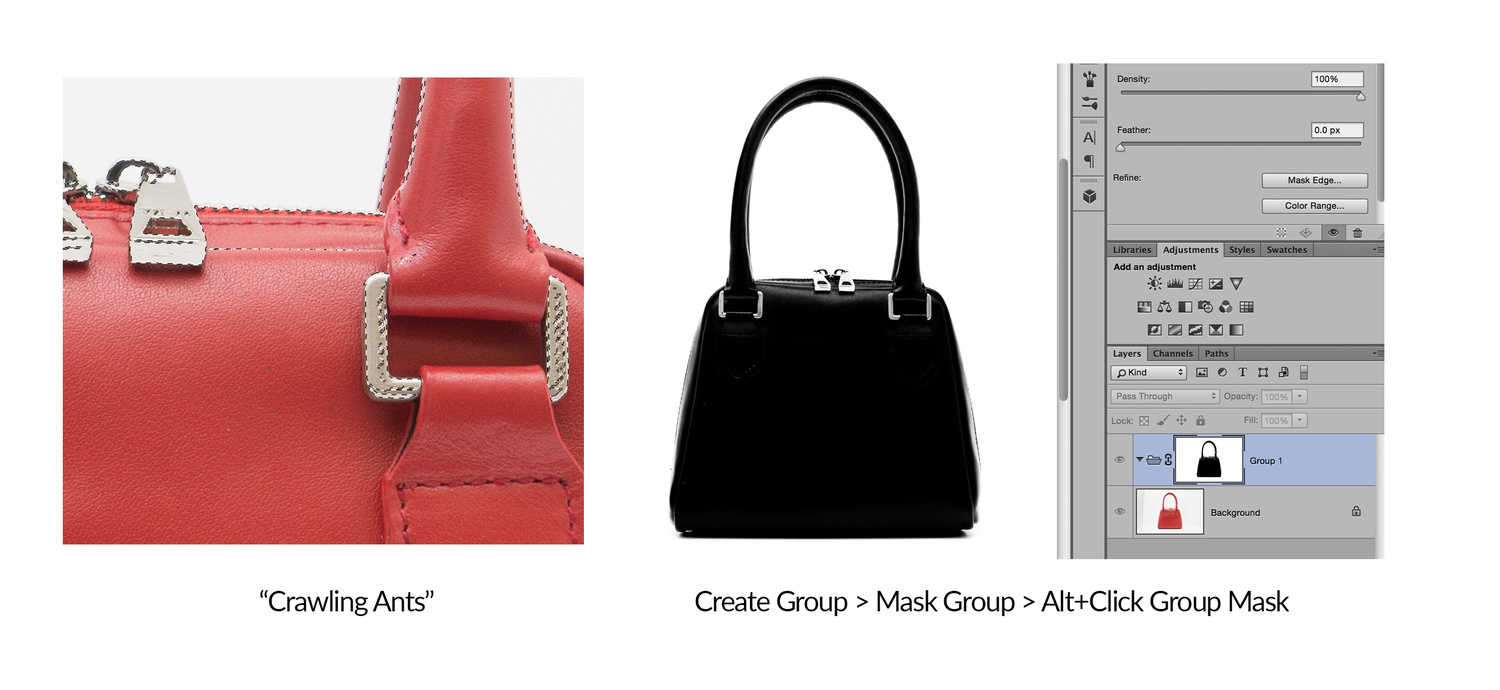
Now that the Color Range panel is open, we are going to use the eye dropper tool that is usually already open by default and simply click on your white background. From here, we need to adjust the fuzziness adjustment. Use your best judgment to find that sweet spot where the subject is cutout. The subject should be black and the background should be white for the mask. If your subject is not completely black, do not worry; we will fix this in the next step. If you’re happy where the mask is, then click “OK”.

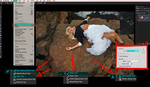
Step Four: Group and Mask Your Selection
After clicking OK, your selection should appear with the “crawling ants” shown around the edges. It does not have to be perfect right now. From here we simply open a new group and click mask in the layers palette.
After we create a group with our mask, Alt+Click on the group mask. The mask you created should now be visible.
Step Five: Make Adjustments to Mask and Finalize
This may be the most critical step in the process. With the mask still visible, we are going to select our brush tool and set it to black. From that point we are going to change our brush mode from “Normal” to “Overlay”. (100% Opacity, 100% Flow, 0% Brush Hardness) This is very important because when the brush is set to the color black and “Overlay” mode, the brush will darken only the dark areas of the mask and ignore the white areas of the mask. This is how you effectively separate the subject from the background.
When doing this just make sure to focus on your subject. If the edges for some reason are still dark, that is okay. We will fix that in the next step.

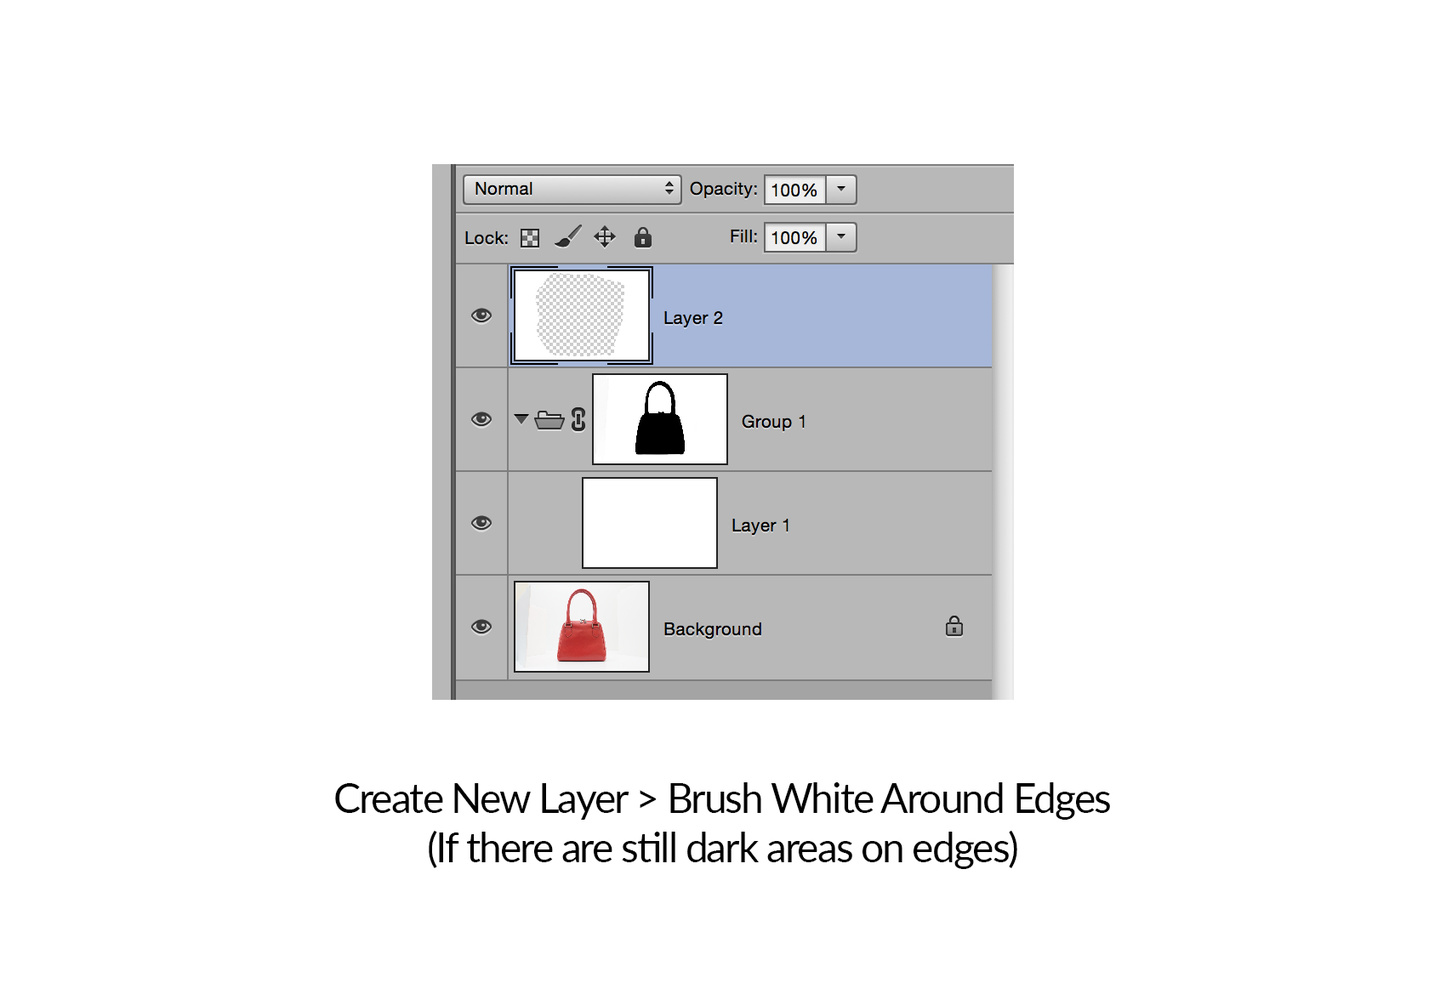
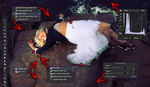
Step Six: Create White Background
From that point, if you’re happy with your mask selection. Create a new layer in the group, and fill the layer with white (#FFFFFF).
Edit > Fill > 100% White

Step Seven: Finishing Touches
After step six, you should have a perfectly white background for your image. If there are still some darker areas around the edges, create a new layer above the group and fill the areas with a white brush.
Optional: Confirm Your White Background
If you want to confirm the white background, you are able to customize the main panel of the background in Photoshop. Simply right-click on your panel next to your image and then follow these steps:
Select Custom Color… > #FFFFFF > OK
This makes the whole background white and should appear as if your subject is floating. Here we can detect if we missed any edges. If everything checks out okay, congratulations you have a perfect white background!
If you're passionate about taking your photography to the next level but aren't sure where to dive in, check out the Well-Rounded Photographer tutorial where you can learn eight different genres of photography in one place. If you purchase it now, or any of our other tutorials, you can save a 15% by using "ARTICLE" at checkout.


Thanks, very helpful video!
The 3rd layer (on top) is not needed if he just paints (brush tool) with white on the mask. (Thus reducing file size and improving speed.
With anything in Photoshop, there are multiple ways to reach the desired "destination" so to speak. Thanks for your input!
...and some ways are better than others. Thanks for the tip Nick.
Great tips, and I really like the technique of switching the brush to Overlay so that it only affects the darker parts of a mask.
I'd like to share how I tackle somewhat white backdrops to make them pure white. It's super quick and easy. I'm interested in your feedback if you watch this video and go "Oh My God that's a terrible idea!!" ;)
https://www.youtube.com/watch?v=0bdrA7b1L4U
Thank you. I've viewed a few videos on getting a background white and always draw from each one of them. One technique to ensure that the areas that need to be white are white is to create a threshold layer (plearn). While he also uses blend if options to avoid painting white on anything that is dark, i much prefer Nick's overlay technique. Thx again.
Proper lighting techniques also help depending on the product. If you don't need to see the floor then you can get a pure white backdrop by simply over exposing the background and properly lighting the subject independently.
Of course, that doesn't help when you need to get a pure white floor but for a a head shot on pure white or an apron on a dressmakers body frame or a close up shot of necklace on a model or necklace stand ...
An nice, evenly, overexposed background means you don't have to worry about the background at all.
Yes, lighting correctly in camera is the preferred way to go. But just incase resources are limited, this is simply just something to fall back on or a work around. Thanks for reading!
There is also excellent videos by Zack Arias, not only on shooting on white, but retouching. His retouching technique primarily uses the Dodge tool in Photoshop, set to highlights at a low strength. Very fast and efficient; I've used it many times successfully. Google "Zack Arias white seamless".
Thanks Don, surprised I haven't seen that video by Zack. Always good to know multiple approaches, will check it out.
the magic wand also works wonderfully if your background is almost seamless white.
nice technique and a well written guide mister author!
Thanks Roger!
Hello, Nick.
May I ask, how did you light the subject (the purse)? Only ambient light or any other light source (position?)
Thanks
Günther, I used ambient light above since the space didn't have room for strobes/flashes. What I did was place the diffused 4'x6' piece that you'll find in a 5-in-1 Reflector overhead as well. This diffuses the light to make a nice large, soft source.
That overlay thing. Thanks! Will try this for sure!
Awesome! Glad to hear!
Another technique I use to CLEAN UP a white background that is similar to this one is to:
1- load my image,
2- select the background with "select-by-color",
3- duplicate layer,
4- add a mask based on selection,
5- clean up the mask (mask out the subject, mask in the background),
6- click on the copied layer (to deselect the mask)
7- saturate to remove any color pollution (not sure I need to do this now that I think about it),
8- grab my curves and move the black end up to the top
So my top layer (the one with the mask) should JUST be my background and the layer below should be my subject. I'm only editing the "background" and the mask let's the subject through the background layer.
You could also do this in reverse by inverting your selection by color.
I do a lot of shooting on white and this is one technique that is a new go-to option moving forward.. including compositing. Thank you so much for this post! :-)
No problem Patrick! Thanks for reading!
For images like these if you:
Duplicate the Background>Command M and flatten/darken the image>Magic wand(about 10-20 tolerance and select the background>then do whatever you do to soften edges and place selection into a curve(I prefer refine edging)...
this will save much more time and eliminate more time so you dont overlay as much should take a few minutes really
even faster perhaps...
1. convert the image to lab color
2. select the lightness channel, (then toggle visibility of Lab, A, and B to On)
3. select the dodge tool and set it to highlights
4. dodge the white background around the outside edge of the object to 100% white.
5. when finished convert back to rgb.
This works really well at turning the white around the object to 100% white particularly around the hair.
Great workflow Ian, just tried it out. It looks like the dodge runs onto the subject just a tad (maybe I'm missing something) but love the simplicity and ease of this. Will definitely try it for hair!
if you are set to highlights on the dodge tool it will only brighten the lightest areas (white background) this will work well if the object is dark to begin with, but yes you can unintentionally brighten the object as well this way, like if it is a doctor wearing a white lab coat. I use a wacom which is helpful for dodging just the brightness of the background only. btw this is a good technique for doing dodging and burning as well as it only is adjusting the "lightness" channel.
So why did you put the mask on a group layer instead of the image itself? Wouldn't it have the same effect?
Thanks for the tips! I am working on some macro shots and wondering if you have any tips for VERY tiny chain on jewelry. I am looking to keep the shadows the pieces are casting on the background, but other than that want pure white. Here's a quick shot I took as an example...Open to lighting tips as well as post production! Thanks!
Hi,if the product has quite a bit of white and black in it, what's the best way to shoot it before editing? Would you still take the picture using a white background, or would you use a colored background to make the color picking easier? thanks!
This is a very good and more effective tutorial about image background change with photoshop.thanks for your best post
Signed up to the site just to say thanks for this. Your "Best and Quickest Method" truly is the best and quickest.
You're a life-saver. With good enough shots, I was able to get perfect white backgrounds even when skipping the critical black brush step, so I've made Photoshop actions into this method and managed to process hundreds of products at once, flawlessly.
Thank you!
Thanks Chris, means a lot!
Great technique, immensely helpful, thanks! I don't have much use for 100% white backgrounds, but it's great for removing unwanted color casts from multiple light sources from a plain white wall or backdrop. Instead of a white layer I just insert a black and white layer of the original photo and any annoying cast is gone. Of course I can then add any consistent color cast I like as well.
I use the Pen Tool to make a perfect cut out and to replace the background. To smooth selections or to fix jagged edges of a text or shape I use this action https://www.photoshopsupply.com/actions/smooth-edges-photoshop-action-free