
Capture One has been known amongst high-end retouchers and commercial photographers for quite some time, the main reasons probably being its powerful tethering and color editing tools. Wedding photographers seem to think Capture One is not tailored to suit their needs. At least, that is what I thought. After a full year using only Capture One to process my raw files, I wanted to share with you why I stopped using Lightroom.
I first started using Capture One about a year ago when I started shooting tethered in studio. The Lightroom tethering tool is so basic; it kept crashing all the time and it has no advanced functionality whatsoever — I started looking for another solution. I ended up trying a couple of programs, but Capture One seemed to do what I wanted and needed the best. So, I started using it. A couple of weeks later, I got used to it and liked my processed raw files better than those I could get out of Lightroom. I thus decided to give it a try for engagement sessions and weddings. Spending more and more time with it, I found a couple of things I did not have in Lightroom that made my wedding editing much easier and also faster.
Shortcuts and Panels Customization
I must confess that I am a geek. So, the first thing I do when I open a new piece of software is either learn or customize the shortcuts. With Capture One, being able to customize not only the shortcuts but also the panels made my life so much easier. I could finally get the interface I wanted. I did not have to work the way the software wanted me to work. Being able to customize the interface meant that I could finally set my raw processing software to strengthen and speed up my workflow. For example, let's say that I do not need the exposure tool because my pictures are all exposed to perfection in camera. Well, I can just remove it from my interface. Or if I want to set exposure before the white balance, I can move the white balance tool below the exposure tool. I know in Lightroom you can also remove some of the tools, but you cannot remove all of them. You can also not change the order they are placed in the Develop module. This is probably something that most Lightroom users fail to understand when switching to Capture One. They keep looking for modules and they want to work they way Lightroom wanted them to work, while they actually could just set the interface however they would like to work.
As for shortcuts, for most international users, having to deal with default shortcuts is often a pain. For example, on my QWERTZ keyboard, I must hit a combination of keys to get a bracket that is often used for brush size changes. That was a problem using Lightroom. It is not anymore when using Capture One. I can finally set up my shortcuts the way I want them to be and thus, it is also much easier to remember them.
Focus Mask
If you are a pixel-peeper, you probably do not wish to deliver a soft picture to your clients. In Capture One, you can display a focus mask on your pictures so that you can quickly check if the focus is correct or not. You can even display the focus mask on the images in grid mode, making your culling way faster and easier. No need to display the full-size picture to know if it is sharp or out of focus. To me, that is a time saver!
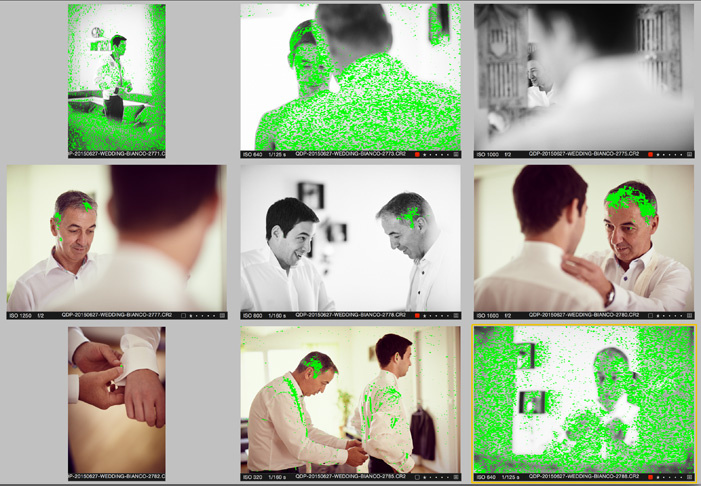
The areas in green are in focus. The tolerance can be set in the preferences of Capture One.
Exposure Alerts
I know what you are thinking: Lightroom also has this functionality. Exposure alerts exist in (almost) every single image-editing program. Even your camera can show you when your highlights are blown. However, what Lightroom fails to offer is the possibility of showing exposure alerts in the grid mode. You must go into the develop module to be able to activate the alerts, which makes it less powerful for mass-editing.
While I surely do look at my wedding pictures one-by-one to be sure they can be printed, the more I can edit them at a small size (i.e. grid mode), the faster I can work. Being able to see if I have any clipped information on my pictures and adjust the exposure, highlights, and shadows without having to quit the grid mode is a time saver.
Unlike Lightroom, highlights and shadows values for exposure alerts can be set in the preferences. You can set them however you like, depending on whether the end result is going to be printed or not, for example.
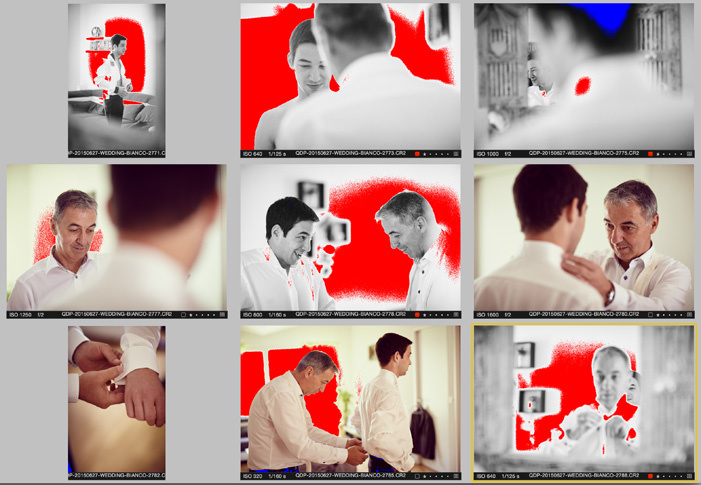
In red are blown highlights, in blue are blocked shadows. The range can be modified in the preferences. In this example, highlights are set at 245 and shadows at 15 to optimize print results.
Better Looking Default Settings
This is probably personal taste. However, I never was able to get a file to look great in Lightroom without having to tweak a couple of things in the develop module. With Capture One, it is an entirely different story. I feel like the default look is way better and crisper. I feel like I need to do less to the images to get a result that is good enough for delivery.
Also, while this remains very personal, I have heard quite a few photographers complain about how their images looked faded when bringing them into Lightroom. It seems like the embedded JPEG looks better than the raw file with the default Lightroom adjustments.
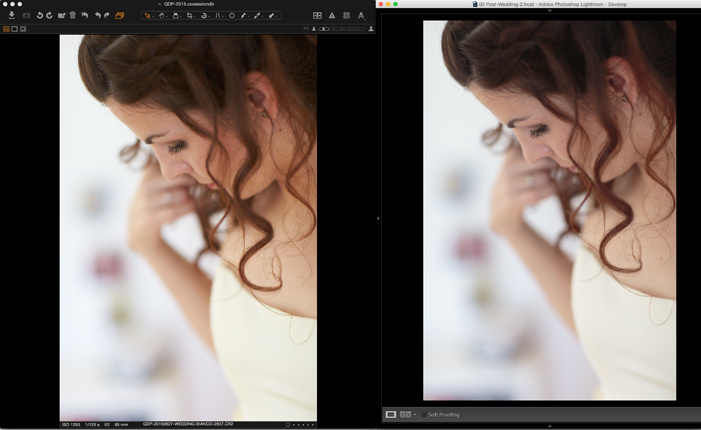
Left is Capture One, right is Lighthroom. No modifications were done to the image in either program. The image is exactly the same, straight out of camera.
There are solutions to this problem, one being to change the camera calibration profile in Lightroom and the other being to apply a personal preset to the imported images. However, still, the less I do to my images, the easier it will be to make them all look similar in term of colors and toning. So, if my raw editing software gives me better results out of the box, I think that's a great thing.
White Balance Based on Skin Tones
I have written a full article regarding that matter; so, I will not go too much into the details here. In Lightroom, I used to do my white balance on the bride's dress. As it is usually white, I knew my white balance would be correct. However, what is a proper white balance?
When shooting fashion, you surely want your clothing to look perfect and like the stylist created it. However, wedding photography is not about clothing; it is about the bride and groom. So, I want them to look perfect, meaning I want their skin to look the best possible in every single picture. I do not want them to look white in the morning before makeup, orange under the bright sunlight, and red in the evening after a couple of drinks.
With Capture One, I can set my white balance for one picture with my bride and groom in it, then create a preset that will let me set the white balance according to their skin tone and not to a neutral piece of paper or fabric. This way, I can keep my skin tones the same in all my pictures.
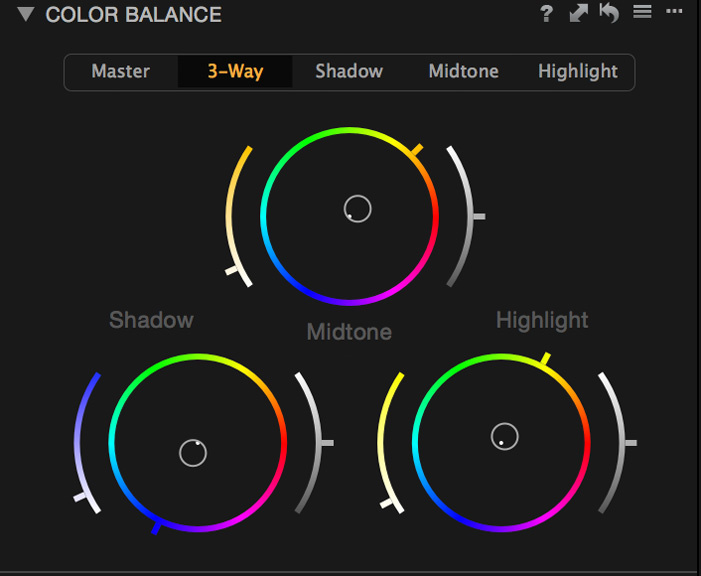
Color Balance
Being a very visual person, using a color wheel to make color correction and toning is way easier. With Capture One, I can use the color balance tool to correct either my whole image or the shadows, midtones, and highlights independently with a color wheel.
Those of you used to color correcting or color grading videos might have seen something similar in other programs. If you do, I'm sure you know how much easier it is to play around with colors than with curves or levels.
When I worked with Lightroom, I used to hate my clients when they put pink or purple lights against the wall at their reception. Their guests would look awfully pink. I almost came to the point where I edited 90% of my reception pictures in black and white to stop losing time color correcting that.
With Capture One, while still annoying to correct, I find it easier to do. I can use my color balance and give an overall tone to my image. Let's say my clients put purple lights all over the reception venue. I can apply in the master channel the opposite color up to the point that the image looks somewhat decent. I do not have to play around with curves, levels or, worse, desaturate part of my image. I can balance it correctly and get away with much better results in less time.
Multiple Exports
One thing we all hate is losing time. Having only my laptop to work on most of the time, exporting pictures is pretty much a loss of time for me. I cannot do anything else without slowing the process down. Also, I usually export my images three times: full resolution, 8"x12", and small web files.
With Lightroom, I had to keep an eye on each of my export processes to see when it would end and launch the next one. So, I could not launch it in the morning, go out to shoot, and come back at night with everything done.
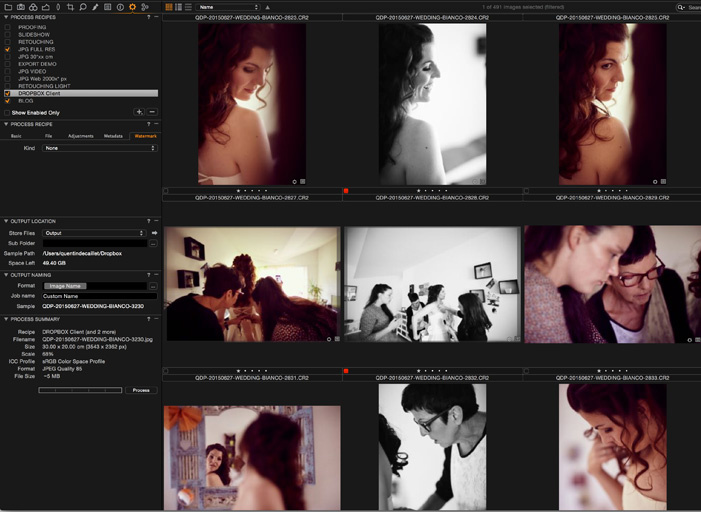
The upper left corner of the window is my recipes, with the ones I want to use checked. There's no need to do multiple exports manually.
Capture One has something called "process recipes." It is much like export presets. However, you can select multiple recipes and Capture One will process your images with each of them without you having to do anything in-between.
So now, I can have a recipe for each file size I need, activate all of them, launch the process, and just let it do its thing. I can launch it before going to bed, wake up in the morning, and everything is done.
Want to Learn More About Capture One Pro for Wedding Editing?
If the seven points mentioned above are not enough to persuade you to give Capture One a try, be sure to tune in on the 26th of November for Capture One's webinar "Capture One Pro for the Wedding Photographer". I will be live with David Grover and we will show you how Capture One can be used to edit weddings to the highest quality as quickly as possible. Be sure to register to receive the link to watch the webinar and be reminded when the webinar goes live.
So, you now have one month to start playing around with Capture One and get your questions ready. You can even watch Phase One's previous webinars on their YouTube channel if you want to get going with the interface and different functionalities. More videos will be available in the coming months in English, German, Japanese, and French.
Finally, if this article or the upcoming webinar convince you to make the switch to Capture One, be sure to use the code AMBQUENTIN to get 10% off your license.


My biggest caveat with Lighroom is the constant switching between Library (in order to view images as a grid), and Develop. When working with hundreds of images on a daily basis, simple edits like Crop and Exposure should be possibly in Library mode. Aperture mastered this perfectly.
Did I say I hate Lightroom?
I finally had to start using Lightroom and was amazed at how much simpler it is in Aperture to make quick edits because you don't have to work in "modes". Still new to LR so maybe I'm missing something but so far it looks like Aperture was quicker.
I've been using Aperture for years, and I totally agree with you after trying the trial of LR.
I've been using Aperture since version 1. Tried to move to Lightroom but couldn't get used to it. It's a good software but not for me. It looks like software made by Windows user for Windows users.
Tried Capture one several weeks ago. And loved it. There are several things that is really annoying - keywoarding system, no stacks, geotargeting, you can't rename color labels, etc. But it's just a minor issues. I think RAW conversion is much better then in Lightroom, color correction tools is just amazing and so on.
Now i'm moving all my Lightroom and Aperture libraries to C1.
You might want to look up what caveat means...
The only thing missing in Capture One is the ability to view PSD files.
I switched from PSD to TIFF files right before moving to CaptureOne and I don't see any advantage for going back to PSD. TIFF can be opened in more softwares than PSD can. The only reason I'd save my work in a PSB file, not even PSD, is if I were to have a huge composite that'd take more space than 4Gb to be saved.
Nice! I'm gonna try this out, thank you.
I don't know why, but I couldn't view TIFF files in Capture One... Are you sure Capture One is able to view TIFF files?
An there is another thing: I've made some tests with some (3) PSD files and they increased almost 50% in size.
I'm sure it does as I usually do my coloring using Capture One after skin cleaning was done in Photoshop for portrait/fashion work. However, I think Capture One does not read TIFF that have been converted to CMYK.
As for the size, you can compress your TIFF when saving them. I personally use the ZIP compression most of the time and the files are smaller this way than saved as PSD.
I've attached a print screen of the options I select when saving my TIFF in Photoshop if that might help. Feel free to contact me using private message if that doesn't work ;)
I had a similar problem. Make sure your TIFFs are flattened (save an unflattened master first if this is a problem), and also make sure that the Save: Alpha Channels check box is unchecked in the Save dialog. This worked for me. Hope this helps.
I was just about to come here and add almost the same answer as yours, Stephen. Reading through Capture One's documentation, I found this:
Tiff and Jpeg support
The number of channels must match that of the ICC profile. e.g if an image is Adobe RGB 1998, it must have 3 channels (no alpha etc).
A 4-channel image must have a CMYK profile, or whatever describes all color channels. Images that do not conform to these specifications will not display properly in Capture One, may cause instability or crash.
File support limitations:
Smallest supported file: Width and Height must both be larger than 16 px
Largest supported file: Width x Height must be smaller than 40000 x 20000 pixles or sum thereof.
Oh, thanks!
Since I work with PSD files to have my layers intact, I don't think it would be a solution to a fully switch now — although I still use Capture One in 90% of my workflow.
I wish Capture One came up with Lights on and off feature like Lightroom. And also, to see before and after you have create variant to compare. I wish there is simple short cut like "/" as in Lightroom. Other than that Skintone one I never tried will give a try. Thanks for good article.
Focus Mask!!
That's the one thing I would very very very much like to have in Lightroom's grid view. It would save so much time!
I feel like there is a PR campaign from Capture One happening on this site. I see three unique benefits in this article, Focus Mask, Color Balance, and Exposure Alerts. Everything else is easily replicated in Lightroom. You can set your defaults to create "Better Looking Default Settings" easily in Lightroom which also would set the White Balance for skins. You can do multiple exports in Lightroom. So outside of being able to see clipping, focus and color balance, there's not much advantage for the average wedding photographer.
I don't see how better-looking default settings, or a custom preset, would help making skin tones even across all images of the day. CaptureOne has a tool that sets the white balance according to skin tones and not according to a neutral area. Lightroom simply does not have such a tool.
As for the default settings, I think I made it clear it was more of a personal preference than anything. But I hear so many photographers complain about the default settings of LR, I thought it would be great to show a comparison ;)
Who cares if there is a PR campaign? If the program does actually have its merits and he makes some good points - who cares? He's not pointlessly lauding it either.
I'm new to Lightroom and I had to try a combination of downgrading my OS, downgrading LR versions and changing computers to get it to work properly without crashing. It's working fine now and there seem to be a bevy of tutorials on this readily available online, so I'll keep using this for now. But if I were a professional with thousands of photos or hundreds of catalogs and LR started acting up like that, I would be having a fit and looking for any other program to replace it.
As it stands, I might check out CaptureOne anyways. I've learned enough of the basics as it is and as a tech geek myself, would like to have the fastest and most efficient method to editing my photos from start to finish.
Thank you so much for this. I've been debating on this and I may give a go in 2016
right there with ya. just waiting till i can get caught up on editing to give it a try.
I used C1 back in v 2 &3 but when Adobe warped up their Raw conversion I abandoned C1, after a some years of using ACR and also teaching Adobe products both at a Art University and a Photography school I thought I had a decent handle of ACR and could pull most detail and quality of a file from the Adobe family.
I stopped teaching this a while ago and due to that I borrowed a Phase One back I had to get back to C1 and started trying it on Canon files and I was also struck by the immediately qualities of tone and "crispiness" that you are also describing.
But tone can more or less be sorted out by calibration and editing of color rendering but what people seem to have not noticed so much is the clarity controls that are way superior to ACR and one quality I discovered when shooting some food. It was fast food with a mayonnaise type of sauce that had some detail in it with spices and herbs and the difference in detail richness in the C1 files was fantastic so I decided to use the same file and do my best in ACR and the lack of details in this file was very disappointing.
I could pick up a fair amount from the ACR file thru a combination of rendering editing, local editing sharpness and a whole range of clarity, contrast, sharpening and so forth editing but still not getting the detail I had achieved in the highlights of the C1 file. This might sound a bit stupid but it is as if C1 manages to get a better definition out of a raw file then the ACR does but I was not able to get as much detail or definition out of the file using and cocktail of ACR solutions the I could get using C1.
There are tools I badly miss in LR and that is things like the lens correction/profiles features that beats C1 for ease of use a million times and the many other features but singly for the file quality and definition I am sticking to C1 and spend longer time in PS for the things where I find Adobe tools being better.
I was actually hesitant to add C1 clarity tool as an advantage. But I did not think it'd really be a huge one for wedding photographers. The results the C1 clarity tool gives is close to what Hasselblad Phocus does, but with more fine tuning possible.
Capture One producing fantastic files, with AMAZING detail. You don't have to go through everything you wrote above, it just happens out of the box.
Essentially you can make multiple collections in LR with virtual copies and make your own "process recipes" for that batch of virtual copies.
Multiple exports is not a problem for LR so I'm not sure the exact point against it here. I do a 8x12, websize, and full-size export for a collection of 500 to 1000 images and it's usually completely done within an hour.
I apply a preset on import so I'm never looking at a default image to begin with. Though I do find that WB based on skin tones to be useful and hope I see that in the future.
I'm so done with LR, mainly due to the raw processor ability. This is a great article and intro into C1 and it's about time I try out the free version.
(side note, has anyone else struggled with LR previews looking muddy and bland AFTER briefly showing the correct jpeg??) Canon 5D Mark III user....
Capture One would clean up right now if they brought back that $149.99 Promo they ran last year. Adobe has been too busy tripping over themselves trying to add new small features instead of improving what they already have or actually adding useful features.
My finger is on the trigger but I am not ready to pull just yet.
Let's be honest here, Adobe is really struggling to match the in-camera color reproduction for both Nikon and Canon. In fact IMO as a Nikon user, it is Adobe themselves that have given Nikon a bad name in the skin tones department. If you compare a properly shot JPG image from a Nikon to its NEF counterpart in Adobe Raw, the difference is disgusting. And Adobe has been getting worse and worse at their "camera profiles", to the point that now with the D810 and D750 the posterizaiton and artifacting is a complete joke.
The only question left is, how does Capture one handle fine detail and noise? I've always felt that Adobe was the cleanest at reproducing super-fine details, and super-fine radius sharpening. It has been the one thing holding me back from switching. Other than that, I've already been hating Adobe colors for many years.
Unfortunately it's not only with Canon or Nikon. I have the same problems with Hasselblad also.
As for fine details - C1 is excellent with handling even a smallest details and color gradings. At least it's my experience. And also one of the reason why i'm moving away from Lightroom.
For me C1 is more intuitive and seamless workflow. More similar for my workflow in Aperture.
Dennis, unfortunately if you reference an Aperture workflow and talk about seamlessness, I tune out right there. Aperture was a joke.
I'm sure that C1 can be "seamless" and "intuitive", those are nice descriptive words that simply mean you've gotten to know it. However I just don't know if it has the same rapid shot-to-shot speed and efficiency, the brute strength, to go the distance when you have to cull and post-produce thousands of images per week.
I do give Capture a test-run with each big update, though. I'll give it another try. I didn't adopt Lightroom until 3.6 or so, before then it was a piece of crap. So I'm no stranger to giving things a second / third chance, and switching if I eventually find something else that is superior.
I am a commercial photographer used Aperture everyday for years. One of the reasons was its easier file management and workflow. When Aperture was discontinued, I looked at Lightroom and Capture One. I have been using Capture One for over a year now and could not be happier. Better image quality and easily handles big shoots. The tutorial videos are great to get you up and running: https://www.phaseone.com/en/Imaging-Software/Capture-One/Tutorials.aspx
I'm not a pro but do shot thousands of shots per week between the 3 teams my HS age children play on. I found C1 was a bit slow for culling hundreds of shots at a time. So I added Photo Mechanic to my workflow and I now breeze through things.
I gave C1 a try about 4 months ago and immediately noticed a significant improvement in the RAW processing engine output. The images were much sharper and vibrant. I'm extremely happen with C1.
Thanks for the response, I'm definitely going to give C1 another try during this coming down season!
Matthew, I guess you are right that it really depends on the person individual needs. To be honest i don't have experience of working with thousand of images each week as you do. So maybe C1 is really not for your tasks/workflow.
May i ask what are you using now? Just curious.
Still using Lightroom, just because I don't have the time to put energy into mastering a high-speed workflow using anything else. Also since I shoot Nikon, I can cull in View NX 2 which is basically Photomechanic meets Bridge, which I love. But yeah, everybody has different color correction standards, and some folks talk about how they can race through an entire wedding in just a couple hours. I think my standards for color and tone are extremely high, and yet I want to be able to color-correct hundreds of images per hour, and that's AFTER culling. If Lightroom were fast enough, I'd color-correct just by typing on my keyboard using something like Paddy or VSCO Keys, and do full tone and color perfection in literally 3-4 seconds per image, but unfortunately even Lightroom is not fast enough to keep up with that. :-\
Capture One does a FANTASTIC job with detail and noise. When comparing a C1 file to a Lightroom file, it will look like C1 gave you lens or camera upgrade.
I guess I've always felt that LR / BR's sharpening was the most gentle yet powerful. C1 and most other sharpening algorithms almost always lead to faint digital artifacting, even if they are able to make images look even sharper.
Then again, lately I've been printing images with a more minimal levels of sharpening, and less use of noise reduction too, so maybe the time is right...
I use both LR and C1. So far I only use C1 for tethering as it is twice as fast. But I regularly look at the possibility of switching. I think we should all celebrate C1, since without it, LR would have zero competition and therefore zero push to improve.
Tried Capture 1 a few months back loved the tether shooting but found the interface too confusing. Maybe will give it a second try.
Hang in there! Its a breeze once you get used to it. The tutorial videos will help you: https://www.phaseone.com/en/Imaging-Software/Capture-One/Tutorials.aspx
One of the MANY features I like is the ability to create a custom collection of tools. There are many tools available, but certain ones I use a lot. I can group those together in a "tab" to easily move from one tool to the other.
Thanks Dan, will go through these and give it another go.
You can do multiple exports simultaneously in lightroom.....
When it comes to C1 and Lightroom, I feel like Bruce Wayne and Batman - Can't have both at the same time. Or go nuts trying.
I've been using LR for quite some time, with ups and downs. Then I had a go at CaptureOne, because I really did love the way it handled colors right out of the gate. Also, you could set up separate catalogues for separate shoots, which can be nice, because, no matter what Adobe says, huge catalogues with tens of thousands of images actually do slow down my system.
So I gave it a try, and I liked it. What you could do to colors of portraits puts LR to shame. (Ok, I'm exagerating, but you get my meaning).
But what kept me from switching was: Plugins. Nik Filters, Imagonomic Portraiture, Export to Facebook, Export pictures directly to my blog, to Twitter, all those thingies neatly hook up with Lightroom.
Capture One: Zilch.
I was desperate enough to have my cake and eat it as well that I tried workflows that encorporated Lightroom AND Capture One, but it ended up in an uncontrollable mess.
The tip of the scale was Capture One's lack of a compare mode, to view and cull images. Sigh.
So I bit the bullet and stuck with Lightroom, but when C1 comes up with those features mentionend above, yours truly might just be among the first to be seen galloping off into the setting sun called Capture One.
With Capture One you can now round trip to external editors when needed. I usually go to Photoshop and use any plug-ins from there. When saving, the new TIF appears in Capture One next to the raw file.
Yeah, I know... but I confess I'm also a crature of habit.
Like I said, I'm on the edge of switching, and as soon as C1 plays a bit more into my workflow of culling and selecting, I'm a gonner.
But one Idea for a two- system- workflow is this:
Preliminary edit in Capture One, then hand the "keepers" over to Lightrooms huge catalogue. Do the final touch- ups there.
But:
LR is so much better at culling and selecting, doing preliminary edits, while C1 is great in final tweaks.
C1 sucks in handling bigger catalogues (and you retrieving single images), and also exporting to social media (batch exports great, though).
C1 handles colors better, which is crazy that it is that noticeable.
Lightroom allows for lightning fast speed in bulk editing.
Well, workflow is one thing, but how is the performance compared to LR5 or 6?
Well, I am hard pressed trying to decide if this is a C1 infomertial thread or an "I hate Lightroom" thread. It is certainly so biased as to be worthless reading to me, except for entertainment.
I am not a "fan" of LR, however I have been using it since before Adobe bought the program from I forget who. I do have aspects that I don't like, too, but people on this page seem to be unaware that LR is way more than a raw processor + tethered controller. It is also a damn good DAM, a print engine, a slide show maker and web site maker and more.
I have tried C1 and in fact bought C1 v7, and then Phase One shafted me with v8 only available in PRO version and wanted even more money!!!
I have circa 70,000 photos in LR, which by today's standards of "spray and pray" digital photography, is not much, however I would love to know how C1 would handle DAM features, from inside it's own program rather than an external crappy alternative. In LR, I have Keywords, Star ratings, Color coding, Flags, Collections, Smart Collections, Filters, Publishing scripts with sync, etc. etc..
Please show me a work flow in C1 to do all of these. Now for all of its sins, LR is still the #1 program used by pro photographers (unless you have some statistics that I am unaware of), so I wonder if they are all wrong?
If Phase One really wants to encourage LR users to switch then they should introduce a one step process to convert LR catalogs, including Collections, to C1.
I could hardly stop laughing when Quentin describes how he customises his interface as one of the first tasks when using a new program. I guess when he gets a new car, he also remaps the steering wheel to the pedals, deletes the gearshift and puts the brake pedal functions to one of the dashboard buttons?
For me, I much rather make use of an interface that has been developed by qualified interface designers, and then polished over the years. Then when I open a tutorial, I have a chance of actually following it. Ditto, if I was to use someone else's computer.
Finally, I want to go on record, that I am NOT anti C1, having paid money to buy a license. It's just that I am not "one eyed" about any product and I feel that C1 is lacking so much still, that throwing away LR is just not viable for me.
I would LOVE to read some people addressing my points - on a factual, and not emotional, level. Look forward to some constructive discussions...
HI Paul,
I don't think its unfair for us to ask you to buy an upgrade from 7 to 8? Especially as it was heavily discounted?
There is indeed a one step process to import your Lightroom catalog into Capture One. Simply File>Import Catalog.
The things you mention (Assett management, color tags, star rating etc are all present in Capture One).
Why is it funny to 'laugh' at someone customising an interface? Any modern RAW converter has a bunch of tools that will not appeal to all (i.e tethered capture options). Do you really want those in the interface if you are never going to use them?
David
Thank you David.
I have to admit I do find it amusing when people type out 10 paragraphs of dripping sarcasm and then ask for an unemotional discussion.
Speaking as an emotional human being, Lightroom for me is a massive pain. But while it may be criminally ugly, clumsy and awkward, it still gets the job done, and I have little time to learn a brand new interface.
This article has pushed me over the edge however.
Just give it a try. I think you'll like it. I've tried it only a month ago with a free trial. And after 2 weeks with it purchased it and in the process of moving completely to C1.
For me it takes time due to the fact, that i'm cleaning and organising my keywords in the process:)
It takes some time to get used to it and after that everything is intuitively easy. I'll be glad to help you if you'll needed help.
I've already became some kind of C1 "evangelist" in Moscow:)