
Does seeing a towering stack of pancakes with syrup running down the sides make your mouth water? What about a rich and thick caramel sauce flowing over the top and sides of a slice of cheesecake? The sauce or syrup pour shot is one that will make your viewers mouths' water. When creating these shots, I like to piece together several pours to make the perfect pour! Here is how I plan and execute a pour composite.
A composite pouring shot allows me to pick the best moments of a pour and blend them together into a final image. You can do this as a single shot, but you run the risks of the sauce or syrup not flowing exactly where you want it to. Before you pour, make sure that you are on a tripod and have the framing and exposure set exactly how you want them. Remember that once the pouring starts, you can't move the camera.
For this stack of pancakes, the chef added a large ball of butter on top as a garnish. I knew that the heat of the hot pancakes and the syrup were going to change the shape of this butter ball. With this in mind, my first shot needed to be of the syrup first hitting the ball of butter. For the final composite, I wanted a pool of syrup on top of the pancakes. I poured syrup into a pool for the Top 2* shot. The final shot of the composite needed to show the syrup running down the sides. I took a couple different version of this and chose the one I liked best as the Side* shot.
*In my workflow, I like to label my layers based on how I will use them in the composite. I use titles that remind me what part of the image will be masked into the composite. For example, in the image labeled "Top 1," I will mask away everything but the syrup hitting the butter and use it as the top layer of the final composite. Feel free to label your layers in a way that best fits into your workflow.
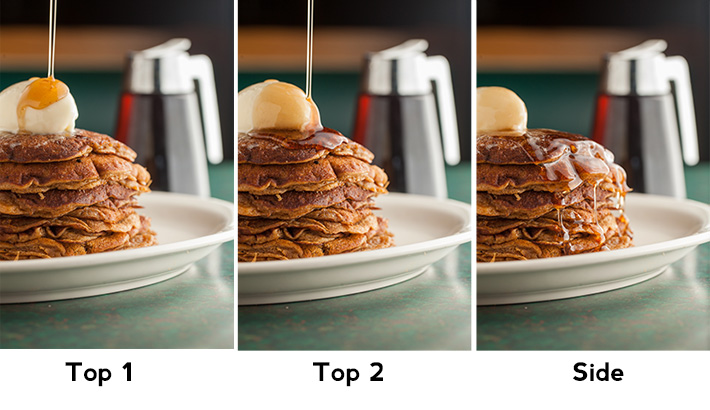
Above are the three images that I used to create my perfect pour composite. You can see how the butter ball has changed shape and moved throughout the pour. Creating a composite allowed me to choose the best picture of the butter ball and pair it with the syrup pouring over the side.
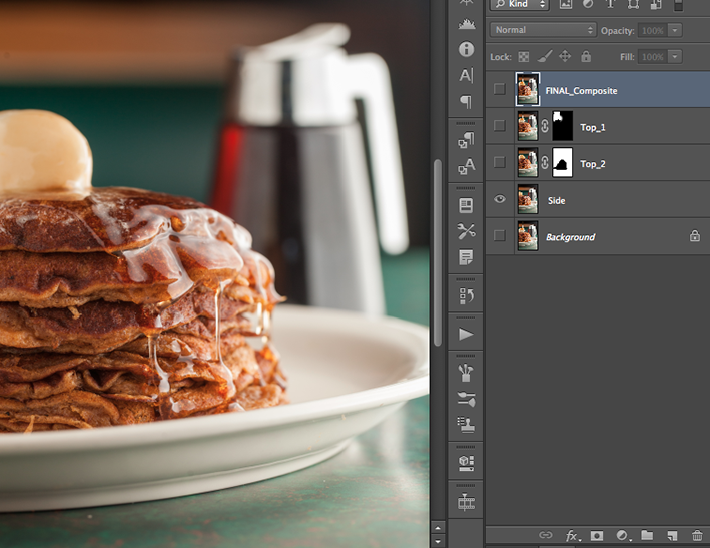
Here is a look at what part I took of each layer.
In Photoshop, I had the Side shot as my base layer.
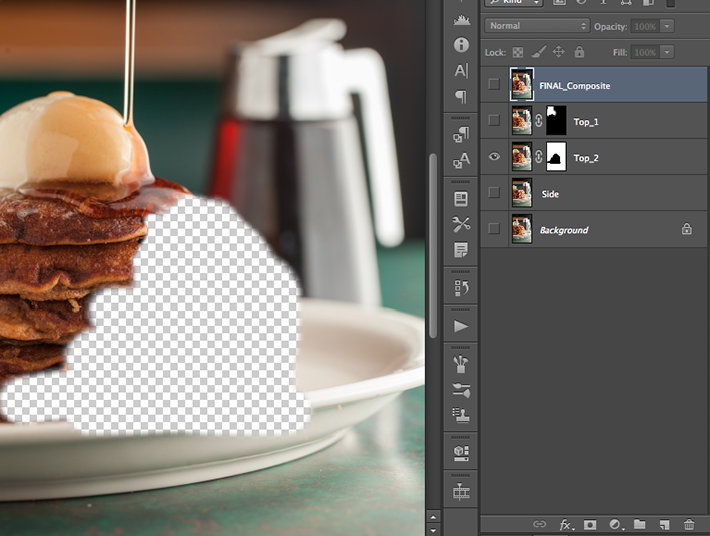
I then placed the Top 2 layer on top of the Side layer. I applied a mask to Top 2 that allowed the portion of Side layer that I wanted to show through. Below you can see what I masked out.
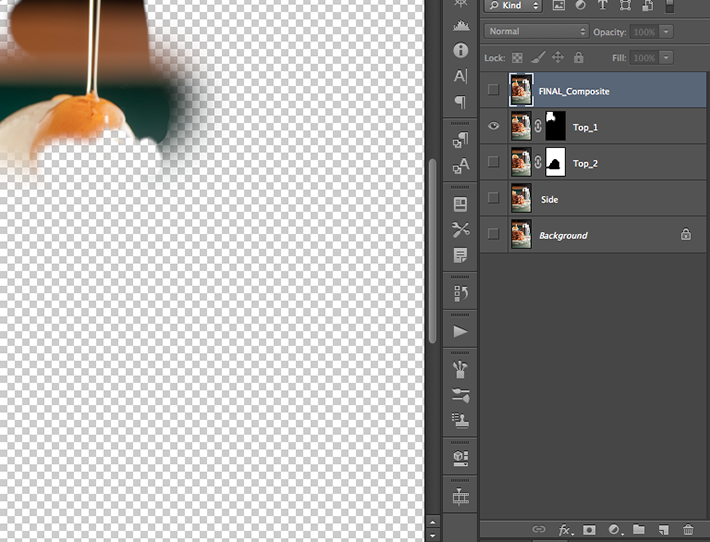
The last layer to add is the initial pour created in Top 1. Below is the part of the Top 1 layer that I used in the final composite. Notice how the majority of the layer has been masked out and the the syrup hitting the ball of butter is all that remains.
Here is the final composite with a minor bit of cloning to create a smoothing looking ball of butter.
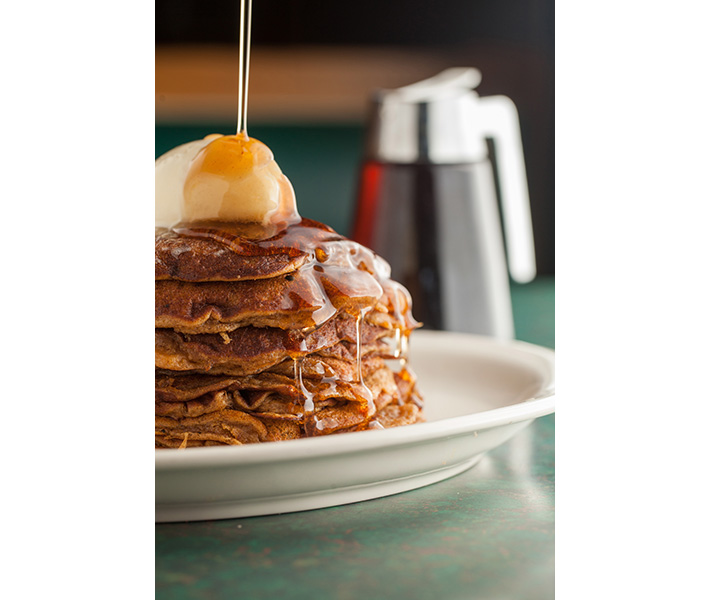
It is possible to create this shot as a single exposure, but you give up control in how the syrup flows over the pancakes. If you have a heat sensitive garnish, like butter, it will change shape throughout the shoot. Creating a composite allows you to pick the stages of the pour that you like best.
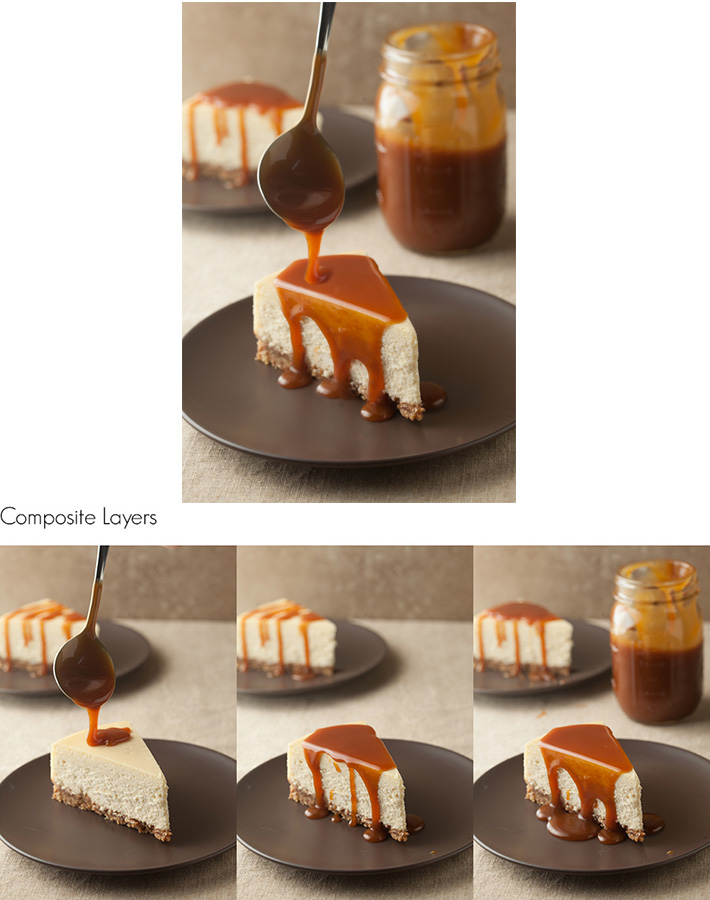
Here is an example a cheesecake and caramel sauce shot using the same method.
I usually aim for around three layers to piece together, but feel free to use as many as you like. As long as you are on a sturdy tripod and don't move the set of camera between shooting, you should be able to line everything up pretty easily in Photoshop. I didn't show it here, but I always capture a set shot of the background before shooting. This is insurance and allows me to easily remove any hands, spoons, or bottles pouring the sauce that might be in the way.
Before pouring, always think about what parts of the pour you want to capture. If you are unsure on how fast to pour, then test the sauce on a separate plate to see how quickly it moves. If you are doing the pouring and the shooting, using a remote trigger will allow you to fire the camera at the exact time.
Want to learn more about food photography? Check out the tips, tricks, and techniques in photographing FOOD Issues 1-8.


I hate when you post food shoots! Now I want pancakes and cheesecake! Should be an interesting, carb filled dinner tonight :)
Thanks for some compositing ideas Taylor. This seems way less messy than most liquid photography. I'll be sure to try it out on that one day of the week I'm motivated to make a proper breakfast. I'd really be curious to know more about your business side of things in your next article, like what stock sites are most profitable for you.
Great tips as always Taylor! I used a few of your tips recently to create a food shot for my local photo club. I used some of your background ideas and bought stick on fake marble tiles from Home Depot, I now have 3x- 2'x2' boards with different tiles on them for $20. I did test shots with a spare wooden tray then swapped out the one with food once I had everything setup. Once I had "the shot" I removed each extra element in case I needed to remove it from the final shot. The final image is a composite of two sushi pictures for better DOF, and I used the clean background layer to allow me to move a few things around slightly. Thanks again for your great articles and details, I know it helped me nail this shot.