
Most photographers and videographers have felt the need to slow down their shutter speeds on more than one occasion: whether you're a landscape photographer looking to get scintillating blurry water and clouds, a portrait photographer trying to slow down a shutter speed to use shallow depth of field with a wide aperture, or a videographer in search of that cinema-like look. While there are a number of solutions, one of the most well-known and most flexible is the Singh-Ray Variable Neutral Density Filter.
The Singh-Ray Vari-ND Variable Neutral Density Filter is more or less just that: a filter (specifically, two filters stacked together) which allows you to control how much light enters the lens. What separates this filter from other ND filters on the market is the fact that the density of this filter is changeable by rotating the front element. That is to say, you can let most of the light enter the lens, or adjust the filter so that nearly no light can enter the lens. It's like having a whole set of neutral density filters built into one handy piece of gear.
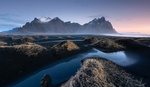
While there are a multitude of uses for this filter, one of the most popular and asked-about uses for this filter is the long shutter speed application, and that is by far the way in which I used this filter the most. I recently took a trip to Iceland to work on a project shooting architecture, and even though I'm an architectural photographer by trade, I knew I'd be missing a huge opportunity to travel to Iceland and not shoot a few landscapes, so along came the filter. Given my subject matter, there were plenty of subjects for me to test this filter on. Whether it was blurring water, blurring clouds, or trying to eke out an extra stop of power from a tiny speedlight, this little guy came in handy on multiple occasions throughout my trip.
A side note: Singh-Ray makes two versions of this filter: the regular mount, and a thin version, which has been milled down slightly more, so that the filter rings do not interfere with the corners of your photos. When shooting at 17mm (the widest lens I used was a 17-40L), the normal version of this filter is known to vignette due to its thickness. I opted for the thin mount version for my trip, knowing that I might run into some vignette issues when shooting at 17mm, had I used the regular version.
First Impressions
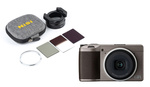
The filter arrived in a well-made leather carrying case, which was lined with a soft protective felt-like material. There was also a belt loop on the case; handy for those hikes or mini-adventures where you want some options with regards to filters, but don't want to lug around a heavy bag on your back. Also makes access easy when working quickly during rapidly changing light.
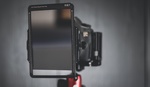
Build is solid, and there was no sloppy play or workmanship noticeable. The filter adjusts with a smooth, uniform feel, and mounting it to any of my lenses was a snap, as it is with most threaded filters. Once the filter is securely attached to the lens, the top half of the filter is free to rotate in either direction, which changes the strength of the filter. Pretty simple to use. Check out the video below for an idea of what I'm talking about (Warning: Waterfall noise!):
With just a simple twist, you have more or less light stopping power, depending on what you need. Something worth noting is that the filter contains "index" points to help you mark your spot. They do not represent actual ND settings , i.e., the marks are non-calibrated - but are there to help you re-set your filter when you wish to recreate a certain strength you have used before. In my use I found that I could go a bit further than the 'Max' setting with no ill effects but there is a point where you'll quickly realize your mistake. See the below photo for an example of what happens when you go too far past the 'Max' setting:
") Whoops! Too far. Back it off about 1/16th of a turn and you'll be good.
Whoops! Too far. Back it off about 1/16th of a turn and you'll be good.In use
As I mentioned, the filter is quick to install and easy to use. I'm a stubborn male who doesn't read instruction manuals, like many of our readers, I'm sure, and I had no problems figuring things out as I went. Using a Canon 17-40L and 5d Mark III, I got some great results with little-to-no practice. The filter showed up on my doorstep the day before I left, and I decided to figure things out as I went. Luckily, there wasn't too much figuring out to do, but I'd still recommend taking an evening to sit down with it and test out the various settings to see how much stopping power you'll get across the range of the filter, as well as figuring out how much is too much. As I said, going past the 'Max' setting can mess up your shot pretty easily, but if you can use your eyes, you'll quickly get a feel for how it responds. I found that the filter provided about two stops of strength on the low end of things, and somewhere around seven or eight stops up at the strong end. This isn't as much as, say, a Lee Big Stopper, which provides ten stops, but Singh-Ray does sell a product called the Mor-Slo, which adds an additional five stops of stopping power to this filter, which is an amazing amount of stopping power for an application such as this. While I didn't test the Mor-Slo, there weren't many occasions where I wished for more stopping power. I feel that too much starts to look a tad unrealistic in broad daylight situations, and during twilight I had all the stopping power I could possibly need.
One thing worth mentioning about this filter that makes it worth its weight in gold is the fact that you can dial back the density to almost nothing, focus on your subject, and then add density back in. Try doing that with any other strong neutral density filter and you'll be tearing your hair out. You'll have to remove the filter, focus, and put the filter back on. Pain in the rear when you're shooting a landscape under quickly changing light, especially so when the 'god light' is working its magic and you only have a matter of seconds to capture the perfect shot. For the landscape photographers out there, you'll know what I'm talking about. I'm not sure if it was designed with that in mind, but the ability to focus with the filter on is far and away my favorite thing about this filter.
The one and only major issue worth mentioning that I experienced with this filter is that even though I was using the 'thin' version (which is also more expensive than the regular version) I still experienced some vignetting at my lens' widest focal length. While I'm not in love with shooting at 17mm and try to avoid it at all costs if possible, there are a few situations where it bugged me. The vignetting isn't so bad that you can't clone it out relatively easily, but it is there. It's a small price to pay for the versatility that this filter provides, but I wouldn't be doing my job if I didn't mention it. See below for an example of the vignetting at 17mm.
 Unedited file. You can see the vignette around the corners, even with the thin version. 17mm.
I also want to make note of this filter's durability. I was setting up my tripod on rocky terrain on a frigid and windy Icelandic evening, when my hands betrayed me and I fumbled the filter as I tried to attach it to the lens. The filter dropped about four feet onto the rocks below. Fearing a shattered filter and a $400 repair bill, imagine my delight when I picked it up and there was not a single scratch to be found. This thing is one tough little bugger. While I was sure to baby it as much as possible, given the price, those who demand durability from their gear should not shy away from this piece of equipment.
There is also a slight color cast, but it's nothing major, and I'm yet to use any neutral density filter that didn't introduce some color cast. There was a very slight warming effect, it seemed, which is removed easily enough in post processing. For color-critical work you will have to be more careful, but with most landscape shooting you have some wiggle room with regards to color and mood, so it is definitely not a deal breaker by any means. The color stayed consistent throughout the different density settings as well, so it won't get out of control on you.
 Straight out of camera, slightly warm, white balance set to 'daylight'
 Color temperature corrected to a more life-like setting.
The Verdict
At $390, this is no easy pill to swallow for most hobbyists. That being said, if landscapes are your favorite subjects, I simply can see no reason why this filter shouldn't be in your bag. The creative possibilities that it allows are endless, and the ease of use is second to none. If you're already a regular user of neutral density filters, you know how difficult it can be to focus with them on the front of your lens, and this filter will solve that problem, which, to me, makes it worth its weight in gold. You'll also appreciate the variable aspect of this filter, which can single handedly replace multiple filters, as well as the durability and solid craftsmanship.
On the other side of the coin, this filter is only available up to 77mm, while the regular (non thin-mount) version is available at 82mm. Even with the more expensive thin version, there is still slight vignetting in the corners. Despite these minor shortcomings, however, Singh-Ray has built a product that should be in every serious lanscape photographer's bag.
The Singh-Ray Variable Neutral Density Filter, both thick and thin, 77 and 82mm versions, are available at B&H Photo Video, and more information can be found on Singh-Ray's website.
While I don't claim to be any type of professional landscape photographer, you can check out a few of the shots from my trip which used the Singh-Ray Variable Neutral Density Filter below.
 Krossnes, Iceland. Filter at full strength.
 Jökulsarlón, Iceland, filter at medium strength
 Kirkjufell, Iceland. filter at medium strength.
 Dynjandi, Iceland. Filter at low strength.


If you already have a circular polarizer, you can just get a linear polarizer and mount it to the front of the circ-pol. And now you have a vari-ND. For a whole lot less than $390, and exactly the same functionality.
but not the same image quality.
Then you have to deal with two filters, one of which is probably a $200 polarizer (if it is any good to begin with) and you're going to lose a lot of image quality with a cheap linear polarizer. Not to mention you'll be putting a $20 linear polarizer in front of $1200 worth of glass. What's the point of that?
Why did my reply get deleted on this comment? Here's a repost:
The only difference between linear and circular polarizers is the former is for older film cameras and the latter is for "newer" (not so much anymore) cameras with more modern metering systems. The optical quality of B+W filters should remain consistent between the two.
Best,
John
www.johnmaclean.com
Linear affects AF systems in modern 35mmm DSLR.. best to stick with circular.
You want a linear polarizer, because you do NOT want the quarter-wave filter that creates the circular polarization.
You've misunderstood what a circ-pol does. Circ-pol is just a lin-pol with a quarter-wave-filter, which creates a circular polarization such that the autofocus can be used. A Lin-pol will not always work with polarization, because the mirror polarizes the light by virtue of being a mirror.
Thanks Anders, great information. Not that I have the money to blow on an overpriced filter.
Just remember that 2x vivitar / cheap polarizers are going to introduce all kinds of undesired effects, such as loss of contrast or sharpness, flare, ghosting, color shifts, not to mention the vignetting from two filters. It doesn't stop you from trying it out just to see though!
If you want quality, don't use vari-ND or dual polarizers. But if you want a vari-ND for whatever reason, get a linear polarizer for your circ-pol, because any vari-ND is simply two polarizers stuck together. Might as well stick em together yourself.
The fader ND has always worked great for me and is way cheaper.
http://www.bhphotovideo.com/c/product/742535-REG/Light_Craft_321_77mm_Fa...
Why only landscape photographers? What about any portrait shooter that wants to shoot with a wide aperture at less than 1/250th in daylight?
I didn't say it was only for landscape photographers - I also mentioned the use you spoke of. I only had a chance to test it with landscapes, though. I don't shoot people, though.
Lifehack - use any variable filter + any polarised filter = no cross !!!!!!!
You whinny bunch, some one took the time to write up a review, which helps you decide weather or not is worth it to you, and all you can do is criticize the cost, or why it's a bad decision, when most likely you haven't had one in the front of your lens. If it's not for you say thanks and move on!
Thanks for writing the review!
Comments like this make writing the reviews worth it! :)
To be clear, there is a significant distinction between top quality filters - such as the ones reviewed, or Lee filters - and combining any two polarizers you have laying around. The reviewer did a top-notch job, but you will be disappointed if you try a DIY approach and expect his level of results.
This particular line of filters IS expensive but not so when compared to others (such as B&W). The beauty of this review and others that I've seen is that we can be educated and prepared. Some will go for the high end and some will find the hacks. The thing is that every opinion (and even yours) is valid and I believe that the readers have enough smarts to be able to pick out the pros/cons of each.
But lambasting others for expressing their thoughts not in line with yous isn't helpful.
I am a portrait shooter and this filter is indispensible. I have a normal mount version of the Vari-ND + Polariser version and while the vignetting is severe up to around 24mm (at 17mm it's like looking through a port hole -- I am considering buying a thin version as well), it's something I keep with me all the time, especially for daylight shoots. It is one of the most versatile tools around, and the results are phenomenal.
Another thing to keep in mind is that this filter effectively allows a fourth point of control over exposure (which allows changes to the exposure of the scene without having to touch the triangle of ISO, aperture and shutter speed).
On a side note, it's also a very good investment if you are looking to get into video, providing smooth and pretty easy exposure transitions without necessarily having to get lenses with smooth aperture adjustment.
I let my promaster branded variable-nd filter sit in my bag for almost a year, until just this season I started experimenting with it. All I gotta say is, it's such a great tool to have. So many new possibilities! It was far less than $400 (and I'm sure inferior quality to some degree) but it works like a charm for many applications.
Thanks for the review Mike, but I'm curious about your comment "or trying to eke out an extra stop of power from a tiny speedlight". How can an ND filter add power to a flash?
Best,
John
www.johnmaclean.com
Speedlights lose a significant amount of power when you go over the sync speed and into high speed sync mode. By shooting under 1/200th (or whatever you camera's sync may be) you'll get more power than if you were shooting without the filter in high speed sync mode.
You just blew my mind! (seriously - I hadn't thought of that and it's brilliant - thanks!)
Wouldn't the extra ND negate the difference in flash power?
I don't have exact numbers, but in my experience hss will reduce flash exposure by two or more stops at distances of just 10-12 feet, since hss uses multiple small pulses rather than one large dump of light.
So suppose an outdoor portrait with subject in light shade, but background in sun. Ambient background is one stop too bright at ISO 100, 1/250, f 4; but flash is just right at 1/2 power. Reducing ambient 1 stop by going to 1/500 requires hss, which now leaves flash underexposed 2 stops. Instead, the ND allows you to drop the ambient by 1 stop, keep 1/250th, and crank the flash up full power to negate the ND.
Yes, in this case you could also close the aperture to 5.6 and crank the flash, but if you want to keep the aperture at 4 for aesthetics, it sounds like a good idea.
I loved using the Singh-Ray in studio so that I can shoot shallow DOF portraits with strobes instead of constant (hot) lights. Definitely worth the money IMO. One nit is that it's angle of rotation is marked by a series of lines from 0 to 8 stops, and I would have preferred that they marked it clearly as 1 stop, 2 stop, etc. In order to cut 4 stops I had to turn it until it lined up with the half way mark, but would have liked to have a number there to verify my guesstimation when shooting fast.
Here's one from a set as an example: http://flic.kr/p/bQfp1k
not bad. Lighting certainly not as expressive but still good
Worth noting that variable ND filters are also indispensable for the 'DSRL film' look when shooting video. For that you need to keep wide (around f3), 1/50 on shutter, and 25fps.
As that leaves you with nothing to control exposure, you instead use a variable ND.
I think your photographs are beautiful. I am in real estate and have recently been photographing properties for other agents. A different type of "Architectural Photography" I guess you could say. Sites such as this provide so much knowledge and inspiration to keep learning. I have often been frustrated after a shoot but when I see photos such as these waiting to be captured, I am reinvigorated. Thank you for sharing.