
There is that popular phrase that goes "the best camera you have is the one on you." That phrase has never been more true in this day and age with considerably powered cell phone cameras living in the pockets of nearly every person you might come across. Even as professionals with thousands of dollars in gear, sometimes we will find ourselves in a situation we shoot on our mobile cameras, whether by choice or by circumstance. I spoke to the product manager of Lightroom to get his take on the best ways to bring the most out of your iPhone images.
I sat down with Sharad Mangalick, digital imaging product manager (oversees Lightroom) at Adobe and we discussed how Lightroom can bring out the best in images taken on less-than-professional cameras (our phones). "Professional photographers have relied on Adobe Lightroom as the final piece in the photography trifecta," Mangalick said. "The right lens, the right DSLR camera and then post-processing in Lightroom. However, in December 2012, Adobe added support for iPhone 4S and iPhone 5, which allowed photographers to continue to correct the tiniest detail and add a professional-level polish even when shot on an iPhone."
I wanted to see what Mangalick could do with some of the images I had kicking around on my iPhone, so we popped a couple into Lightroom and he started to go to work.
"Since these photos were taken on an iPhone, before beginning any edits I made sure to click “Enable Profile Corrections” to ensure Lightroom recognizes the iPhone lens used in each photo. While Lightroom is smart enough to automatically detect what lens is used, you can also manually select the correct lens from a dropdown list."
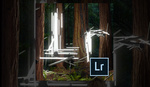
First we started with this rather terrible and cliche photo of myself on a plane escaping New York:

Despite my discomfort with my face on the monitor, we discussed the issues with the image. "The clipped highlights from the window in the original overpowers the image," Mangalick said. "I want to soften them to provide a more balanced color tone and bring more attention to the your beard and balance the color cast from the window over your face."
So here's how we did it:
1. Enable lens profiles
2. Select White balance selector to adjust the white balance, which also reduced some of the tint.
3. Using the tone controls in the Basic panel. We reduced contrast and highlights to darken the image slightly
4. Increase shadows to reveal detail lost to darkness (again through the tone controls in the Basic panel)
5. Adjust the Hue and Saturation of the individual color channels in the HSL panel (We tweaked this until we achieved the visual color feel that we were going for)
6. Use a Graduated Filter on the left side of the image to reduce the glare coming from the window
7. Use a Local Adjustment Brush to add clarity to the eyes, eye brows, mustache and goatee (my little hair smudge more accurately), which added additional edge contrast
8. Add a post-crop vignette to help frame the subject a bit better
After all that, we get our final, side by side with my original:

Next up we went for one of my landcape images. We chose one of my favorite iPhone photos, one that I snapped of the fog above my beloved San Francisco.

"The sky in the original image is a bit murky." Mangalick said. "I want to differentiate the clouds from the rolling fog, but also accentuate that fog to give it some separation from the sky and city." So we went to work:
1. Of course, enable lens profile
2. Warm the image and adjusted the white balance by increasing the temperature and tint using the slides in the white balance section
3. Reduce exposure and highlights, and increased shadows using tone controls in the Basic panel
4. Increase clarity to provide edge contrast using the Clarity slider
5. Add saturation to give the colors a bit more pop with the HSL panel
6. Use a Graduated Filter to even out the blue and green accents in the sky
7. Use the Local Adjustment Brush to give the rolling fog more clarity and add a more “edgy” tone
And there you have it! Check out the finished product next to the original:

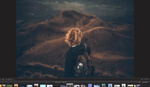
Finally, we loaded in one of my most treasured images (simply because of the memories associated with it). It's a terrible photo, from a purist perspective. It's dark, dreary and what light there is comes off as hard and almost flash-like.

"That hard light overwhelms the rest of the image and left a number of glare spots," Mangalick noticed. "My goal with this image is to minimize that overexposure while also balancing out the color tones." After enabling lens profiles of course...
1. Adjust the tint to balance the colors
2. Reduce exposure a bit using the sliders in the Basic panel
3. Reduce highlights (Again, the goal was to remove the flash glare as much as possible)
4. Increase clarity and shadows to bring back some detail and add edge contrast
5. Use a Local Adjustment brush to reduce exposure and increase clarity for the award frame (This helped reduce the glare a bit, but not quite all the way.)
6. Use another Local Adjustment brush to further reduce exposure on the more prominent flash spots on the frame
7. Use yet one more Local Adjustment brush to increase the highlights and add saturation for the award (the area inside the frame); this makes the award easier to read
8. Lowered the saturation over the overall image
And with that, we're done! Here they are side by side:

In the end, you'll be the only one who can convince yourself to use Lightroom with your mobile photos. Most of mine weren't so good before editing, but after seeing how Lightroom can help amend that, I'm likely to spend more time with my iPhone images in post. Do you use Lightroom to edit photos taken on your mobile device? Let us know, and share your best efforts in the comments below.


As long as there's sufficient light, shots from the camera phone are always going to be relatively acceptable.
Good pointers all around for color grading. This is a really strong artform people take for granted today.
Here is a photo that I took with my iPhone 4S about a year ago. Didn't spend too much time on it and I understand the upper-right corner is blown out a bit, but the purpose of displaying this is just to show that you can still take quality photos with your phones. "The best camera you have is the one that you have on you." - :)
Great article, thanks! I actually never imported any iphone shot in my lightroom but now i will give it a go :-)
I think I'd rather edit my phone photos in Snapseed than bother uploading and editing in Lightroom - far too much effort :P and the Snapseed app is really rather good!
i do the exact same thing!!!