
I’m a huge fan of Annie Leibovitz and the imagery she has captured over the past few decades. Being a self-taught photographer, I looked to her work time and time again for inspiration and motivation. Over the course of a year, I scoured the internet for information on her lighting setups, equipment and methodology. But, the more I dove in, the less concerned I became about equipment and the more I felt the need to simplify my style.
I’ve read the books, watched the documentaries and read the interviews, I even went as far as to research her past assistants. I would never claim to be as talented a photographer as Leibovitz, I'm still learning everyday. However, I am claiming I've done enough research to tout a simple Leibovitz light setup and I love talking about it. But, this article isn't necessarily about Annie Leibovitz, but more about her style of photography that has greatly inspired me.
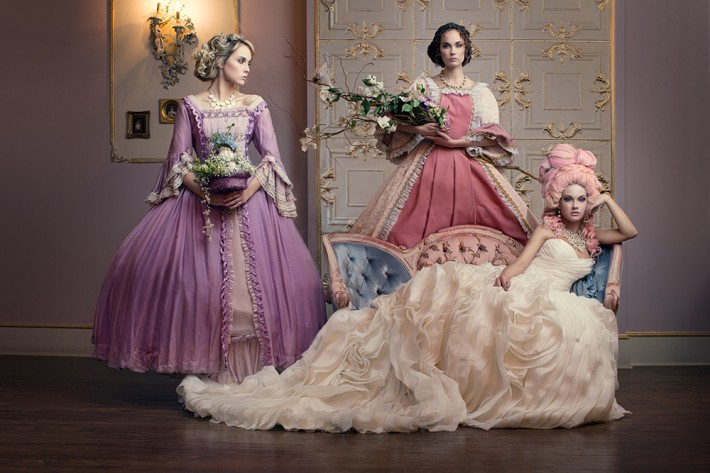
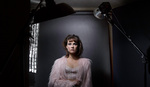
Sometime last year, I began to focus more on subject matter itself and what it means to the viewer rather than the technicalities of it all. I began to see lighting as light, which meant bringing a natural feel to my lighting and imagery. Around that same time I introduced a set of images called the "Oliphant Portrait Series". The series focused on a set of my colleagues that have been inspirational to my career, much of them being photographers, designers and artists. The images were all captured in front of a custom painted 9x12 canvas from Sarah Oliphant of Oliphant Studios, hence the title of the series. The images were a smash hit and I received a lot of great feedback, but the biggest question of all was... "How did you light that?"

One Light Is All You Need
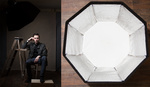
During my research, I learned that when Annie started shooting portrait assignments, she would only bring one light and an umbrella. For many years that was her go-to-setup which created some of the most iconic images we know. Today, she has progressed and moved into several different diffusion methods, but in many behind the scenes videos you will always see one Profoto Acute Head and one large soft modifier; a 60" Photek Softlighter II. That is very similar to the setup I used for my series, one light and one umbrella.
If your ever assigned to a group portrait, use wrap-around and to your advantage. The larger the group, the larger the light source. Don't feel the need to add more light or a stronger light, simply add a bigger modifier.
Get Close
The closer the light source is to a subject, the softer the light will fall on the face. The distance from the sun to the earth is about 93 million miles, hence why the sun on a bright day creates such hard shadows. Don't be afraid to place that light close to your subjects face. On many occasions, I have had the light less than a foot from the cheek and if you were to look at my RAW images, the modifier can be clearly seen in the frame. But, with a quick cloning session in Photoshop any and all distractions can be removed.

Big and Soft Double Diffusion
If you place a subject near a window, the light would look natural and wrap-around the subjects face. Take that same thoery and apply it to one strobes. The modification that lies in between the strobe and your subjects face is up to you. But, in the case of Annie Leibovitz, a 60" Photek Softlighter II proves to have worthy results. If you want to go even softer to mimic that nice window light, place a scrim in between the 60" Photek Softlighter II and your subject. Leave about 2-3 feet in between the light and the scrim then place the subject about 4 feet away from the scrim. What you'll notice is a nice soft even light that still retains a hint of drama.

Under-Expose
It's important to get it right in camera, but there is also a smart way to go about setting your image up for post processing. In the digital age, we can easily increase exposure in post, but we can't take away blown out highlights. Under-expose your image a stop or two and you'll not only save yourself some processing headaches, but you may just see a overall more dramatic image. Never be afraid to go to dark with those shadows.

Up The Ambient
Using a slow shutter speed in dark situations is an important facet of my work and I know Leibovitz has always incorporated ambiance for more natural and realistic portraiture. I dove into this technique more in the article Up The Ambient - Create Beautiful Portraits By Mimcking Daylight. Shutter speed only controls ambient light and aperture controls artificial light(and some ambient), therefore you have the ability to bring up the exposure of the ambient light without altering the flash using shutter speed. Up the ambiance then create drama with the artificial light source. You want the strobe to mimic the look of natural light.

Next time you have an open studio or a bored friend, grab a strobe or speedlight and a couple of soft modifiers. Using some of these tips explore the depth and dimension of your lighting. But, simplify things, connect with your subject and you'll see that less is very much more. That is my one light challenge to you.
Clay Cook | Facebook | YouTube | Instagram | Twitter
If you'd like to learn more lighting and shooting tips, consider checking out our Fundamentals of Fashion Photography course with Shavonne Wong or our more in depth Fashion and Editorial Portrait Photography tutorial with Clay Cook. If you purchase it now, or any of our other tutorials, you can save a 15% by using "ARTICLE" at checkout.


Great article Clay!
Thanks man!
I love single light, most of my portfolio is one light.
One light is the way to go! Thanks for checking it out Dani!
If you can't tell someones story with one light, adding another light won't change that. ;)
That's one of the best quotes I've heard in awhile. Thanks for sharing!
haha, cheers man. Popped into my head. Any plagiarism is incidental. Gonna have to look it up before I claim it as my own.
If you thought of it, or said it, it's yours. As yours as any portrait you've ever made. You do't have to be the first doing/saying something for it to be yours. Just saying
“Many a man fails as an original thinker simply because his memory is too good.”
Friedrich Nietzsche
:)
love it
Awesome handle / name BTW.
Great article, last week I ran in situation where I couldn't get multiple lights to trigger so ended up doing the entire shoot with just one light and was pleasantly surprise with the results. Will be doing a lot more one light shoots.
Thanks for reading Isaac! Bummer about your triggers, but perhaps it was a blessing in disguise. Keep it up!
why not just use a broncolor para 133 better more radiant light
Probably because the Bron is around $2600, whereas the Photek comes in at just under $100
Great article. When I looked into Annie's lighting I found the same thing.
Her single softlighter is what made the Vanity Fair Africa series covers so dramatic.
Thank you! The Softligher just rocks. I'm compared it to other modifiers and I just can't seem to find a modifier that has the versatility or fall off of the Softlighter.
Softlighter is just an umbrella with a secondary diffuser screen wrapped around it. There's no secret or magic behind it. I've used it a few times (and probably still own one, if I can dig it up from the confines of my basement). I've found it to be a poor quality product. You are much better off with a Westcott Octabank, or a Profoto umbrella with a similar diffuser screen (though granted, it's going to cost you a little more). Phototek is like the $5 umbrella you buy because you were caught unprepared. Good once or twice, but it falls apart in the long run.
I will agree Michael, the Photek Softlighter isn't meant for the long haul, I have owned 4 of them. But I have used the Westcott Apollo Orb and the Profoto Umbrella. I have actually even compared them side by side. They both produce amazing results, but the Softlighter does have a stronger fall-off, which is the look I want. At the end of the day, it's about the product we provide to our clientele, its up to you how to get there! :)
David Hobby was right. There is no Lighting 103...
Superb.
Thanks!
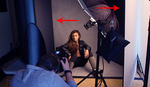
Love it! Great post. I'm also a fan of one light. It's funny seeing a diagram with one light. =) Just curious, how much do the Oliphant Backgrounds cost? Do they sell them or only rent them out? I see the rental prices but don't see any "Sale" prices.
I e-mailed them about buying a 9x9 similar to the ones clay used in these shots, they quoted me $1200 for a 9x9....
You're right on the marker!
Thanks for reading Bert! The Oliphant backgrounds are certainly an investment! You're going to be paying anywhere from $1000 to $3000 depending on the size of the canvas. Most of mine ranged in the $1500 area. I can guarantee you get what you pay for. They are amazing and have really changed the aura of my photography.
Great article! You've done a great job in finding that lighting style for yourself. But you've also managed to find that muted, creamy look she has as well. Can you your post processing approach to color and tones? Thanks!
Yes could you share this as well?
Sure thing! Check out the article here:
http://fstoppers.com/color-grade-like-a-pro-the-secret-the-cinematic-ima...
Thanks Grant! I really appreciate that.
I broke down all my color tones in the article here: http://fstoppers.com/color-grade-like-a-pro-the-secret-the-cinematic-ima...
Thanks again for reading!
Hi Clay, do you have the reflector on your flash head when using the Photek Softlighter II? Or do you mount the Softlighter directly over the flash without the reflector?
Awesome Clay. I tend to roll with one light often, I like to keep things light and simple (pardon the pun haha!)
LOL, I like that. Thank you Kate!
Firstly, congrats on this article. It's a relatively simple technique with often glorious results. Joey L alsa uses it quite often for his portraiture work.
Secondly, since you also did your fair share of "Leibovitz Reaserch" may be you could help me with one mystery. I've been hung up on this photo for quite some time.
http://www.tedsabarese.com/guesspics/Keith-Richards-Annie-Leibovitz.jpg
I know that it was lit in a similar way that you're describing from BTS video.
https://www.youtube.com/watch?v=_RGunD1tngg
I get, that there is specific set design and seriously unique subject matter but there are was some kind of post processing done to it. It shifts colors into this pastel palette, gives specific texture to Keith's face and has this overall "Rembrandtish" feel as Keith puts it.
Can anybody think of a process that could lead to these glorious (for me at least) effects? I would greatly appreciate any help in that matter since it doesn't let me sleep in peace in months. :D
I see Annie with her camera firing a strobe (it appears) yet I see her
assistant holding up the "umbrella" which seems to have a continuous
light coming from it. Two lights then? And shooting this in a dimly
lit hotel room at a shutter low enough to successfully capture enough
ambient---I dunno, there's just a whole lot more details to this Keith
shoot that I'd like to know.
It's just a studio strobe. It has a continuous modeling light but actually flashes when she shoots.
Slow shutter to bring out practical lights is correct (as mentioned in Clay's article).
But there is whole other thing in post going on. Affecting color palette (some sort of color remapping?) and overall image "plasticity" (most apparent on Keith's face). Of course postproduction is working upon perfect exposure provided by Annie but there must be some kind of post production secret sauce. :D
@Clay Cook, it would be amazing if you could weigh in on this. :)
It's just a studio strobe. It has a continuous modeling light but actually flashes when she shoots.
Slow shutter to bring out practical lights is correct (as mentioned in Clay's article).
But there is whole other thing in post going on. Affecting color palette (some sort of color remapping?) and overall image "plasticity" (most apparent on Keith's face). Of course postproduction is working upon perfect exposure provided by Annie but there must be some kind of post production secret sauce. :D
@claycookphoto:disqus , it would be amazing if you could weigh in on this. :)
Hey Filip! Thanks so much for reading, I have done a lot of research into this shot. It was lit and captured exactly as the article above describes. One light, slow-ish shutter. Much of this is post process and a multitude of dodge and burn. But the secret is in the color grading. This grade is very de-saturated in certain areas, including his skin. I did break down my color grading process in the article below. Hope this helps!
http://fstoppers.com/color-grade-like-a-pro-the-secret-the-cinematic-ima...
Thanks so much for your answer! This color grading part was what interested me the most. And I see lots of great information in this article you mentioned. :)
When I saw your first picture in this article my mind went straight to Annie's Actors and Directors shoot for Vanity Fair :) Very nice final product.
Thanks again for linking this article and congrats on signing with Wonderful Machine seems like a great step in a right direction.
Thanks Filip! Cheers!
http://guessthelighting.com/2011/03/22/leibovitz-lights-keith-richards-f...
This doesn't really shed much more light on how this photo happend but seems like an interesting page, nonetheless.
I love this shot...
oh, and as much as we are talking about how awesome one light is here. something I learnt from an awesome photographer is hiding flashguns in things, like the lamps in this shot, or one in the room where the door is slightly open.
This gives you a bit more control over your set, whilst still keeping it looking natural.
(however, that isn't what they did in this shot, but would give you a lot more of this image in camera)
Hi Clay/Filip, that shot has always had myself intrigued too. I think there is definitely some degree of compositing going on here.
My two cents: If you look at the frame they show on screen in the BTS video it certainly looks like this is the select for Keith's pose, but look where the suitcase is on the bed in this frame compared to the final image.. also the position of the book differs and the cup of tea isn't even visible! While it's possible that just those items could have been moved in post, I think it is more likely that she captured Keith's pose under those lighting conditions in one frame and then additional frames of the scene were captured before/afterwards. I wouldn't be surprised if Keith was a complete cut-out here. What do you guys think?
I would still love to know how it was actually created, and if any additional lights were used. Maybe we can find out who did the retouch?
Great article Clay! A few months ago, my photography took a whole new direction when I learned about quality of light. I apply these concepts and get amazing results.
Thanks Daniel! That's awesome to hear, keep up the awesome work.
Awesome article im feeling inspired
Thanks for reading! Get out there a shoot!
Of all the modifiers I've ever bought or rented, the softlighter is my favorite. One light, deep shadows and great expressions. Wonderful work.