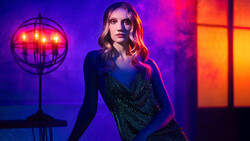
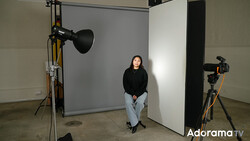
Fashion Photographer Lindsay Adler has put together a new behind the scenes video that shows you how she is able to capture images of a model that look like silhouettes, but still have glare and depth as if they were wearing latex. This video shows us the lighting setup in her studio for capturing these unique images.
Related Articles


19 Comments
Great idea and concept! Nicely done Lindsay. Shoots like these are really inspiring! I'm still a bit skeptical though about the lens. My Sigma 24-70 f/2.8 is barely giving me the sharpness that I want (even at f/4 and above).
yet everyone knows lindsay and nobody knows you.. the edge on sharpness seems to be not so important i guess.
You know, there is a way to make your point without being rude
well sorry... but i become more and more unpatient with all the gear heads.
as if the 24-70mm from sigma is not good enough.... i have done work in the 80s with lenses thast are really BAD compared to what we have today.
Not only are you a complainer, you are completely out of line. The OP was making a statement about his experiences with his 24-70 sigma. The OP was not getting into the whole "gear head "sigma vs canon or nikon comparisons. Additionally the OP was positive in his review of the photographer and the concept. Unlike your negative and rude comments. If you don't like complaints why don't you start by being more positive and stop complaining.
cool images, wish there was a clear lighting diagram included in the BTS!
well this video explains not how you get the look at all.
let some guy/girl put 2 softboxes in front, 2 lights at the side and two for the background and you will not come up with this look. so no this is not a TUTORIAL at all.....
@ Tobort55 I think she indicated that to get the final look she had to increase contrast and darken the image in post for the final look.
@Tobert55:disqus - definitely not an appropriate title for the Fstoppers post.. BUT.. She did a full edit of one of the images from this shoot during her Creative Live 3-day course a few weeks ago. Took it from image to final showing every step. I don't recall the exact steps but it was pretty simple techniques from what I recall. Most done in the RAW conversion (think she used Adobe Camera Raw in this example). - b
What's that plastic on top of the photographic paper she's standing on?
it´s for reflections.
What's the name of that plastic on top of the photographic paper she's standing on?
Hey guys, yes I explained the entire retouching process in my creativeLIVE, but basically you increase contrast, darken the image, and when you convert it to black and white you drag the reds and yellows to make them darker. Thanks! Lindsay
If you have any more questions, I'd be happy to answer them. I am just using a white seamless in the shoot (savage) and am standing on white plexiglass.
Thanks so much for this, Lindsay! I've been wanting to try this technique after seeing it in a Helmut Newton portrait of Alek Wek years ago. I'm adding it to the list of self-portraits to try.
Thanks for the video Lindsay - I found the way you explained things really clear and concise which is a big bonus for these types of BTS videos.
Great photos and a cool idea.
Very cool effect, I would love to know how you got the skin so shiny?
Eke, if you watch the video, it was lube. Literally, lube. Like vaseline, KY... anything to give a shiny texture seems fine.
Thanks Lindsay for sharing the technique, I just bought your Creative Retouching Techniques class at Creative LIVE hopping you explained that. No regrets at all, it's a great class!