
We all have cameras and know how to operate them. But how well do you understand the image forming principles? Modern technologies spoil us and we are often not required to possess any knowledge about the process behind the functions of a device. However, such knowledge can lead you to fun experiments like the one I am going to share with you today.
Not so long ago my photographer-friend from Omaha, Ronald Shankland, shared a few interesting images on his Facebook. They were photos of a room with the street views projected onto the walls and ceiling. It looked really neat and I asked Ron to kindly share his project and the steps he took with the Fstoppers' readers.
For those of you with a geeky desire to try various photography techniques and tricks like Ron and I, enjoy!
"I know most of you have looked inside a camera, but have you ever been inside a camera? Let me introduce you to the interesting world of camera obscura photography. Latin for “darkened chamber or room”, the camera obscura is one of the prime precursors to the modern photographic camera.
Basically, it is a room-sized pinhole camera, but rather than exposing film on the projection plane, we use film or digital cameras to capture the image projected onto the walls, ceiling, and floor opposite the pinhole. To learn how to capture these images, I followed in the footsteps of Cuban-American photographer Abelardo Morell.
Let me show you some examples and share my technique with you.
Location
First, find a room with an interesting view such as a cityscape, flower garden, architecture, etc. The fewer the windows and doors in the room, the better. If there are many them, you’ll have to expend a lot of effort covering them up. It also helps if the walls are white or a light neutral color, so the projected image is brighter.
Speaking of brighter, you’ll probably want to make your camera obscura images on a sunny day (unless the view out your window is ridiculously bright, like Times Square).
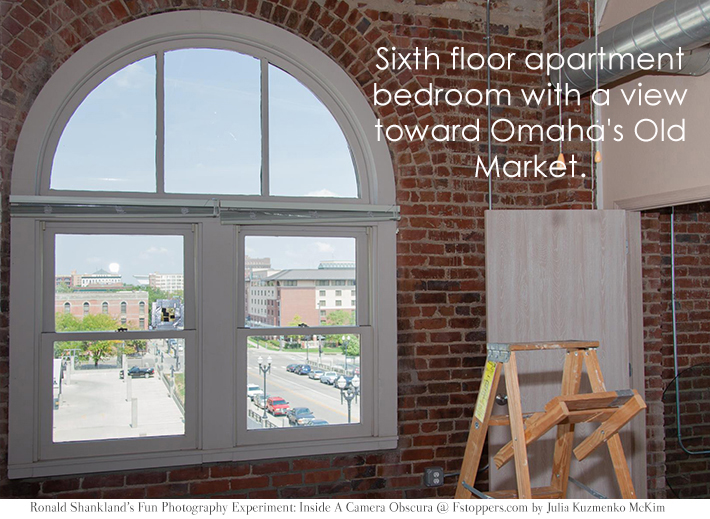
Furniture has been removed form near the window to allow free access while covering the window and setting the tripod.
Pinhole
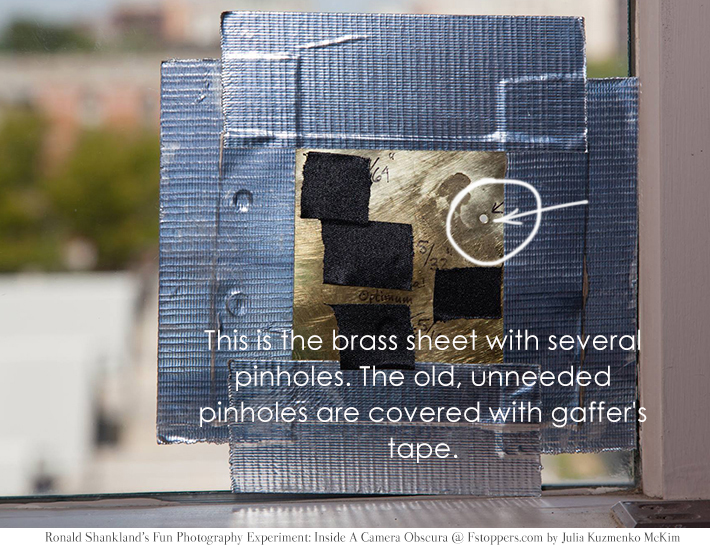
Once you know the size of the room, you can make the pinhole. I’ve found the best material is a thin sheet of brass that can be found at the local hobby store. I use 0.005 inch thick brass sheet.
By clamping the brass sheet between two pieces of hardwood and using a sharp drill bit, you can make a relatively clean hole through the brass. Then, use progressively finer grades of sandpaper to make the hole as perfectly round, clean, and smooth as possible on both sides of the sheet.
Take the time to do this part right because it is the “lens” for your camera obscura.
Pinhole Size
What size should your pinhole be? Theoretically, for the absolutely sharpest image the pinhole should be as small as possible; however, the smaller the pinhole, the less light will be allowed into your camera obscura. Also, because of the wave properties of light, a pinhole that is too small will cause the light to be diffracted and become less sharp.

I followed the guidance first published by Joseph Petzval and Lord Rayleigh in the late 1800’s to develop the formula:
D = 0.02897 x sqrt(F)
where:
D = diameter of the pinhole in inches
sqrt = square root
F = focal length in feet
Thus, if a room that is 30 feet (= 9,1 m) long from the window to the back wall, the diameter of the pinhole for optimum sharpness would be would be about 0.1587 inches, or about 5/32 of an inch (= 0.4 cm).
There is some latitude regarding pinhole diameter: you can use a somewhat larger pinhole for more light and shorter exposure times if sharpness isn’t critical, but don’t go overboard.
F-stop
The f-stop is determined by dividing the aperture by the focal length. Using the example above, the f-stop would be 360 inches (9,1 m) divided by 0.1587 inches (0.4 cm), or f/2268.
You can use this information for determining approximate equivalent exposures. However, keep reciprocity failure in mind when converting exposure times – exposure times may be longer than initial calculations indicate.
Framing & Composing
The next step is to figure out where to place the pinhole on the window. Because light follows the same laws of physics as it does in a photographic camera or your eyeball, the image in the camera obscura is projected upside down and backwards. Therefore, the best way to “aim the camera obscura” is to place yourself against the wall where you want a particular feature to be projected and then look at that feature through the window.
For example, if you want a specific building to be projected at a certain place on the wall, put your head where you want the building to be and then sight through the window at the target building. Place a small piece of tape on the window directly in line of sight with the building to mark where the pinhole will go. Attach the brass pinhole sheet to the window with tape.
Cutting The Light
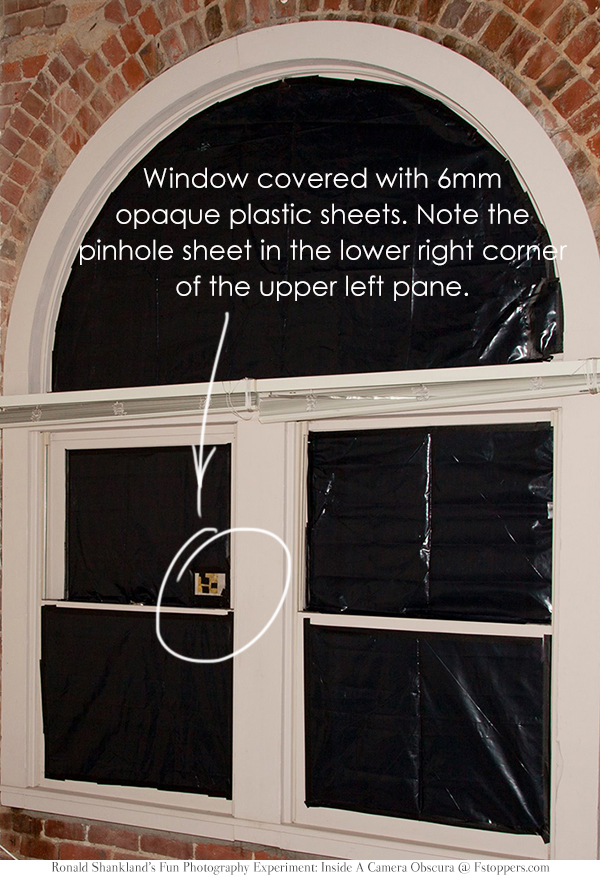
To darken the room, cover all potential light sources (windows, transoms, door seals, etc.) with 6 mil black plastic sheeting using a good opaque tape, such as gaffer’s tape. Leave the pinhole uncovered, of course.
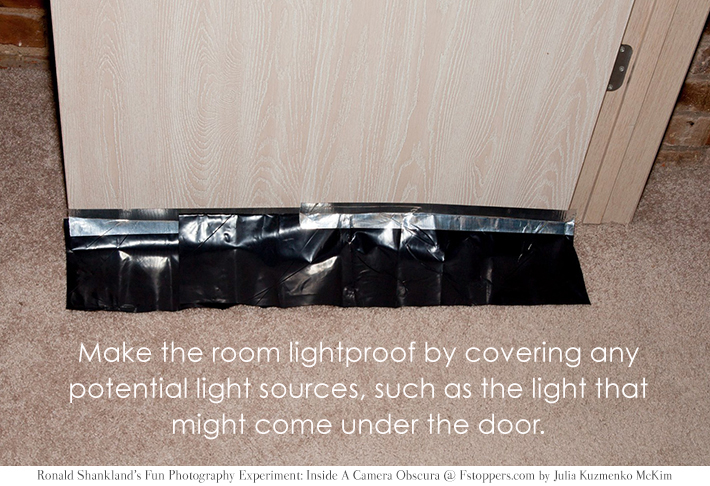
Other light sources to watch out for are clocks, electronic appliances, smoke detectors, etc. Either unplug the device or block the light with a small piece of gaffer’s tape. After a while, your eyes will adjust to the dark and you’ll begin to see the image projected in the room, especially if you’ve opted to use a larger-than-optimum pinhole.
The first time you see this, it’s breathtaking!
Placing Your Camera
With your camera on a tripod somewhere close to the pinhole, set your focus and exposure for a test shot. The camera should be near the pinhole in order to keep from distorting perspective, but be careful that you don’t set the camera directly in front of the pinhole where it casts a shadow on the image.
If you don’t want to bother with the calculations, you could just take shots and adjust as you go. I usually start with a five-minute exposure at f/4.0 and ISO of 3200 on a sunny day.
A locking shutter release and a timer or, even better, an intervalometer, is a big help with this part. Otherwise, you’ll need to sit there in the dark and hold the shutter open by hand as most cameras don’t have a shutter speed longer than 30 seconds.


Image Noise
Long exposures usually result in a lot of noise/grain in the image. This can be reduced significantly with in-camera or software noise reduction, such as that found in Photoshop, Lightroom, or Aperture.
Keep in mind that (at least for Canon cameras) the in-camera long exposure noise reduction process takes as long as the exposure itself, so it will take ten minutes for you to see the results of a five minute exposure.
Go ahead and give your own camera obscura imagemaking a try. You’ll be amazed to see physics in action and have fun at the same time!"
Thanks so much for sharing the details of your project with us, Ron!


Could be neat, but the product shown here is "meh."
Good tutorial, nonetheless.
Brandon, we all would like to see what you can make with this.
Brandon, we all would love to see what you can make with this.
As a tutorial, I find it helpful and interesting. As much as it concerns the pics, I think they pose a challenge for those of us that find them "meh". Let's try it!
Julia provided the link for Abelardo Morell's work, which will show the potential of such a setup when you get everything right.
I'd like to try to capture more camera obscura images like this, but finding a good location is a challenge. Sometimes you can find a space with a great view, but it's impossible (or prohibitively expensive) to make it light-tight. Attached is a camera obscure image I created in apartment in Chicago in May 2012. Unfortunately, I no longer have access to this space. Would love to learn about locations in the Omaha-Lincoln area where I could do this again and make more powerful images.
This is a beautiful one, Ron!
Thanks, Julia! Here is another image from the Old Market Lofts apartment, but this one is facing the Durham Museum across the 10th Street bridge. (The model, by the way, is Amber Parker -- she had to remain motionless for over 5 minutes while I was capturing this image!)
Anybody got some advice on the best quality pinholes? From the research I've done it seems that the laser cut ones may not be the best ones? I know it's a bit of a 'how long is a piece of string' question when it comes to machine drilled vs laser but any info you guys have would be an awesome help!
Thanks
You can buy a pin hole from Edmunds Optics http://www.edmundoptics.com/optomechanics/apertures/pinholes-slits/preci.... A laser can make a .005" diameter hole but it will not be perfectly round. The Edmunds holes are photo etched into very thin stainless and are absolutely round.
Thanks for the quick help Zeke. They look like really really nice pinholes but unfortunately it looks like Edmunds Optics only do pinholes up to 1000um which by my calculations would only help with an image plane of about 2 meters, unless my calculations are incorrect.
I gave this a go a couple years ago, but used a refrigerator box so I could be more portable and used film to capture the image plane: http://www.wmiii.co/p/welcome-to-my-ginormous.html?m=1
amazing! thanks for sharing