
Carbon Copy Cloner is one of my all time favorite programs that takes the stress out of ensuring data security and redundancy. It’s a simple program that copies data from one place to another exactly when you want, and exactly how often you need it to. It completely takes the guess work out of dragging and dropping blocks of data from one volume to another; it’s perfect for photographers.
We’ve all been victim to the dreaded dragging and dropping of folders onto hard drives only to manually match the exact GB’s from the source and the GB’s on the destination. If this sounds like you, then maybe it's time for you to take the manual labor out of file backup on shoots and put a program like CCC to work. If you are already practicing this, then you get 5 stars and a red lollipop. If not, keep reading.
As studio manager for a major studio, part of my job is protecting data. Carbon Copy Cloner is my go to application for ensuring that the RAW, working, and exported files of a shoot are backed up regularly and in three locations at all times. I do all of this by programing CCC at the beginning of the shoot and then just periodically check up on the program every few hours. It does a way better job than me fumbling through folders on various drives to make sure everything is copied in multiple locations. Plus it does it in the background while we are shooting or reviewing images. We don't ever have to stop and let a digital tech take over, or switch cards. The production can continue all day without stopping to dump data. Here’s how it works:
Step 1. Set Up the Source.
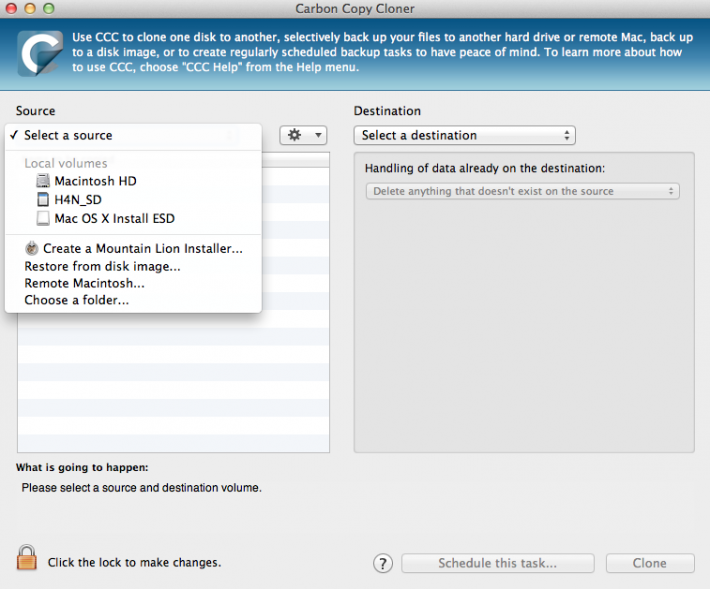
After setting up the initial job folder for the entire job on my Mac, I open CCC and select “choose a folder” and then select the specific location of where that folder is on my hard drive. I typically only shoot to an internal solid state drive that I keep less than 15% full. As a rule of thumb, you should never fill your hard drive past 80% full, as the drive will slow down and the risk of problems become greater. This is especially easier to do with SSD’s because they are so much smaller than a standard HDD.
Step 2. Select the Folder to Copy
In this example, I chose a capture folder I’ve already created for the job located on my internal solid state drive. Whether we are shooting medium format or 35mm, we are typically tethered to a computer so we can instantly have access to the files. The master folder includes all of the folders that I have already built inside of my master folder including all of the captures as they come in. In our workflow everything is labeled by Year, Job Number, Agency, Client, Folder Type. So 13-098-FSTP-CCC-Captures is the capture folder that we are shooting to, which is also inside the overall job folder. Next step is to setup where all of those ones and twos will be copied to. You will notice that in the above photo, the destination is on the right and is selected the same way as the source.

Step 3. Select a Destination & Customize How It's Copied
In the third step I select a destination of where I want my data copied to. In this case, I’ve setup a backup folder located on a Lacie Thunderbolt drive connected to my computer. It’s labeled as the same folder name, but with BACKUP 1 on the end. Also because it's a solid state thunderbolt connection, it allows for the fastest write speeds so the computers resources can focus on capturing files and rendering previews. In addition, if you feel like having multiple backups ready to go to multiple locations at the end of the day, simply build an additional backup to a second external drive. With Thunderbolt you are able to daisy chain drives together if you have ports to support it.

There are 3 basic options and also total customization on how you would like to copy data, which are the following:
Option 1. Temporarily archive modified and deleted items
“This low-risk collection of settings is recommended for new users and when the destination is not dedicated to this backup task. CCC will prune previously archived files until 15GB of free space is available on the destination. During the backup, CCC will move older versions of modified files and files deleted since a previous backup to the "_CCC Archives" folder on the destination. Files and folders at the root of the destination that don't exist on the source will be left alone.”
Option 2. Delete anything that doesn’t exist on the source
"This collection of settings offers a "traditional" clone without an archiving safety net — any files and folders unique to the destination will be permanently deleted. If you store files and folders on the destination that don't exist on the source, CCC will permanently delete those items. This collection of settings is ideal when the destination is dedicated to the backup task, and for users that have no need for preserving items that were deleted from the source."
Option 3. Preserve newer files, don’t delete anything
"This collection of settings is appropriate if you are restoring files and folders from a backup to the original volume. Files that are newer on the destination will not be overwritten and files that only exist on the destination will be left alone. Older versions of updated files will be archived, and CCC will forgo any pruning of the archives. This preset is not appropriate for restoring the operating system or applications onto an existing installation of Mac OS X. If you are restoring applications or the operating system, use one of the other presets instead."
Personally, I always use Option 2 which “deletes anything that doesn’t exist on the source.” This is a riskier option that opens us up more to human error, however we typically never delete any files whatsoever throughout a shoot day. Plus you can customize your second backup with option 1 as another fail safe. Option 2 is great because I like knowing that exact copies exist on the source and destination. Later on, once selections are made, and images have been dumped onto our server, we will purge our working folder of any unneeded data. If you are the type of person that edits, or deletes files as you go, you may want to select option 1, which will preserve anything deleted in an archive folder in case you accidentally delete a working file or great RAW capture.
Step 4. Schedule This Task
Next up is to tell the program how often you would like it to copy the source to the destination.

I typically select on an hourly basis, every 1 hour. You have the option to name the scheduled task on the left and have multiple scheduled tasks running at the same time. Other options allow you to wake/power up the system to run the task, send e-mails with progress reports, run shell scripts, power down the system, unmount the drive, or silently skip the task if the destination is unavailable. If there is any error whatsoever during or before copying, the system will alert you with a notification of what is wrong.
My only issue is that I wish there were an option for backing up every 15 or 30 minutes. If I feel that we’ve accomplished a lot in a short time frame on a shoot, or captured our hero shots, I sometimes have an unwarranted paranoia that the HD will crash right at that very moment. In these somewhat frequent cases, CCC has a “run” button underneath the scheduled tasks box on the left and also on the main screen you will see a "clone" button. This overrides the timer and manually allows you to copy everything when you want. I have been known to hit this button on occasion. Feel free to do it as much as needed. If you are running a slow computer, meaning an older version with a slower processor or with little RAM, you may see an overall slowdown in your computer. Check activity monitor on you Mac to see exactly how many resources this program uses during a backup.

Additional Features
In addition to being your own personal digital tech on site, this program will also create a disk image of your entire machine, restore from a previous backup, create a MAC OSX Mountain Lion installer onto a volume, and backup files from a remote computer via the Interwebs. These are all very handy features for anyone who owns a Mac.
This program has been a lifesaver for me and such a handy tool for helping my anxiety on shoots while increasing my organization at the end of the day. If you or someone you know is manually copying data from folder to folder on a periodic basis, please inform them that this program will do a much better job and they can go back doing something more creative.
Price
The price for this program is perfect coming in at a mere $39.95 for a license on all Macs that you personally own. I myself have 4 so it comes out to be $10 a pop. Not a bad deal considering the amount of time I save. Plus I sweat way less on every photo shoot and really, you can't put a price on sweating less. Well, you're right, you probably could.
Cons
For Mac users only.
What Do You Use?
There are other programs like this on the market. Which ones are you using and why do you like them? What digital asset management techniques and tricks do you use that help your workflow? For example, I utilize the SD slot on my Mac with a 64GB SD card for a backup on location with little access to power.


Good grief. $40?
I use DropSync. Bought it a couple of days after I bought my Mac. It's pretty much exactly the same setup - You define a source and destination, as well as the rules of that particular copy, and then it does all the work for you. And I'm pretty sure DropSync was only 10 bucks.
Agree. In the age of .99 cent software, it was a hard pill to swallow however I've been using the program since long before it was free and they got me hooked. Never once had a problem with it and it never crashes. For that reason alone I'd pay more than twice that.
This is the BEST software for full clones. I don't trust anything else. I run several servers (email, web) at my main job and this runs nightly. As far as I'm concerned, it's bulletproof. never had an issue with it in the 5+ years, I have been using it.
$40 for "bulletproof software" isn't expensive. But it's stupid to spend the 40 bucks when 10 bucks buys you the same thing. Dropsync (that I use) does this exact task, and I've been using it for almost a year and I haven't had a single issue, so I'll call that "Bulletproof" as well.
Don't get me wrong - I KNOW that Carbon Copy is great. I read a thousand reviews about it when I was looking for software to do copies like this. I know it's great. But I also know that the 10 dollar Dropsync pretty much does the same thing, and it does it just as solidly :)
Very valid point :)
Really.. I read all the article, imagine how I would do things... only to find "Mac only" almost at the end... that was mean :( hahaha That should be on top. Seems to be a good program tough
Ramiro, Apollo says that Puresync is legit and it looks like the Windows version. Plus it's free. Now get out of here and start copying stuff. -Cheers
A few years ago my MBP drive died. It said IBM on it, which surprised me. I had backed up with CCC. Put in a new drive, used CCC to copy back my info. New drive booted right up. How hard was that.
IF ONLY SOMEONE WOULD INVENT some "THING" that would backup stuff to multiple hard drives automatically!
You know, like, some kind of REDUNDANT ARRAY of INEXPENSIVE (INDEPENDANT) DISKS. We could call it "RAID"
My problem with RAID is that for that Array to be functional at ALL, all disks need to be in the array. I find that a little limiting. Here's why I say so:
My photos are backed up onto an external drive. That disk is duplicated to another that lives off site, which I bring over every now and then to update. Now, if I were using RAID, there's no way I could write images to the primary disk without the backup being connected as well. With a piece of software, I just write everything to the primary one, and update the second disk whenever I see fit. No limitation.
40$ for that software? Really... I use Puresync which is free and a lot more versatile. For example, when I plug my offsite Backup HDD to my desktop and when it's turned on, Puresync immediately, without asking, starts to backup new files to the drive on the background. I don't notice when it starts or when it stops.
Nice. Sounds legit. That looks like the Windows version that Ramiro was looking for. I only covered a part of what CCC is capable of and focused on how it works with our photo shoots. CCC does everything you just said as well. Plus it looks like PureSync is 20 Euros for the full version to get all of the things that you would need it to do. There are a lot of great software programs out there. Remember that software new to the industry typically starts out FREE. CCC was free for years.
I don't see Retrospect mentioned. Works across networks, on Mac and PC. Has endless backup scenarios. Has been around for many years. However, the initial learning curve is a bit steep.
As someone who uses Retrospect (version 9.0) in an IT environment with 100+ Macs, 10 mac servers and a few PC's, I can honestly say that it sucks. I have clients drop off line all the time and have to reinstall the client software, the sever software locks up on occasion. It takes up a good 2-3 hours of my work week, every week.
Disclaimer: this is for version 9.0 - Version 10 is out and I have not purchased it yet. A new company bought it, so I hope they are doing great things with it.
Agreed. Often, for example, AVG started out as a free Virus-software and now it costs.
But for Windows users, PureSync is quite a neat software, I warmly recommend. It can also automatically shut PC off after backup. I use that quite often when I move my pics to external drive which is slow as ****. :D Useful to leave PC on for the night.
Another great option for Mac users is Chronosync by Econ Technologies. Does a really great job of syncing your backup drives and the support is top notch. I think it costs like $15 or something but you get updates forever. I bought it like 6 years ago and still use it.
I am not paid or anyway affiliated with the company, just a happy user
I use Super Duper. Great for doing bootable backups of complete system. Use it on my rMBP for backup and ease knowing I can boot up from that backup in an instant if needed
Look, copying files from one drive to another, by hand or with the help of a program -there are many, is one thing. But cloning a hard drive with a Mac Operating System on it is another thing entirely. CCC will do this and when it is finished cloning not only will it be an exact duplicate, The new drive will boot the MAC Operating System as well. I know no other way to do this.
which means you can start up, boot your Mac from either drive.
put one of drives away for a great back of your complete system..
Duplicating a hard drive is one thing making a duplictate hard drive that BOOTS is something entirely different, CCC does this, and that is why it is great!
note the "clone" drive can be a larger capacity hard drive than the cloned drive.
a nice way to move to a larger hard drive.
I can boot up computers that I had years ago.. by connecting one of my old clones from the past and rebooting. wella! just like it was years ago.....
I Highly recommend this product.
I'm using Crashplan. The software is free, backs up to internal or external drives at your current location, backs up to internal or external drives at any off site location (friends, family, home, office) as long as that location is also running the Crashplan software, and it optionally backs up online if you pay for a membership. You have the same options about file deletion or retention, and it gives the same option of 15 minute backups that you wish you had with CCC. If you do pay for the membership, you get the benefit of a mobile app that gives you access to your files on any device.
CCC is good software, but I took the free route and make my bootable backups with SuperDuper!
Since this is for Mac only, how about PC user?
I am on GFI backup, would like to hear more - which good back up are there. =)
I never really used any of those programs, but this one sounds pretty good, it sure does save you a lot of trouble!
I usually shoot with my 5D Markiii, and put the option to save on both of my cards and back them up as soon as I'm done on my external hard desk, so I can imagine the time that this saves!
Might actually start using this one!
What about time machine? Would that not do the job?
I have a MacMini server running 24 hrs/day and I have a Storage Area Network (Synology DS214+) which is connected (Ethernet connection) to the MacMini. During day hours I have video footage coming from different places being loaded on that external drive. To make things even more secure I wanted to connect the MacMini another external drive (Firewire connection).
I was thinking of having ccc to backup folders and files loaded on the Synology to the external drive.
I was going to have two schedule for backup. One starting at 8h00 and running every hours until 22h00. The other schedule starting at 8h30 and running every hours until 22h30.
This would make the backup to run every 3pm minutes.. Do you think ccc being the right solution for that?
I,e there are no monitors neither keyboard connected to the MacMini server.
Thanks!