One of the most versatile and powerful secrets of Photoshop is the luminance mask. Similar to a channel mask that allows you to select very precise parts of your image based on color, the luminance mask allows you to select parts of your image based on tonal range. Using Photoshop to select those tonal ranges for you, you can quickly and effortlessly make very specific color and contrast adjustments to color grade like a pro.
This is not a tutorial on how to make huge adjustments to your image (although luminance masks certainly allow for that); this is a tutorial on how to subtlety color grade an image to give a result that doesn't look like a preset. The best part, though, is that it's almost just as easy.
- First, create the adjustment layers that you will be using to do your color grading. In this example, I've used a Photo Filter Adjustment Layer. One for the highlights and one for the shadows. Disable both adjustment layers for now.
- Second, select the mask of the highlights adjustment layer. Go to Image > Apply Image. Set the Layer to "Merged," set the Channel to "RGB" and set the Blending to "Multiply." Hit OK.
- Alt or Option+click on the mask to show only the mask. Use Levels (not a Levels Adjustment Layer) to change the contrast of the mask to select the proper range of the highlights.
- Adjust settings of the adjustment layer to taste.
- Repeat the steps for shadows, but during Apply Image, select "Invert."
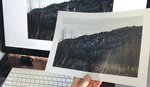
The great thing here is that luminance masks can be used however you want. They can be used for contrast, color or virtually any other selective effects. Sharpen on the highlights? Sure. Remove noise from the shadows? Absolutely. When printing, it's common for the image to print darker than it appears on screen. Instead of brightening the entire image, I use this process to select the shadows to only brighten those tones, while preserving the tones of the rest of the image.
Good luck! Hopefully you find this as handy as I do!


Thanx Chris. I always used channel masks until now, but it's actually much quicker the way you showed it here.
Glad you found it helpful!
Thanks for something on grading and color, I think it's an area that needs more attention to since we all know how to do all the other stuff. Good job.
Hey, speak for yourself. I believe that I am still learning what should be basic. The more I learn, the more that I realize how little I know.
Thanks for this Chris. Awesome!
Awesome tutorial Chris. There is an alternate method to select luminosity masks with the main RGB channel(by cmnd clicking it once or more by cmmd shft clicking it)which works much faster as it auto creates the mask. I need to test how much control there is in both the methods.
Great point! This works when the image is already flat. If you've got adjustment layers already in place (I usually do since I save color grading until the end) using the apply image combines everything for you.
Interesting, I usually don't work with lot of adjustment layers and always tend to merge to new layers, but I see what you mean.
Selecting the main RGB channel for luminosity masking does include all the adjustments you've done on the image before.
It doesn't sound logical that selecting the main RGB channel ( even at the end of your workflow) ignores the adjustments you've already made, even with adjustment layers.
I don't see this being an issue, but do correct me if I'm wrong.
Thanks!! Sharing is caring.
This is really great
Great tutorial! Thanks!
-CJE
Holy damn I've been looking for a method to tone shadows and highlights globally with this much control forever. Thanks for this! :D
Thanks for sharing Chris! I found this very helpful!
good article. You can find a great action set for luminance masks here. http://iso.500px.com/luminosity-masks-in-digital-blending/ Just follow the link to Jimmy's site and you get 18 different masks you can ctrl click to load and do your edits. Saves time from actually adjusting levels on a mask each time.
This is great, I usually try to do this method with brushes in Lightroom but it's clearly a lot more time effective and accurate moving an image into photoshop for the same work. Thanks for sharing!
I'll have to give this a try
Great tutorial! Thank you for sharing!
Cool. One more to go in to the memory banks :).
Staten Island Man, you little beauty! Nice video Chris, will give this a try
Excellent post.
I am looking for a course that will teach me all about color grading, etc. Can anyone reccomend me a good course please?
ooo im gonna play with this
Chris Knight rocksss! :p
I was looking around the web to properly color grade images, thank you for the clear tutorial! really appreciate