
It is no secret that a picture will rarely look the same on every media. Even from one screen to another there can be a huge difference! Blacks that might look like pure black on your laptop might be a very dark grey on your phone. Having so many media support and manufacturers makes it really hard for a photographer or a retouching to have a picture that will look great despite of it.
When talking with other photographers I realized that many didn’t know there is a very simple way to double-check an image and its details. Whether a small detail wasn’t cloned out or the dodging and burning wasn’t regular enough, this very simple trick will help you get your images cleaner than ever despite the media on which they are displayed on. No more sensor dust, spot, crossing hair, etc. or at least no more excuses for them when you will learn this simple trick.
How to Go Beyond What Your Screen Displays
It can be very easy to forget small details after spending hours retouching a single picture. I recently shot the following picture. After about one hour of retouching, I saved it then uploaded it on my Facebook page but I forgot to double-check it. A fellow photographer wrote to me telling how I forgot to clone out a detail. Can you spot it?


On my MacBook Pro Retina, I could see it. Then I checked it on my iPhone and it was shocking! I opened the PSD file and saw that I forgot to use a solar curve before saving my file. A solar curve will show you all the flaws your image still has. It is nothing really fancy or complicated, but it works like a charm!
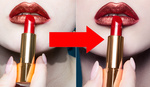
Here is another example with a beauty shot I recently retouched. First let's see the before/after of the picture with almost no retouching:


And here is the final version. See how the solar curve has smoother transition between the colors and the skin does not have any bumps or sudden change of color?


If you look closely at the solar curve version of the final edit you can even see that I could have taken the retouching even further, especially the hair.
How to Create it
In order to create a solar curve you simply need to create a new curve adjustment layer. Then add 6 points to the curve. Drag them at equal distance from each other with the first point having an output value of 255 and the second a value of 0. Do so with the four other points in order to get a wave shaped curve. Your curve should look something like this:

Once created, your picture will probably look weird.

With the solar curve I can clearly see in top right corner that I had forgotten to clone something out of the picture!

To clean I just have to create a layer below the (solar) curve layer adjustment and clone the "flaw" out with the stamp tool sampling from Current & Below. Once that is done and I am happy with my picture I just have to disable the curve and save the file.
Perfect your Dodging and Burning
I find solar curves are also a great way to check my dodging and burning. In the same picture as shown above we can see that the arms should be almost symmetrical. However, with a solar curve applied we can see that the arms aren’t dodged & burnt to the same extend. The fall off is smaller on one arm than the other. Even though the solar curve is applied, I can still work on my dodge & burn layouts as the layers are the curve layer adjustment.
A solar curve can also help to see clearly your highlights, shadows and mid-tones. When dodging and burning, it’s always best to display the pictures in black & white (learn about the how and why in Julia's guide to the dodge & burn technique) but sometimes displaying the picture with a solar curve can make it even easier. Be careful though because it’s easy to get carried away and make a portrait look really flat using this technique. Make sure you use it sparingly just to make sure you haven’t forgotten any details or that your contouring/dodging & burning is consistent.
Simplify your Life with an Action
If you are not familiar with actions, you definitely should learn about them! They can be a true time saver. A solar curve is not very long to create, however having an action that will do it for you is quite easy. I already created one that you will be able to download clicking on this link.
The action will create a curve adjustment layer and a layer to clean up things that you might see using the solar curve. When using the layer created to clean up, don’t forget not to sample from all layers with the stamp tool or the healing brush but from "current and below".
Now that you know all about solar curves you have no more excuses to forget to clone out a detail like I did. This "technique" is really easy and can save you major problems when working on different screens or having multiple final media supports. Give it a try and I am sure you will soon include it in your retouching routine. I used to use it only once in a while but since a few weeks ago I use it all the time whether it is to control my dodging and burning or checking that the skin of my model has been properly cleaned up.
Have you ever used solar curves? What are your thoughts on this technique? Do you find it useful for your work? I would love to hear your experience about it in the comments below.


Drag the slider all the way to the right edge. You will see a red curved line, probably from a reflector or softbox.
Oh, he forget to clone out the red circle... Easy mistake ;)
You were right to think so because it is! ;)
Thanks, it took a bit to figure that out. Maybe they should insert your direction directly above the photo. :-)
I thought I was the only one
There is a chain from the background system showing up in the corner (circled in red in the before/after picture). Depending on your screen you might not see it… I personally didn't see it when I published the picture on my Facebook page and a photographer told me it was clearly showing on his screen. Using a solar curve would have avoided me this problem. Also when printing the picture, it showed up clearly.
Thank you for the download!
Not the best instructional post, complete with poor reference photos
I just updated the article with a beauty shot with almost no retouching and the final edit I came up with to show how powerful a solar curve can be to see flaws in a picture.
You've got to be kidding be...here i am like crazy trying to find something with my 27" QuadHD screen...and feeling lost...(IPS Screen with color gamut superior to the one on the iMac 27")
I'll update the post tomorrow with an additional example. Though it's crazy because on my iPhone I can see the problem on the picture but not on my MacBook Pro or on my calibrated screen… It only shows up with the solar curve, which was the point of this article ;) Some problems/flaws won't show despite the quality of your screen.
Ok it is visible on the iPad and my OnePlus One aswell! ... just how..the screen is calibrated aswell,... o_O
I know, right? It didn't (and still doesn't) make sense to me either. The problem wasn't visible on a calibrated Eizo screen but showed up on an iPhone… go figure it out! Proof that tricks like a solar curve should never be left out of our retouching workflow.
True...damn i'm feeling lost now. Hhahahahaha
I don't even see it with the solar curves. No clue what you're talking about. The only thing I see in the original picture is the red cord but why do you know a solar layer to see that? :D
It appears the solar curve action doesn't load into Photoshop CS6.
I created the action using CC 2014 but it should work in CS6 as well. Try downloading Conny Wallström actions pack from the following link: https://www.dropbox.com/s/ylbto78qihozz1g/Editing%20%26%20File%20Handlin... It includes a few other actions that might also be useful ;)
I don't quite understand how to interpret the solar curve... can someone help me out? Are we just looking for anomalies in a certain area?
I have just updated with a second example, it might make more sense now ;)
Thanks, it makes more sense to me now :)
I set up my Photoshop D&B action to also create a folder called "Help" at the top of the layer list. Inside, it creates a solar curve and a high contract B&W layer effect. I turn them off/on periodically when doing FS and D&B to help find areas I can't "see" normally. That said, I don't drive myself nuts trying to take care of every little detail that these help layers turn up. I find that when I do, the retouching starts to look plastic and fake.
Great tip! I always love these tips! I usually check between my calibrated monitor and my out-of-the-box monitor to double check things, but this may be a bit easier haha and better for that matter
Double checking on different monitors is still a great thing to do as it might help with your coloring.
For example, if I have a picture that I know will only be published on my website or Facebook, I double check it on my iPhone as most people go on the web with their mobile devices nowadays.
Same if I have something I need to send to a client, most people I work with have a Macbook or iMac, so I double check on one of them.
Though, to see skin flaws, things to clone out or dodging/burning consistency, a solar curve is probably more efficient and practical ;)
Thank you so much for this tip! Recently used this to verify how clean my background was, before handing off to a client. It can be very disturbing to see what looks perfectly clean on a mac and iphone, only to see ugly banding show up on another computer.
great tip!!! I downloaded the solar curve with your link and found out that the curve is created through green, red and blue channels separately....and the curve is not completely wavy....will it influense the vision with this curve ? before I made mine just using RGB channel and it was really wavy. Just wondering how is better ? thanks!
Will this also show spots on the sensor? I know there are some leftovers, I don't want to make myself depressed about it :(