
When it comes to the quantity of lights that one needs, opinions are often heavily polarized and a hotly contested debate often rages. There are those that are staunch supporters of one light while others claim that a handful of lights are needed before anything meaningful can be done. Ultimately neither group is right as there is no definable minimum or maximum number of lights that one should use.
It’s not a crime to use six lights on a portrait, nor is it lazy to use just one. The fact of the matter is that “right” number of lights is the number of lights you need to deliver yours or your client’s vision. This vision is also heavily driven by your photographic style or look which nobody can really debate as right or wrong. My suggestion therefore is to stop getting hung up on the number and focus more on understanding why the choice is made to use one, two, three or even ten lights and the considerations you need to make when choosing that number. Before we dive in, let me just say that natural light is also a perfectly acceptable zero light solution but it's simply not the focus of this post.
Sources vs. Lights
First off, let’s constrain our discussion to the number of sources as opposed to the number of lights, given that it’s the sources that really matter. We can blast four heads into a single scrim which still produces just one source. It’s also not uncommon to use four heads to light a background with two heads on each side, thus producing only two sources (see below).

Eight strobes but only three sources
Feeling
Generally a single source can be viewed as more natural since natural light generally comes from one location such as a window. That being said, you can still retain a natural feel from multiple sources by keeping the direction of the sources similar. As you add more lights from different angles such as kickers or hair lights the image can become more polished but at the same time less organic. Neither option is wrong but it simply depends on what you’re after. Another option is to heavily diffuse the light so that you blur the line between it looking like another light source or simply bounced light.

Getting a natural look from two sources keeping the light very soft with lots of fill
Constraints
If you have a 40’ x 40’ space with 20’ ceilings to shoot in, along with an endless supply of V-flats, flags and diffusers at your disposal, then the world is your oyster and you can just move on to the next section. If however you don’t have a commercial budget and have to work within a more cozy space with limited gear, then constraints may begin to creep in. One of the first deciding factors is centered around how to expose both your subject and the background. With a single source we can vary the distribution of light by bringing the subject closer or farther from the background. Let’s imagine that we want a white background and a well exposed subject with a single source. To accomplish this, we need to bring our subject close to the background relative to the distance of the light from our subject. If we have our light close to our subject, then based on the inverse-square law the light will fall off quickly and its exposure will be drastically reduced before it reaches the background. In order to offset this, we can pull the light further out or bring the subject close to the background. This is once again driven by constraints of space and gear. If we have a large space we have a lot of room to move our light away from our subject. At the same time, if we want to keep the quality of light similar, we’ll need to increase the size of our light source, thus requiring a larger diffuser. If on the other hand we bring our subject closer to the background, then the subject will cast a shadow which we may or may not want. A third approach is simply to add more lights. We can use one or two lights to independently expose the background and leave our subject and main light in the same spot. Once again, neither of the three approaches is wrong, they’re merely a series of tradeoffs. The below lighting diagram demonstrates this.

Various options for lighting a background
The image you see below was shot while filming my fashion and beauty photography/retouching course at RGG EDU, and as demonstrated there was done by putting the model close to the background resulting in a shadow using a single light source (a small parabolic). One could argue that there is a fourth option to the above which is to shoot it with the background lit moderately well with a plan to extract the subject in post processing and brighten it after-the-fact. Once again, it’s a viable option but involves a trade-off.

Single strobe to light both the model and background, subject close to the background

Single hard light source with a flag above the model to create a shadow on the background
Another example is that of fill light. In most cases a nice soft fill can be had by moving in a white V-flat for full length looks, or a reflector for portraits. Although V-Flats are incredibly useful, they’re hardly easy to transport and require a fair bit of space. Given that the degree of fill is controlled by their distance to your subject, you’ll once again have to factor in studio constraints. Often times I’ll set up a large octa to provide fill instead of a V-flat simply because of the flexibility it gives me. I can feather the light or change its angle, and most importantly adjust the power right from my camera, allowing me to work faster. A similar situation arises when clamshell lighting your subject for a beauty shot or portrait. While you can use a simple piece of white foamcore or reflector as your fill, I almost always opt for an additional light source. Once again the reason is that I can control the exact quality and output of that light while keeping it on a stand at a comfortable distance away from my subject. Although this is my way of working, I’m hardly suggesting you do the same. What I am suggesting is that you choose one vs. the other for a reason and consider their pros and cons.

More complex beauty lighting, five lights with two on the background and three on the subject
Camera Settings
Another factor to consider are of course the camera settings. If we’re shooting with our aperture wide open, we have the opportunity to utilize mixed lighting sources. The below image is another one that I demonstrate in my photography/retouching course. With this look I had either the option of using two lights with one for our model and one for the background, or a single light on my model and using window light for the background. The main difference between them was the choice between fitting my lens with an ND filter or not. The decision is once again driven by constraints such as whether window light is available, do we have an ND filter, do our strobes go low enough in power, can we isolate our subject from the window light, etc. As I demonstrate in the tutorial, the difference in the final look is negligible but the single light option proved to be much easier to execute.

Shooting with wide open apertures allows us to mix artificial and natural light sources
Arguments for a single source
So what are some of the key reasons to use a single light? For me the most obvious one is the look it gives. For fashion work I find that a single source gives a nice raw feel to the image that slowly dissipates as I add more lights. Another reason I strive for one light for most of my portrait or full length looks is that it’s easier to manage. I don’t have to worry about the interaction between multiple sources and spend time balancing them, moving them, flagging them off, setting them up, carrying them, etc. I have more fun working with a single source because it allows me to spend more time interacting with the model and working on posing and less time messing with the lights. Remember that the more sources you have the more you have to control those sources as the chance of reflection and flare increases. Learning to make do with only one light also teaches you how to problem-solve. While the constraints I discussed above can be viewed as drawbacks, they also force you to think outside the box and come up with creative ways to get around them. While some looks can’t be achieved within those constraints, learning what can and can’t be overcome will help you plan your shoots and help you to think on your feet when shooting in unknown locations. The final advantage is simply that of cost. One light costs much less than five and my advice is to invest your money into modifiers first and number of lights second.
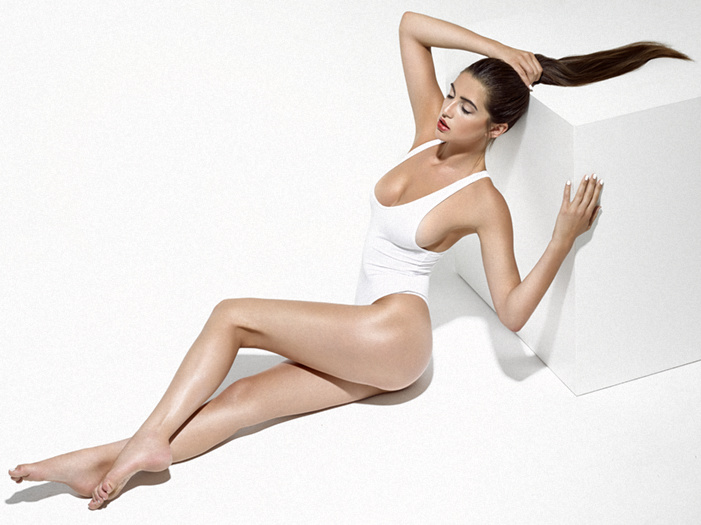
Single light fashion shot using an open reflector and 500ws strobe to light everything
Arguments for multiple sources
Despite some the benefits that single sources offer, sometimes I just bite the bullet and opt for a more is more approach. When shooting beauty I almost always use 4-5 lights because for me, beauty is about perfection. Not just perfection from the model, makeup or retouching, but also the lighting. I want a high degree of control and a polished and perfectly exposed in-camera image. This polish and control is often desirable and beneficial in a commercial shoot as you’ll generally be working with fewer constraints, higher budgets and where an excuse like “we’ll make that look good in post processing” isn’t something your client wants to hear. You’ll generally want your image to look as close to the final as possible right out of the camera so that your client can see their vision being realised with little guesswork. If adding another light or two will save you hours of retouching then doing so may well be worth it.

Three light beauty setup, one on the background, two on the subject in a clamshell configuration
Another advantage is that of creativity. Even though adding more lights steers us away from a natural look, it also allows us to experiment with some interesting looks. Adding gels, subtle kickers and controlled light shapers gives you the ability to create something a bit more unique than what is often possible with a single source.

Same setup as the above image but with an additional kicker camera left to give the cheek a highlight
How do we choose?
For me the selection process always boils down to three steps:
- What sort of light quality am I after (soft, hard, natural, etc.)?
- What do I need to light (subject, background, foreground, props, etc.)?
- What constraints am I faced with (space, gear, power output, etc.)?
With these considerations in place I begin to eliminate options and weigh the trade-offs. I’ll generally aim for the minimum number of lights that will give me the look that I want and add more when there is an apparent benefit of doing so. As you add lights be sure to check their effects by metering them or taking test shots with one light on at a time. This is important in understanding the interaction of the lights and helps you to better gauge their effect and value.
I hope that by this point you’ll agree that there is no right or wrong answer in the light source debate. I always aim to take the path of least resistance, whether that’s one light or five, and never do so for vanity or bragging rights, but rather for ease and effect. You have to be a strong photographer to use one light properly and you have to be a strong photographer to use five. Neither requires more skill or vision than the other and neither will produce a better or worse result. The results may be similar or different, but all that matters is whether it’s the result that you or your client wanted. Remember that your viewer won’t care how you shot it or what you shot it with. Rather than argue over the "right" number of sources, let's just focus on taking great photos with however many you want to use.
You can follow me via the social media links below


Great article Michael. As always.
Thanks a lot Tony. Glad you liked it buddy.
Just read it again. Wish I could write like that. Guess I'll just stick to video. ;-)
Very useful article @Michael. Thanks
Thanks very much Duke, cheers
Nice article thanks Michael! The next one on light positioning (one or multi light setup)? ;-)
well done michael. thank you for doing this :)
Love it, nice read and good descriptions. I always enjoy reading articles on this topic.
A very well illustrated and helpful guide - thanks so much for your appreciated expertise and efforts.
Very cool article Michael (again). Great advices on planning my shoots! Thanks
Great article.... agree with whole thing.
I have found personally, the amount of lights required (as stated) is more or less what needs fill your vision. That said. These high key lighting situations were a PITA for me to setup and tear down. Scrims and blocker boards, paper hanging etc..
I've done away with a large portion of this hassle with a LastoLite HighLite 6 X 7 unit. Unpack, 1 light or 2. Roll out the train, I'm good in about 10 minutes. It's packs as easily. So in situations where 6 or 8 light were used before. I now look at 3 or 4 to get the same results.
This isn't even taking account all the other uses it has like being a 6 X 7 soft box. Or, changing the color with a gel, hanging a neutral gray over it for composites.. One of the very best pieces of kit I own and use weekly.
Awesome article! Thanks Michael!
Great write up!!
Much appreciated Chris. Glad you liked it.
Nice article! Thanks Michael! :)
Much appreciated Florencio
Brilliant article my friend!
Thanks a lot Clay, cheers buddy
Great article Michael, informative and helpful. Cheers!
Thank you for reading Niall
This one of the more solid articles I've read on FStoppers recently. I like how it focuses on the "why" and not so much on the "how." Don't get me wrong; I love tutorials, but sometimes it's nice to get some perspective on why we're shooting the way we do as opposed to learning how to execute.
Glad you liked it Jason, thank you
very nice, I've been messing around with multiple light sets so this is helpful
Glad you found it helpful Simon
very well written - I especially like how you were quite objective and informative while still sharing preferences and practical considerations as well (we all don't have 20 ft ceilings etc.)
Thank you for reading Mike
Thanks for this great article....very useful
Thanks a lot Alejandro, cheers
Michael - What to thank you for all what you bring to us through the tutorials - Much appreciated !
I love this type of article !
This is one of the BEST articles I've ever read here. A fantastic read.
Excellent article. Great information and well balanced on your approach, pros and cons of the options.