So it goes without saying that there are a ton of different ways to match skin tones across your subject or between images in Photoshop so it's often just a matter of picking the option that is most convenient or intuitive. Despite the wide array of choices, I seldom see people use the selective color adjustment layer for this task. The beauty of selective color is that it allows us to go off the numbers rather than intuition and achieve an accurate result in little time.
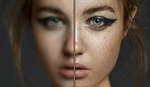
In this video, we'll be using one of the images I shot while filming my Fashion and Beauty Photography/Retouching course and our aim will be to match up the lower part of the models body with the tones in her face. The result of our selective color adjustment can be seen below:

Before and After the Selective Color Adjustment
The key to the selective color adjustment layer is to analyze the distribution of CMYK colors at your source and match it at the destination as I demonstrate in the video above. It requires a bit of basic math and ratios, but don't worry, it's nothing too scary. If you've never used the selective color adjustment layer, I highly recommend exploring it a bit as it can be both a powerful correction and color grading tool that allows you to target any of the below by selecting the appropriate color.

Commonly Used Selective Color Adjustment Layer Colors
For landscapes or environmental portraits, the other color options (Blue, Green, Cyan, etc.) can also be useful for targeting areas like sky, grass, etc. In the video we'll be focusing on either the red or yellow color since skin tones generally fall into those two colors or somewhere in between them. When I train people, they are often confused about which way to move the respective sliders so it's important to remember that if you subtract either Cyan, Magenta or Yellow, you're adding their opposite color. The easiest way to remember those opposite colors is to think RGB vs. CMYK. When we remove Cyan we add Red, if we remove Magenta we add Green and if we reduce Yellow we're increasing the amount of Blue. The Black slider can be thought of as the brightness of that color although I don't recommend making drastic changes there. Keep your adjustments within the -10 to +10 range on the black slider to avoid washing your colors out. If you want to adjust the overall brightness of a certain color, you can use a Black & White adjustment layer, change the blend mode to Luminosity and adjust each color slider accordingly.
Note that if you are trying to match colors from one image to the next, this will only work if the overal lighting is similar across them. You can't match colors properly if the lighting or exposure or even model's skin type are drastically different. I typically use this approach across multiple images when working on an editorial series where the lighting and model have stayed consistent.
For additional color matching techniques, you can use my SACA method/action described here, and also check out my photography/retouching course where I cover color correction and understanding light and color differences in depth.
You can also connect with me via the social media links below


great way to match skin, never though of that. what about photographing other skin tones, would it always be reds? (i'd assume not but curious as the most appropriate channels for different skin tones)
Thank you mate. Will probably save me a lot of time, since ive been doing it by matching light intensity first, then hue, then saturation of those troubled areas. There is another simple way of going about it, but does not produce that spectaculary close results, based on hue and saturation layer.
What i wanted to ask you guys, if you could show some similar way of keeping the colours consistent through the bulk of images. Is there an easy fix to move the adjustments from 1 image to another and just edit the mask?
Just a by the way: For anyone looking for a GREAT fashion photography tutorial that not only covers the photography and retouching side, but things like what agencies are looking for in test shots, the RGGedu one by Michael is by far the best I've seen and I've been subscribed to Kelby and have seen almost every one of Phlearns. It's super thorough.
Really great tip! Going to try this out!
This is great !
Great tutorial for white skin. What about the rest of us?
did you watch this video?
Did you see Cody Ash's comment above? Yes, I watched the video. Why do you think I didn't watch the video?
I think you could easily improvise after watching that video, the image was just an example. you could apply the process for any skin tone.
This really crosses out those tutorials that say "use your eyes to gauge" also stops you from worrying about it matching on other screens. Thanks.