
You use Lightroom to process batches of images because you know how important efficiency is. But if you're not fully utilizing Lightroom's available rating (and sorting) options, you're not running as tight a ship as you could.
We are often burdened and overwhelmed by the massive numbers of images that require sorting and editing — even from a single day of shooting. To make matters worse, clients can demand fast turnaround, leaving us up at all hours of the morning and night, scrambling to create deliverables in a timely manner.
But the challenge of a "dump" of hundreds or thousands of images onto your hard drive can be manageable. With its efficient rating system, Lightroom's ability to rate and sort in bulk becomes your secret weapon in the battle against over-long edit queues.
First, this article will share the three main rating features within Lightroom (star, flags, and color flags), then I'll make suggestions on how to utilize these to maximize your efficiency. You should finish this article with a deeper understanding of the rating functions, and perhaps have a new approach to rating. Don't be overwhelmed by the three rating systems. You might find efficiency with just a single one.

Photo by Avi Richards on Unsplash
Before last year, I was using a simple "green flag" rating system, attributing a green color flag to each "keeper" image as I edited. I had no idea how inefficient my editing technique was until I was nudged by a colleague to implement a stronger system. Once I did so, I was thrilled with how much faster my workflow became. And I know clients were happier too. In order to divulge everything to you, let's first delve into the basics of Lightroom's three rating functions, starting with star ratings. After that I'll explain just how the systems can be implemented.
Star Ratings
Star ratings are arguably the most versatile of the rating functions available in Lightroom, but depending on how you use them they can also be the most time-consuming. Star ratings allow users to apply a 1-to-5-star label on an image, reflecting its perceived importance. This is especially useful for projects in which you want to assign different hierarchies of importance or quality to a batch of images.
For example: You've taken a set of images for a wedding client. You begin by culling the batch of images, selecting any photos decent enough to be potential "keepers" with a simple 2-star rating. You can scan through the batch with your arrow keys by pressing the "2" button on your keyboard for each selected image. You have the option simply ignore rejected images in this process, and you can flag reject images with the X button. More on flags later.

Rating set to 2 stars via the 2 button on keyboard
Now that you've thinned your batch a bit, select the 2 star button in the filter module (above image image filmstrip). You are now viewing your 2-starred selections. If more rating is needed, you can go through these 2-star images and create another layer of hierarchy by selecting the best-of-best with 3-star ratings, and so on. Here's a situation in which you might have multiple layers of star labels:
- 2 Stars to begin, creating a baseline of usable images for your own collection
- 3 Stars for the selections you will send your client
- 4 Stars for images you'd like to share on social media
- 5 Stars for the images you're adding to your portfolio
That's just one example of how the star rating system can be used, and the process can be simplified or customized.
You can adapt this rating system for your particular needs. Perhaps you're narrowing your batch to select the best-of-best-of-best, and the 2-5 star system is your way of analyzing your images until you reach your "top picks" that lead you to your end goal of just 5-star photos. Although going over the batches multiple times and narrowing to a higher star rating might seem time-consuming, since you narrow your selection, the process gets shorter each time.
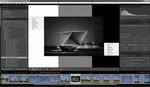
Any time you want, you can revert to a star rating setting in the filter module and see those images as rates lower or higher. Selecting 2 stars on the filter will show each image at 2 and above (etc).

Sorting by 2 Stars and Higher. This is done by highlighting the "2 Star" symbol in the toolbar.
Flags
Flags are a useful, simple option to rate images as you make selections. Flagged, unflagged, and rejected are the three settings that can be applied here. The key shortcuts for flagging images are: P for pick flag, U for unflag (which simply removes the "flagged" status), and X to reject.
One nice feature of the flag system is simplicity: either you keep the image or trash it. Rating by stars requires more immediate decisiveness; assigning flags is a lower-pressure alternative. Once you've set your flags, you can view images by flag status with the filter panel, just as with star filtering.
If you have a batch of images and only a handful of them won't make the cut, you can use the Reject flag to cull those images from your batch. This will gray the rejects out, making it easy to skip over them while you edit.

Image flagged as "pick." This can be done by pressing P, or selecting the flag in your toolbar.
Color Flags
Color flags offer a more customized approach to rating, since any flag color could represent any status you select. For example, you might mark images meant for social media with "green" flags, and use "blue" flags for images you plan to keep in your personal archives. The possibilities are endless.
To quickly flag an image by color, use the numerical values on your keyboard in Develop or Library mode. The color flag keyboard shortcuts are 6, 7, 8, and 9 for red, yellow, green and blue, respectively. Once you've set images to a color flag, you can view flagged images by color, by selecting appropriate color filter buttons next to the star filters.

Label set to Green. This is be done by simply pressing the 8 button.
Which Should You Use?
Your choice of filters (stars, flags, or color flags) should be determined by your needs. Some or all of your jobs might only require a once-over with a flag, 5-star, or "green" label (green being “best of," for example). You might have multiple uses for images, and even find that some combination of rating types works best.

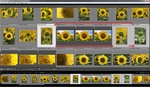
Sort by a combination of ratings -- in this case, 2 Stars and Higher, Labeled Green.
For instance, after setting your 2, 3, and 4 stars to narrow down top tier images, you could go through once more and color flag the ones you're posting to your portfolio as "green". Since multiple rating systems can be applied to a single image, you can efficiently flag an image, label it as 5 stars, and slap a green label on it. It's up to you to decide how simple or complex your ratings should be.
Workflow: Rate First, Then Edit
I mentioned earlier in this article that I used to rate images as I edited. That is to say, each image in the batch queue was rated one at a time, then edited one at a time. This is inefficient for obvious reasons, but I had convinced myself that only needing to go through the batch one total time was saving me time. The truth is that Lightroom's main function and use is batch editing, so rating and editing one-by-one doesn't make much sense. You'll find that if you can quickly go through your batches and rate (those keyboard shortcuts will speed this process up), applying a batch edit to your rated images, then going in for fine adjustments on singular images will save you much time. Don't be afraid to go through a batch more than once; despite what you may think, it can end up saving you a lot of time!
Other Tips
- While keyboard shortcuts are the fastest way to apply image ratings in Lightroom, you can also set ratings by right-clicking (control+click on Mac) the image and using the pulldown menu.
- Setting the "reject" flag to an image doesn't remove it from your Lightroom library, it simply applies the "rejected" label to the photo. To actually remove an image from your Library, press Delete or right-click + Remove Photo in the pulldown menu.
- You can set rating attributes in any view module (Loupe, Survey, or Grid View) as well as in both Library and Develop mode.
- Use Collections along with ratings for maximum organization within Lightroom. Collections within collection folders provides extra organization within groups of shoots (multiple sessions for one client, genre, etc.)
Conclusion
If you aren't utilizing rating systems with Lightroom yet, I hope I've convinced you that it's a worthwhile practice for your editing workflow. Even if you're using a simple single-rating system, I urge you to expand it (as I did) to better organize and rate, if not improve your entire selection process. If you have any extra tips on rating images in Lightroom, please leave them in the comments section below.
Lead image by Brad Neathery on Unsplash.


If you keep the "caps lock" key on, when you rate (0,1,2,3..) or flag a photo, Lightroom will automatically move to the next image (no need to use the right arrow key). This results in a single keypress to rate each photo, making the process as fast as possible.
Did not know about the caps lock solution. I've just kept Auto Advance activated (Menubar -> Photo -> Auto Advance).
Thank you both for adding these tips!
I just got through culling 20k images from a motorsport event so this is fresh on my mind.
One of the limitations of Lightroom's built in flag system is that it doesn't seem to be standard metadata so it doesn't get exported or imported. This is fine if you only work in LR but if you import from Photo Mechanic or export to (or share via XML files) with another RAW processor like Capture One Pro the flags are lost. Because of this limitation I switched to red-yellow-green and rating. Especially because they can all be accessed on the numpad while the flags (U, X, and P) are spread out across the keyboard. They also carry one more level of specification (unflagged + 3 colors vs unflagged + 2 flags) which is useful.
So I use Caps Lock and one hand on the numpad to scroll through. Junk images immediately get a red flag (6), keepers get a star rating. I leave my filter on to hide my junk images so I can kind of narrow down a group of images. This gets me down to about 10%. Then within the rated images (often sorted decreasing by rating) I flag yellow for 'candidates for editing' (7). That gets me down to about 1% of my images. Then about half of those get an edit I like and I flag them green (8) as ready for export. I can go through about 2-3k motorsport images per hour like that.
Thank you for sharing your workflow, you've obviously found an efficient system for bulk rating and I might try yours out myself.
I agree, it's a shame that LR doesn't affect metadata, but I guess that's the whole deal with catalogs and .xmp files. It's sort of like Apple, where they want you to stay exclusively on their platform once you're in.
Thanks, it's still a work in progress but it seems to be pretty efficient.
Also within Catalog settings you can set LR to automatically write all metadata changes to the xmp files if you prefer that. Then it's kind of a live backup of your tagging. And LR will write almost everything to those files, there are just a few internal features that don't seem to be universal like their flagging system.
Do those metadata changes carry over to other non-Adobe software?
I think it depends on the software but I know for Capture One it does, you can read metadata from the XML files into the Capture One catalog and vice versa.That XML format seems to be standardized. When I was playing with switching I was jumping back and forth like that, I had a catalog for each referencing the same raw files and I was keeping the metadata synced by writing to the XML files. They store their working metadata in their respective catalog files but you can import and export from the XML files.
I'm just beginning my transition to lightroom, this is extremely useful! Thanks for sharing.
I drag photos from card to folder.
Then open Photo Mechanic. Use cursor keys, Key 5 for 5 star rating for selection. (need to set up PM to do that)
Open LR, import folder, star rating comes over from PM.
Then I use colour tags to group shots, Blue is the top keeper, other colours for groups within a shoot.
Then I run through again to relegate images to 4 star, leaving final selection at 5 star.
Once final approval is given by client.
Select all unrated images and bin them.
Great system, sounds efficient. Thank you for sharing it!
0 - unrated
1 - garbage but I saw it
2 - keep (might be part of a panorama, location sign etc)
3 - worth showing someone
4 - Best images from this event
5 - Portfolio/standout image
red- bad, delete, dont show etc
yellow- maybe
green - share/best
blue- part of a set, needs special processing, panorama
purple- nsfw
Using this system I go through photos either in LR or PM and choose either 1 or 2 stars (pass/fail) and I can verify I saw everything because nothing will be zero stars.
Next I will promote all of the images by 1 star that are good until I hit 4 stars. I usually edit 3+ star images only. If there are many good images that are similar I will tag the best ones green and the others yellow and red.
This sounds like a bit of work, and it is, but it makes it easy to find the good stuff quickly. I also have an auto export to google photos with a rule for 3+ stars, green. So only the best photos make it to a shared album.
"This sounds like a bit of work, and it is, but it makes it easy to find the good stuff quickly."
Absolutely, despite how tedious it sounds it will always save time.
"I also have an auto export to google photos with a rule for 3+ stars, green."
Is this done within LR settings panel, or Google Drive?
I use this plugin to export to google. http://regex.info/blog/lightroom-goodies/google-drive
That's nearly as I use it. In addition I use the color rating for the folders in a slightly different way. Also to see which ones I didn't touch so far or which ones in progress and so on.
And then I wonder after how long LR is on the market that someone found out how LR works... If you don't use the DAM there's no need of LR.
"Stop Wasting Time and Start Using Something Other Than Lightroom"
Ouch! If you'd like to make your case for some other software, please do so. I'm interested to hear.
It was mostly a "slow Lightroom" joke (I guess 2 people didn't get the joke or didn't appreciate it.) As far as culling goes, I actually do find Photo Mechanic to be FAR faster. That being said, Lightroom has improved a lot and isn't nearly as slow as it once was so for the average person, it's probably fine. I still wouldn't recommend it for anyone doing high volume work, though (at least not for culling and starring).
I fully agree. This is such a waste of time every single shoot. Culling without first building 1:1 previews is the biggest pain in my @ss... Building 1000 1:1 previews takes forever, even with quite a top of a line CPU and lots of RAM. 10,000 previews? I launch the process before going to bed to avoid wasting my time (it uses so much resources that I can't do anything else in the meantime).
I'm in the process of learning Capture One, but the learning curve is steep and I don't have so much time (and pretty scared about what to do with all my past work / LR catalogs...)
I guess you don't use LR? Otherwise you'll know (you hopefully know your tools) that it has changed some versions before (and you can configure it to your taste). And 1:1 was never needed for culling. You could have generate lighter ratios.
I just wrote that I'm using LR. If you know of a way to pixel peep without building 1:1 previews, and without having to wait 3-5 seconds for a picture to render, I'm truly all ears.
Rayann, I have experienced 3-5 second preview/thumbnail load times in Lightroom but it is often remedied by a simple computer restart. May I ask how large the files you're previewing are?
Restarting LR/computer never changes anything. Using a fresh, empty catalog doesn't speed things up. And I'm not even talking about big files, just the 20 megapixels of the 1DX2.
The reason I need 1:1 previews is to decide which files I delete. When I shoot wildlife, there are inevitably several images that are to be thrown away, and as cheap as storage is, I don't feel the need to keep GB's of useless images. And the only way to spot these images is through 1:1 previews...
Btw, I do have a decent system with an i7-8700K and 16GB RAM. Now that RAM's so cheap I'll double that but not sure it'll do any good.
"Stop wasting your time and start using Photo Mechanic rating system". This simple change in workflow saved me a lot of time.
Agreed. Especially when a Client wants to review the images and make a selection.
I think we are talking about different things. Tethering is beneficial is you and your Client want to see outcome while shooting is in progress. I was talking about reviewing all images once shooting is done. Sorry, I don't have time for further discussions.
By the same school of thought. Stop using Lr to grade and cull images period.
It's slow, ham-handed, and I don't want every image in some vague "catalog" sitting on 9 places on the globe.
Photo Mechanic is the fastest rendering/culling tool out there. I allows for total ingesting - culling - applying more EXIF to images YOU have selected. There is nothing left behind to deal with. You export to your editor (insert whatever here) and you're done.
I also supports the colour and star ratings that can be read by most...if not all other image software on the backside.
But then you're limited to culling then editing in order. If I'm trying to get images turned around or posted quickly then if I'm culling in LR I can quickly bust out an edit for social media if I happen to stumble upon an image I like a lot. Or sometimes there's an image that I might want to keep if I can make some tweak or crop and it's nice to be able to jump over to the develop settings and play with it before deciding. I also found the previews Photo Mechanic use (that allow it to be so fast) sometimes feel too low resolution to determine I really nailed focus/panning on a shot. In LR I can quickly build a standard or even 1:1 size preview to pixel peep.
I agree Lightroom is a lot slower than Photo Mechanic but there are upsides to culling directly in LR as well. As far as your complaints about catalogs, I dunno exactly what that issue is but managing your catalogs is just part of utilizing LR well.
But that's the issue when you pixel peep like I also do. When shooting wildlife, only super sharp shots make my final selection, so I need 1:1 previews to be able to judge and reject all the images that don't fulfil this condition. This 1:1 previews building is so painfully slow. If Adobe finally improved this, I would have so much less to complain about LR.
I wonder if there's a way to preview images at a lower resolution in LR, similar to Adobe Premiere's preview settings?
Rayann, do you know of a faster solution? Because rendering and displaying 24-42 million pixels is always going to be a intense task. There's not really any way to reduce the amount of data you're pushing around. Photo Mechanic is faster than LR but at the tradeoff of lower resolution previews. You see the trend there. I doubt you'll find software that's significantly faster at 1:1 preview generation and viewing.
I only have 20 megapixels files. And stupid me assumed that a decent system with an i7-8700K and 16GB RAM would actually allow to go through that amount of data that you mention ;)
One of the features I like the most is ctrl+backspace, it opens a dialog for remove or delete imgs flagged as rejected.
I rate all the potential keepers 3 stars, then I go through the 3 stars pictures downgrade some to 2 stars upgrade some to 4 stars, then I go through the 4 stars and do it again. I tend to think that the less pictures you have to choose from the easiest it is, narrowing it down this way helps. Also I like to give a little bit of time every time I go through to preserve the "freshness" of my eyes, I found out that it is better looking at the pictures 4 times 15min than 1 time 60 min.
I agree on taking a little break, and I practice that a lot. I also like to review images at 25% or even on my mobile as a way to get a better feel for the composition. Often I'll notice things at a distance that I never saw while viewing on the large desktop screen.
I foresee an upcoming article on this!
One of the nice things about Lightroom is how configurable it is. Different people can use its features in different ways. A lot of the people here seem to think that every photographer is a portrait photographer with clients and 1,000's of images for each shoot, and that's just not the case.
For example, I set up multiple Smart collections that display all of my 4-star images, and then one for each year. I also set some up for Wildlife, Landscapes, etc. One click and I can see all of my best stuff for that keyword.
I also use it to determine portfolio images with a smart collection filter like "4 stars or better and has a keyword "[Portfolio]". I have Lightroom setup to not export my keywords with the brackets in them.
I use the label colors to indicate pano and HDR source images, along with them being in a stack.
I have virtual copies of images for each crop ratio for prints. It makes it easy to find, organize, and maintain. Being a software developer, I'm an expert in the windows file system, I live in my file system every day, I have a 30-inch monitor dedicated to nothing but a file manager (Directory Opus). But I still prefer Lightroom for my images.
Not everyone shoots 20,000 images at a time. I rarely shoot more than 200 at a time. I do 90% of my editing in Lightroom, but everything starts in Lightroom.
There's also the fact that many people work differently. A portrait photographer shoots for a client, edits those images, might put some in their portfolio, and then they're done with them. A wildlife/landscape photographer might come back to those images multiple times, either to produce new prints, calendars, new sizes, etc. A writer may look through them to find example images for an article.
Stop thinking that *your* workflow and needs are the same for everyone else, everyone is different.
The comment section here is proof that Lightroom is versatile and configurable.
Curious, do you add keywords after importing, after editing, or just when going through catalogs? I haven't gotten into the keywording habit at all yet, but I would like to.
LR needs a tuneable module that can perform the basic culling automatically. Better yet, one rating or culling application just for importing. With a great interface and well written software.
You could dial down the parameters on the most important imports and the lesser ones bring up the reject criteria or whatever criteria sliders you choose. Heck if Google photos can search for "dark" or "red hair", it is a small leap to culling software.
If Adobe could create an algorithm that detects images with no focus area (blurred rejects) that in itself would cut down a good portion of bulk edit time. Although we all strive to never blurry images, sometimes autofocus fails or we are rushing and don't nail the shutter speed right away. I'd love to see advanced features like this.
Also (at least on the D850) you can rate images in camera 1 to 5 stars. So a client can pick their favorite pose (for example) on the back of the camera. If you dont overwrite the metadata on import into lightroom the in camera rating shows up in lightroom as rating stars.
If you are truly interested in speed you would use Photo Mechanic. It’s light-speed compared LR. This is like telling us how to run our fastest in water.😏
My personal system goes a bit further than that.
Flags for Metadata status (keywords, location, etc.), with rejected as the general „don’t bother with the rest“ status, approved as „done“
Star ratings for quality with 2 stars as „yep, it’s a picture“, 1 star as „so close“, and 3 stars and above for the keepers.
Color labels are for edit workflow: red for „to do“, yellow for „work in progress“, green for „Done, general use“, blue for „Done, only this session“ and purple for „want to revisit another time“.
I‘ve set up a bunch of smart collections so that freshly infested images flow through all the stages of post processing, and publish smart collections automatically pick up properly rated and flagged images.
Works for me, so of course it won’t work for others.
One more tip (apologizes if it was mentioned somewhere and I missed it), if you prefer the "keep or don't keep" route vs. individual ratings, go to "Library > Enable Filters", then "Library > Filter by flag > Flagged and Unflagged Photos" before rejecting anything. That way when you hit the "X" key not only is the image rejected, but it becomes hidden from view. This helps keep clutter down as you're culling without deleting the images outright. I find that getting things off the screen altogether makes concentrating on the keepers a little easier, rather than still having everything on screen with a bunch of different labels.
Excellent article.
I have been using the flagging system for my workflow past few years, but something to automate it would be great.
Is there a way/tool/plugin to input a list of specific filenames, and it flags them all in one go, instead of us manually navigating through them all and flagging?
Use case is that the client sends us a bunch of file names that they want processed. I would like those pics to be flagged, so i can filter them and work on them...