
A question asked very often by photographers is "How do I fix red or mismatched skin tones in Photoshop?" As with everything in retouching there's hundreds of ways to achieve the same thing. So the question you're left with is, which is the most efficient method that has the best results. Here's the top three methods known to mankind, pick the one right for you!
Method 1
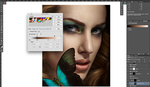
This is by far the quickest method to take away any red color in the skin. I use this for red noses, and fingers. It can sometimes gives the unsaturated look though so be careful.
Method 2
I find this to be the most accurate but a little more time consuming. I use this when hands are whitish and lighter then the face. Level has the ability to not only change color but also make something lighter or darker.
Method 3
I've used this method on all different areas of the skin but I find it to work best for the bags under the eyes. The advantage of this over method 2 is it's fail proof since you are sampling skin. By sampling skin there's no guessing games involved.
Which is your favorite method? Feel free to share other methods in the comments!


I use Method 1 a lot as a quick fix -- but with one difference. In the Hue panel, I click that little hand, which is a color picker. I can then click on the nose (in your example), and simply drag up/down to adjust saturation (or left/right to adjust hue).
This way I don't have to guess if the face is too red or too magenta. I've been surprised sometimes to do this click/drag and see the magenta colors adjust instead of red, but saw exactly the effect on the image that I wanted, so musta been. :)
Also, in many cases I am just doing a quick fix of a photo of friends at a party or whatnot. In that case, I do this fix in LightRoom, since the photo is not "important enough" to make the trip to PS. There it is the same basic trick, albeit in the Develop module in the HSL panel.
I appreciate these tutorials and welcome more, like the comment from Burt, because excess red and magenta in skin seems to be a continual problem with Canon 5D3 bodies. Kind of a drag to deal with.
I've heard it called, "Canon Color."
I have tried 4th method today and absolutely loved it. And it goes a little something like this.... https://fstoppers.com/education/gradient-map-perfect-skin-color-61864
Some of the best, easiest to understand tutorials I have watched. Thank you!
Great tips thanks!