Yesterday, I showed you the process of pre-producing a successful photoshoot and used a recent session as an example on all the steps it takes to put together a successful session with a large team. Today, I put together a breakdown of the entire production and post production process on creating a successful portrait session and a behind the scenes look into what all goes into it.
Ever since moving to Albuquerque, I've always been in love with the vastness of it. The city itself is pretty populated, but once you leave the city, there is absolutely nothing but road for miles and miles. For whatever reason, this feeling of emptiness has always inspired me, and I've always wanted to use it in one of my shoots but hadn't had a lot of chances to.
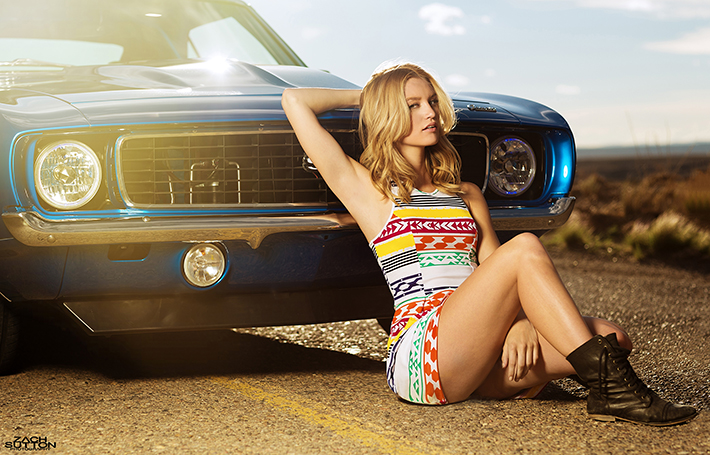
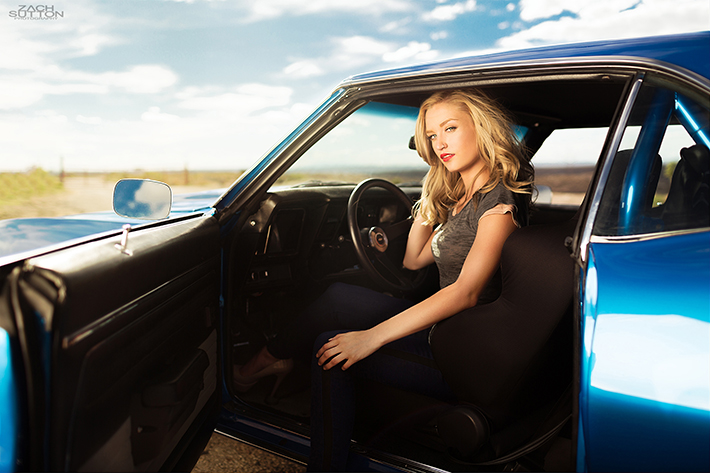
The concept of the car and girl is pretty simple, but I've had it in my mind for a while now. I wanted the photos with an environmental aspect to them, showing the emptiness surrounding the scene. We found a great place to highlight that, got the car and everything else under control in the pre-production, and sought out to create some awesome photos.
Production
Equipment Layout
I shot the majority of the photo shoot with the Canon 35mm f/1.4L and a Canon 5d Mark III. I chose this lens because I really love the focal length, especially when trying to create expansive environmental photos, without having too much barrel distortion on your subject. Pair that with an ND filter and the ability to shoot at f/1.4 with strobes, and you've got a killer combo. All the equipment used on this session was --
| Canon 5d Mark III | 2x Einstein Studio Strobes |
| Canon 35mm f/1.4L | 2x Manfrotto 13' Lightstands |
| Canon 85mm f/1.2L II | CyberSync Flash Triggering System |
| Canon 17-40mm f/4L | Paul C Buff 47" OctoBank |
| Canon 135mm f/2L | Paul C Buff 21" White Beauty Dish (Old Model) |
| Fader ND II 9 Stop ND Filter 77mm | Vagabond Mini Battery Pack |
Lighting & Other Equipment Techniques
I'm a strobist, and use artificial lighting for nearly all of my work. However, if you want to be able to overpower the sun, you're still limited to your sync speed of 1/200 of a second (1/250 on many crop bodies), meaning you'll end up bumping your aperture to f/16 and lose all shallow depth of field in your photos. I don' t want that, so I often use an ND filter for my sessions. This allows me to limit the amount of light entering the lens to the sensor, allowing me to stop down my aperture and get a shallow depth of field while still using strobes during daylight.
Aside from that, I also shot many of the photos using a large 47" octabox to get great coverage of both the model, and the car. However, when working with a very reflective object, such as a car, you can run into some problems with glare. I wanted the car to show contrast, without being too distracting. So what I often did was remove the white front element to the 47" Octabox. This narrowed the beam of light coming from it, and was able to mimic a soft glow you'd get from a partly cloudy day. This made the light much more controllable, and allowed me to focus the light on her, with a nice feathering effect onto the car.
Lighting Diagrams
Image 1

Image 2

Image 3

Image 4

Post Production
Retouching
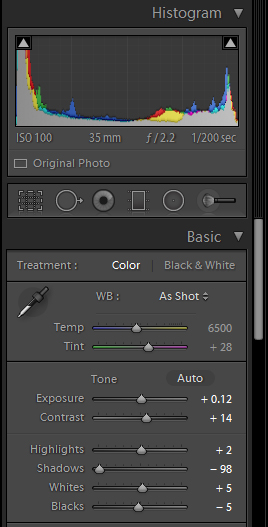
My process for retouching is done predominantly in Adobe Photoshop with light exposure corrections done in Lightroom. I first import the entire set into Lightroom, cull through the images that I like, then do minor adjustments to get a nice black point and white point before importing them all to Photoshop. For all of my photos, I work to have a true black and a true white before I even start editing (Often these spots are very small, but I find it brings the best contrast and colors). I also will adjust exposure, apply lens corrections if needed, fix horizons and remove any Chromatic Aberration if needed. However, with that said, the majority of my editing in Lightroom is done in the Basic dialog located on the top of Develop Mode. The toning done to the images was done using mostly Alien Skin Exposure 5. I first warmed up the photos a bit using the Kodak Kodachrome 25 preset built into the software, and then added a Sun Flare effect on many of the images to help lower the contrast among the objects in the background, pushing the attention to the subject. I then went through and added a cooling filter on the model, only to regain some skin tones so she doesn't appear TOO warm. From there, I did all of my skin retouching using the Frequency Separation technique, and did some burning and dodging to add contours to the models face and limbs, as well as details on the car.
Before & Afters


Final Images


Conclusion
So that is a quick look into what goes into my process for creating a successful shoot, certainly I encourage you to go through and find your own techniques to help get everything accomplished. None of this could have been a success with an active team all working together to accomplish everything that was involved in putting together such a big production shoot in such a short amount of time. None of this photoshoot could have been accomplished without my amazing team. Special Thanks to Jesse Heidenfeld and Allen Hrynick from H/H Productions for the video work, Flytcam for the aerial footage, Solve Maxwell & Toad Road for styling, Kata Baron of The Pretty Committee for MakeUp, Dani Ann for Hair, Marie Paoli for being my lovely muse, and Curtis Jingle for the use of his beautiful 1969 Chevy Camaro. All images in this session are copyright to Zach Sutton of Zach Sutton Photography. If you haven't read the pre-production on how this photoshoot came alive, I suggest you do.


"...you’ll end up bumping your aperture to f/16 and lose all depth of field in your photos."
But f/16 will GIVE you more depth of field, not make you lose it. Surely you meant to put the word "shallow" before the word "depth".
"...allowing me to stop down my aperture and get a shallow depth of field"
"Stopping down" your aperture would be going from f/2.8 to f/16 thus giving your more depth of field, not not giving you more "shallow depth of field" as your post says.
But yeah, Great photos man. And nice breakdown and BTS look.
Thanks for sharing!
Joey Joiner
Fixed...but I think you knew what I meant ;-)
Wow Zach, sick post!
Great post Zack!
Nice JOB - but I LIKE drone video fly ^.^Y
Thanks! Checkout Flytcam's facebook page if you're interested to learn more about the drones :-)
Very nice, fun to watch. No lens shade. Must have been purposeful...
Zach! Dude, great job and great work! What a complete top to bottom coverage of your shoot you have provided here. Such value and thank you SO much for going the extra steps and showing before/after of the post processing, also including the .PSD file for download. Awesome. So thankful that you've produced this. It's definately an article I'll be coming back to as a reference in the future.
Cerul, vad, era senin,
Pula locuia-n vagin
Cocoselul lung si tare
Locuia între picioare.
Excellent post Zach!!!!
Zach, thanks for a brilliant write up on your thought process. Definitely very helpful. Looking forward to more of your articles.
Thanks O-Nev. I've been writing for Fstoppers for a while, be sure to check up on some of my other stuff :-)
always wear your seatbelts!
nice job with everything else, by the way!
So cool, excellent resource for someone like me who is just learning about studio strobes and lighting in general, thanks for the great writeup - posts like these are the reason I visit FS on daily basis!
Great and detailed post... and what a car!
Oh I know. I fell in love that day...and it wasn't with any of the pretty girls on set with me. It was with that Camaro...
Awesome post. One question, in the first before/after it shows that you zoomed-out in post, was the original a different image or was that added by photo-manipulation?
No, I actually had to rebuild her boot and whatnot from other images...that is why the after looks like its a little zoomed out.
It was a total pain :-)
WOW. I can imagine!
Good post, Zach, and really beautiful images :)
I'm curious - Having 7 stops of ND and shooting at 1.4 - how sharp were your images?
I'm curious to see how those things impacted sharpness, and I'm also curious to know what filter(s) you used?
Thanks!
I don't ever really lose any sharpness with it. But the one I have is far nicer than a lot of them out there.
Nice photos, my problem with the shoot is the idea of that girl driving that car.
This is a great post and sets an example of the type of stuff I want to come to Fstoppers for. Anyone can make a great image but it takes a talent beyond that to be able to elaborate on, share, and explain the process. Very well done!!
We should also require something around this kind of depth for the picture of the day. There are so many people willing to submit their finished product but we should really be taking the ones who come up with a tutorial on how they got there...we'll all learn something then.
Fantastic article- thank you so much for the technique and diagrams! This is such a super helpful read- if only more articles were as good as this! Quick note- as an owner of a 5d3 that was less than an hour from dropping onto cement because the screw of the Black Rapid strap nut unscrewed itself, i hope you have it screwed in with Loctite and/or have a secondary safety strap set up like i both do. :)
This article shows that to achieve great photos you need 1 professional light source, and in some photos you need a second light source - you can master most scenes like this with 2 lights. <a href="http://www.lawsonphoto.us/tips-to-improve-pictures/" rel="nofollow">More Photography Tips</a>
In some cases like the above photos yes- key and fill. But for other photos, you can truly elevate the photo to another level by including a kicker or rim light. I usually use 2 as rim but if i'm on location somewhere in a busy setting and i need to work fairly fast, 2 works great and if you have good light around you to begin with, one is great, especially the beauty dish the author uses. It's also surprising how many photogs i see who shoot outside and never use reflectors. That, imo, is criminal.
cant download psd file , please fix this!
Those are some awesome photos Zach!! Do you still have a link to the PSD? I'd love to see the editing.
Thanks
Cheers!