
If you've dug through your camera's settings a few times, you've likely ran into the Color Space setting. You may have asked another photographer what it all means, and they've probably just told you to set it to one or the other, and forget about it. However, both sRGB and AdobeRGB have their advantages and disadvantages, so how do you distinguish one from the other?
What is Color Space?
In layman's terms, color space is just a specific range of colors that can be represented in a given photo. JPEG images can contain up to 16.7 million colors, though neither color space actually uses all 16.7 million colors available. Different color spaces allows for you to use a broader or narrower range of those 16.7 million colors used in a JPEG image. The difference lies within what is considered wider and narrower color spaces.
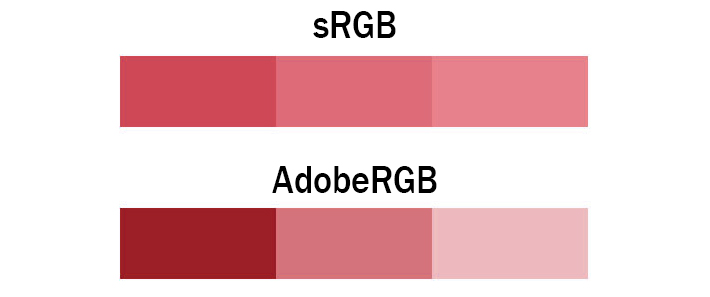
The image above explains it pretty well. Both images contain only three colors, however, the colors shown in the AdobeRGB scale have more differential between them. This means photos taken in the AdobeRGB color space will have more vibrancy in their colors, whereas sRGB will traditionally have more subtle tones. In situations where you're photographing strong color tones, sRGB may need to dull them out to accommodate, whereas AdobeRGB is able to display those colors with more accuracy.
The Types
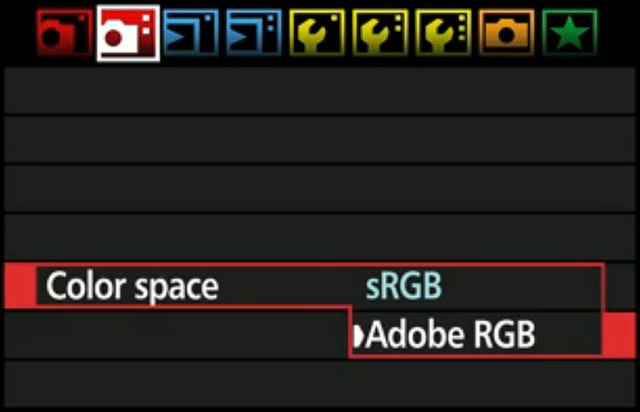
In digital photography, there are two main types of color spaces, AdobeRGB and sRGB. If you go into your camera’s settings, you’ll see that you’ll have the option of using either, straight out of the camera. You’ll also have the option of converting it to one or the other in post processing (with limitations), but which one should you use?
The Difference
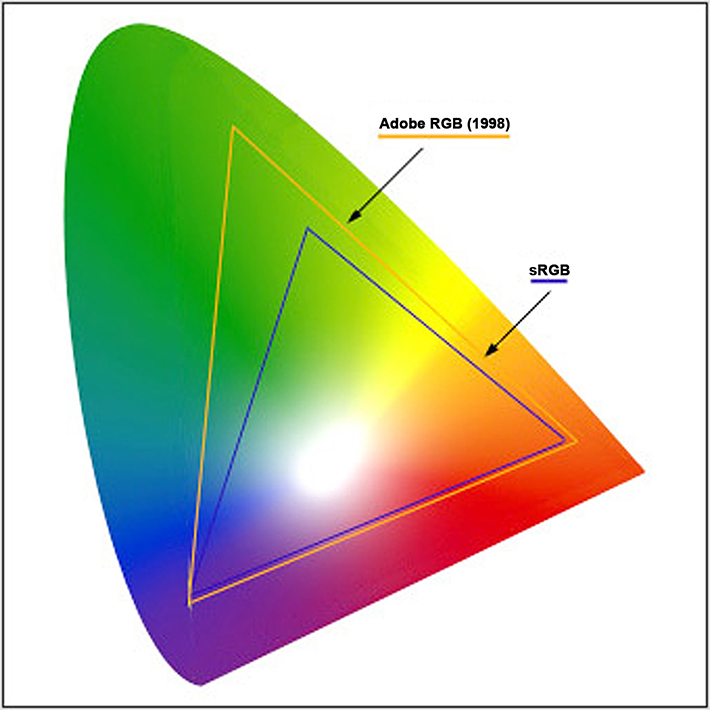
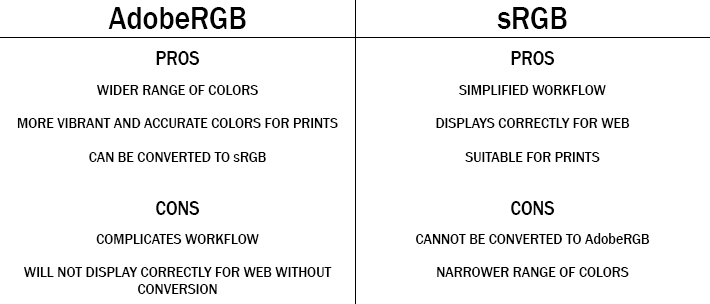
To better understand which one to use, you must first understand the difference between the two. AdobeRGB, by all accounts is better, as it represents a wider range of colors. How much better? They say that AdobeRGB is able to represent about 35% more color ranges than sRGB is able to. But does that make it the best for photography? Not exactly, as the world works with sRGB far more than it does with AdobeRGB.
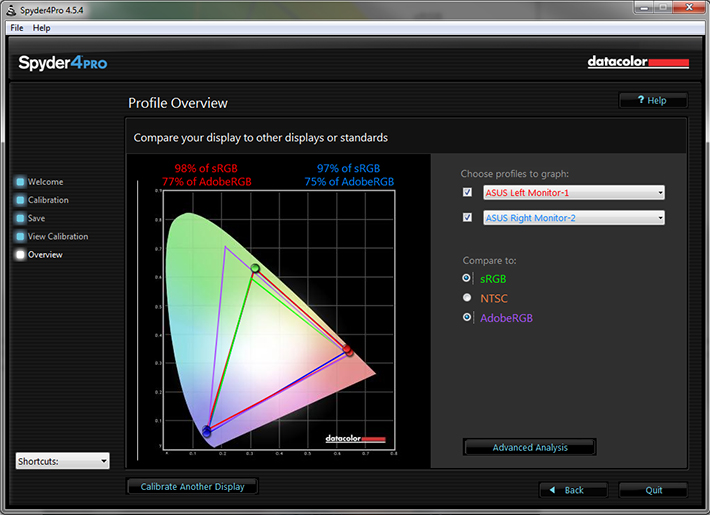
sRGB came first, and almost everything on a computer is built around sRGB. The internet, video games, applications, personal devices, and most everything else has adapted sRGB as their standard for color space. Even the monitor you’re using likely cannot display all the colors of AdobeRGB. That's right, most traditional computer monitors can only display about 97% of the sRGB color space, and only about 76% of the AdobeRGB color space. Even screen calibrators will often tell you how much of the color gamut you're able to display.
Since most web browsers have adapted sRGB as its color space, if you upload an image to the internet with the AdobeRGB gamut, the browser will convert it to sRGB, and it’ll do a terrible job at it, as shown below.
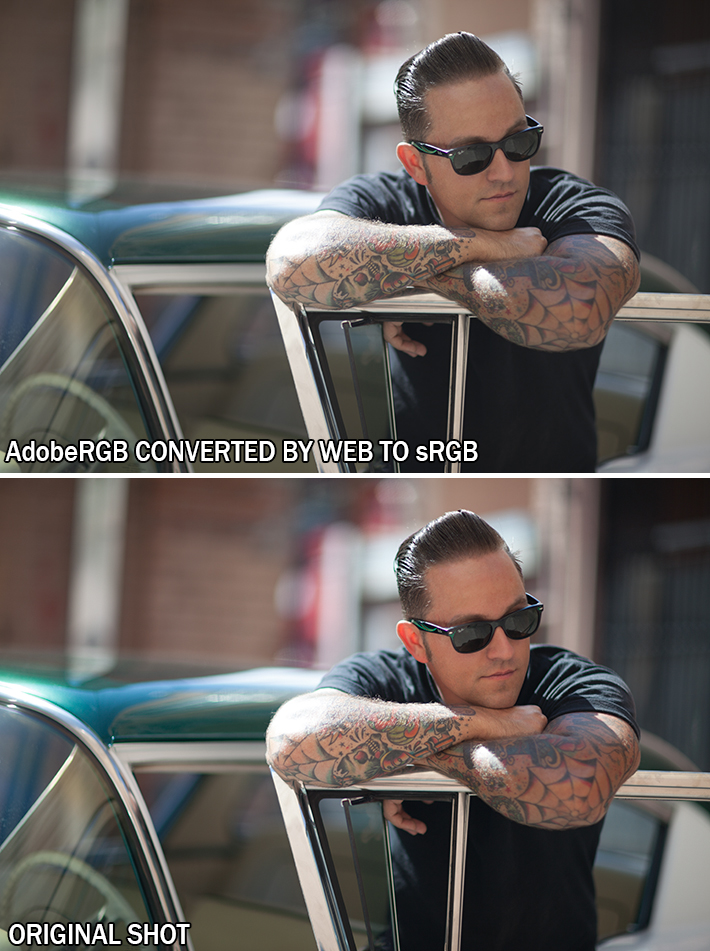
The photo above is an unedited photo that I took this summer. If you shoot in AdobeRGB, and let web convert your photos, you’ll be left with dull, muted tones. So why not shoot in sRGB full time? You absolutely can. However, if you’re printing your work, you’re losing potential colors in your images by shooting sRGB.
Printers, have began adapting the AdobeRGB color space. This allows for more vibrant colors in your prints, with better color consistency that your own monitor cannot even replicate. But do you want your prints to look differently than they do on your monitor? I say yes, as it provides richer colors that bring out details that would otherwise go unseen.
When shooting in AdobeRGB, you're able to convert it to sRGB at any time, without any loss of color in your images. However, this is a one way street, as sRGB is unable to accurately convert back to AdobeRGB.
If you’re not printing your work often, sRGB is the choice of color space for you. It’ll be the surefire way to guarantee that your photos look great on the web, and still look accurate in print. However, if you’re often printing your work, and looking for vibrant colors, AdobeRGB may be the choice for you, it just adds a few steps to your workflow process, as you'll need to save them as sRGB to correctly display them on the web.
How to Accurately Convert Your Photos from AdobeRGB to sRGB
In Adobe Lightroom
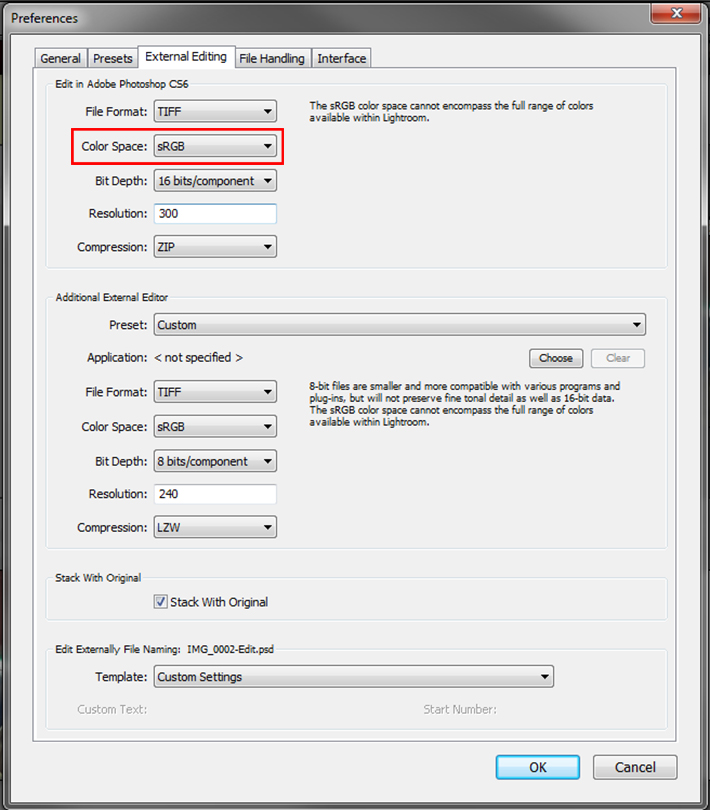
If you use a tandem of Lightroom and Photoshop, Adobe makes this conversion process painless for you. My workflow, and many others consists of loading images into Lightroom, making basic corrections, then importing the image directly into Photoshop. Upon importing to Photoshop, you can have your images converted for web with just a few simple setting adjustments. Simply go into Edit>>Preferences>>External Editing and adjust your color space to sRGB when being imported to Photoshop. This technique is the most preferred, as it'll automatically convert all images you export to Photoshop to sRGB, without any color loss in the web format. This will also allow you to keep both an AdobeRGB copy of the image for print, and an sRGB version to use for web and everything else.
In Adobe Photoshop
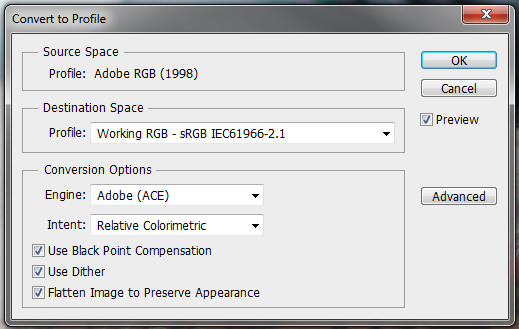
If you work without Lightroom and still want the benefits of AdobeRGB color space, you can also convert your images for web in Photoshop. Simply navigate through your menus to Edit>>Convert To Profile and change your destination space to sRGB after editing your image. To insure that you do this everytime, I recommend you incorporate it an action used for saving your images. Remember, failure to convert your images prior to saving them for web will result in dull and unflattering color tones.
Conclusion
If this at all confuses you and leaves you feeling overwhelmed, switch your camera to sRGB color space, and leave it like that. It'll still allow you to photograph and print beautiful images. However, if you're shooting specifically for print, AdobeRGB offers more range and versatility in the images taken. It all really comes down to personal preference, AdobeRGB does offer more colors, but at the cost of complicating things for a subtle difference in your photos. However, if you're a perfectionist, like myself, the extra steps taken to shoot in AdobeRGB may be worth the headache to achieve nicer prints, and get the best of both worlds.
If you'd like to learn how to use Adobe Lightroom more efficiently on any device, make sure to check out our Mastering Adobe Lightroom course with Pye Jirsa. The content Pye covers will appeal to every level of photographer and will save you an incredible amount of time on your image editing. Save 15% by using "ARTICLE" at checkout.


Any comment for those using Aperture rather than Lightroom?
Paul, You can set in Aperture preferences what color space you'd like you external editor to use and whether you'd like it as a psd, tiff or jpg. I use ProPhotoRGB and a 16bit psd or tiff when I export to Photoshop CS6. When you export a version from Aperture it exports as a sRGB tiff or jpeg.
Great article. I've long been told I should shoot RAW in Adobe RGB, but was confused when nearly everything NOT done in house is produced in sRGB. Until I start printing my own work, I'll stick with sRGB. Thanks again for a very understandable article.
You miss an important complication of using AdobeRGB or ProPhotoRGB when combined with 8bit per colour images (eg JPEGs). With low bit depth images, the steps between different colours (e.g. slight variations in blue in the sky, or paint on a wall) are almost noticeable with sRGB. AdobeRGB and ProPhotoRGB have larger gamuts, so the colours are further apart. This means that clean, subtle tonal variations develop distinct steps which ruin the image quality. For most real life images, there are very few pixel colours outside the sRGB gamut, so the ability to capture indigo or extreme magenta or cyan is moot. Better to keep the smooth tonal variations for the colours that actually exist in the image.
I have a question when calibrating on a wide-gamut monitor. Is it better to calibrate while in sRGB or aRGB? I've been calibrating on aRGB for my ASUS PA246Q P-IPS since I do quite a bit of post-processing on Photoshop.
- Joe Gunawan | Fotosiamo.com
I'm not sure why the author states that you can't convert accurately from sRGB to Adobe RGB. These are colorspace models imposed on RGB data. Data is data. You can impose any colorspace you want. The colorspace model will take the RGB data and modify it relative to the colorspace specification. The RGB data is still the same.
If you have an image set to sRGB, you cannot correctly convert it to AdobeRGB. It'd be equivalent to trying to put 3 liters of liquid into a 2 liter bottle. You won't get any additional colors within the color space when converting to AdobeRGB, as the color gamut has already been truncated for sRGB.
Nope. The colorspace model is placed on top of the RGB data. The RGB data remains the same. You may have truncated the color, but once you're in the wider colorspace, you can retrieve it.
Zack is correct in his analogy although the statement (you can not correctly convert) could be worded better. If you convert from sRGB to Adobe RGB (1998), you gain nothing at all useful, you don't make that data a larger gamut. The container as he says is bigger but the contents are not gaining more gamut but if you now create new data, or paste Adobe RGB data within this new conversion, that's fine and necessary for the initial conversion into Adobe RGB (1998). But if you think taking an image in a small color space like sRGB, then converting it to Adobe RGB provides anything useful in of itself, nope. Not a lick. Better do it in high bit too or you end up losing data in the process which is highly questionable.
Not quite. If you process an sRGB image your adjustments can easily produce new colors that are out-of-gamut for sRGB. As I commented above, you should do your processing in the largest RGB space (ProPhoto) so that all your adjustment results are in-gamut. I'd call that "a lick". The last step of your processing is to "render" back to the gamut of your media (printing or sRGB JPEG) - after viewing the out-of-gamut indicators in Soft Proofing.
I realize I'm jumping into an old thread, but wanted to chime in. While the info in the original post is very helpful overall, I think this particular bit of info is exactly backward. It's converting AdobeRGB to sRGB that's like putting 3 liters of liquid into a 2 liter bottle... AdobeRGB is the larger color space!
AdobeRGB-to-sRGB conversion is by necessity a lossy operation: you have to express a wider gamut of colors using a smaller gamut of available colors. In some cases there may be no practical difference in the file's color fidelity & DR, but in other (most?) cases you're going to be losing something, at least in high-quality printing. Conversely, an sRGB-to-AdobeRGB conversion should be lossLESS... there should be no colors in the sRGB image that can't also be expressed in the AdobeRGB colorspace.
The only thing you can't do is increase the color range of an sRGB file in the process of converting it to AdobeRGB... i.e. the conversion is effectively one-way: a back and forth conversion of AdobeRGB->sRGB->AdobeRGB will result in an AdobeRGB colorspace image file, but one with colors that are compressed/truncated by the constraints of sRGB when compared to the original file. In contrast, an sRGB->AdobeRGB->sRGB conversion should result in an sRGB file that's very similar to the original sRGB file.
Articles like this cause all the confusion in the internet. It should be deleted or edited by someone who actually know color management!
1. Color space set in camera doesn't apply to RAW files. It applies to JPGs only.
2. Pictures in AdobeRGB uploaded to WEB are not getting converted to sRGB. They are displayed in sRGB.
Seriously Roman stop judging this article as something it is not trying to be. It is a simple explanation of a very complicated subject and is meant to be digestible to people who know little to nothing about color spaces. You keep nitpicking his statement on RAW files, we get it already, color space does not apply to RAW. He has explained some fundamental differences in AdobeRGB and sRGB. RAW is in no way a part of this article so drop it. And at no point was I under the impression that he was saying pictures are converted to sRGB when put on the web. If you are so upset about this article start a blog and write your own articles on the matter.
Quote from article: "Since most web browsers have adapted sRGB as its color space, if you
upload an image to the internet with the AdobeRGB gamut, the browser
will convert it to sRGB, and it’ll do a terrible job at it, as shown
below."
There are thousands of articles on that matter already. Many of them are misleading. Some are good.
That the RAW is not a part of this article is a big part of the issues here.
Settings shown for LR work only for RAW files. If you photograph in JPG these settings will not apply.
It is another "I know something but not really" article.
I recommend this for understanding color management:
http://www.cambridgeincolour.com/color-management-printing.htm
Thank you for clearing that up. I was actually wondering about RAW as well and thank God I went to read the comments after the article.
I thought I learned a lot from this article and was getting ready to go back sRGB as I almost make prints. I then I realized from your comment, it does not make any difference i I shoot in RAW format only. Great clarification!
Except for one problem - the article and lots of the discussion here simply get the facts wrong. Roman is exactly right on #1 - RAW files store data in the sensor's native color space.
One of the disturbing things here is that there is no mention of the fact that monitors and printers also have their own gamuts. That's right - your monitor has its own RGB color space as determined by the red/green/blue dies in the actual pixels of the monitor. Look at the Spyder Pro profile in the article - the monitor gamut is actually a bit larger than sRGB. What happens when the sRGB image is displayed is that the (r,g,b) color values are first transformed to the monitor's RGB space an that determines the intensity of the pixels. The issue with browsers or mobile devices is that when the image is transformed to the monitor's gamut, does the algorithm assume the image is sRGB, or is it smart enough to look in the JPEG metadata to see if it is Adobe RGB, in which case it uses that transformation. The nice thing about sRGB is that most commercial monitors exceed this space, so the algorithm doesn't have to deal with out-of-gamut colors when it displays on the monitor. For Adobe RGB, monitor out-of-gamut colors must be rendered in gamut.
Same thing goes for printing, however, printing gamuts must be visualized using a 3D color space, like Lab. That's why we have Soft Proofing and color management in the print modules.
Its vindictive people like Roman who shouldnt be allowed to comment on the internet. The writer has tried his best to simplify a tricky topic. I think it is a very excellent article indeed!!
thanx heaps for the info, have always wondered, you've laid it out nice and plainly for me!
Hmm.. I'm surprised you didn't mention that LR has systems in place to convert (raw) images to sRGB as you export them into jpegs (you only talked about when exporting into PS). I had to double check. Good article though! I had no idea.
Why bother .....i always remove the color space..
And i do not have any problems with web or print .....
Really? Images with no color space are useless for print.
These comments remind me of something I would like to ask you all color experts;
- when I import a NEF file into LR, after a second or two all the colors change and become different from what they really shoul look like.
Is there a way to avoid this?
That could be the Camera Calibration Profile Lightroom adds after importing your pictures (Develop Module, scroll all the way down at the menu on the right).
Coincidentally I've been looking into colour profiles the past few days, because after buying an EIZO CG246 screen I've noticed that the company that hosts my website (Showit) strips the sRGB profile from my pictures, so all perfect skin tones change to red. Is there anything I can do to avoid this from happening?
Raul, that's what happens when you shoot in RAW. Most of the settings you apply in camera like the picture style and lighting optimizer etc won't be applied to RAW files only JPEGs. The only effect that stays on a RAW file is your white balance.
If you want to keep those settings you need to use the editing program that came with your camera and then export that image to LR as a TIFF.
I put my Lightroom Preferences at PSD, sRGB, 16 bit depth but when I have finished retouching in Photoshop and create a jpeg do I convert that 16 bit image to a 8 bit?
JPG's are 8 bit. When you save a PSD/16 bit to JPG PS flattens it and saves it as an 8 bit file.
more: http://blogs.adobe.com/jkost/2010/07/saving_16_bit_images_as_jpeg.html
Color Management is Muy Complicado. The camera (its screen), the file (its format), the monitor (its display), the software (its bit depth), the lab (its conversion), the printer (its rendering) and the paper (its profile). Every imaging chain is different and a translation is made at each link. So you need to consider each link you are using.
On another note am I the only one who finds the example image problematic? Seems to me the areas where we are considering color accuracy are those in shadow. Its a question of exposure also. And aesthetics. I would bring down the shadow side of his face myself for a more realistic look. A more fashion/commercial look would maybe bring it up a bit. Underexposure tends to make colors look more saturated. Over exposure less saturated. Maybe this is off thread but seems salient to me.
Drihan, I have all the settings of my D800 at zero.
Here is the deal, from my understanding lightroom only displays some funky prorgb colour space. Thats not the exact name, but its a larger colour space than sRGB. I simply wont edit in lightroom due to that. If you are in PS you can change the workspace to monitor (if you have calibrated your screen) and save the outputs as SRGB with the embed colour space unchecked. This way what you see in PS is the same as your export and the same as displayed on the web.
Based on what I assume is an entry level reader (JPEG shooter rather than raw shooter), as a Color Geek, I'd give the piece a B+ maybe A-. Yes there are some inaccuracies that other's have pointed out (the bit about the web for one). IF you are a JPEG shooter, setting the camera to produce sRGB makes some sense. It's absolutely not an appropriate color space for a raw workflow. Neither is Adobe RGB (1998) for that matter.
I've grappled with a way to explain this complex subject for those users who want to understand the implications of Gamut (a term that should have been used in the piece) and have provided a rather exhaustive 37 minute video that shows the pitfalls of sRGB which should clear up some of the issues pointed out here:
Everything you thought you wanted to know about color gamutA pretty exhaustive 37 minute video examining the color gamut of RGB working spaces, images and output color spaces. All plotted in 2D and 3D to illustrate color gamut.High resolution:http: //digitaldog.net/files/ColorGamut.movLow Res (YouTube): http://www.youtube.com/watch?v=n0bxSD-Xx-Q
>>Here is the deal, from my understanding lightroom only displays some funky prorgb colour space.
The raw processing color space in LR is very much like but not exactly ProPhoto RGB. It uses the RGB primaries so the gamut matches (which is good). You can export ANY RGB color space you have an RGB profile for, within LR. EVEN if you import your camera sRGB JPEG, edit in LR (or ACR), you're processing in this ProPhoto like color space. As was mentioned, raw has no defined color space, each converter has to assume some color space then process that data using it's own internal space (again ProPhoto like in Adobe converters) then give you a color space you ask for upon export. That being the case, there is no reason to use anything BUT ProPhoto RGB from raw data in these converters (it's using it anyway) to at least begin work on a master RGB image. You can always convert to a smaller JPEG in sRGB for web. You can't go the other way. CMS in LR is discussed here:
http://www.ppmag.com/reviews/200701_rodneycm.pdf
Ok, so if I take pics in raw and basic and set the camera to sRGB then I have small pic for the net in sRGB and the raw pictures, which will be in aRGB after going through LR. If I want to show an edited version of the pic then change it in PS to save for the net. If I'm printing the picture (litho or photographicly) should I change the aRGB to sRGB for better results?
If you take the image and save as raw, the color space can be anything you wish at export time in LR (or Edit In preferences). Use the largest color space you can at this point for the master image. You can always size down and produce a smaller gamut iteration for sending the image to the web (sRGB). If you're going to set the camera to raw, might as well set the camera for Adobe RGB as while this will NOT affect the raw data, it does play a role in the big lie the Histogram and clipping indicators have on the camera LCD (see: http://www.digitalphotopro.com/technique/camera-technique/exposing-for-r... )
I did not know that (Histo and clip indicators). Thank you.
You know, I thought I had all this figured out then I decided to see what my print labs prefer and it's all sRGB. I export to ProPhoto and send it in that format and they've never complained so they're probably just converting it to sRGB before printing. Any print I have received has always come back looking fine, never washed out in any way. My main concern is my website where I have images for sale. Am I shooting myself in the foot by uploading the prophoto version? I know most browsers support color profiles now so everything should display correctly for viewers, but am I better off just outputting everything to sRGB? When I originally did all this research I was printing things for myself, and I know in that instance using the larger color gamuts is preferred, but I never imagined so many online print companies used sRGB. I know a lot of photographers online have made the comment that a print company isn't worth using if they don't use aRGB, but I'm pretty sure Bay Photo, WHCC, and MPix are well above Costco and Walgreens.
I've found that for any serious 16-bit colour editing or manipulation such as HDR editing, that sRGB does not cut it. It has created digital artefacts that Adobe RGB or Pro Photo RGB workflows do not create. In addition, sRGB tagged images look inconsistent across software and the web on my calibrated wide-gamut monitor. sRGB is the standard now, and any wide-gamut workflows need to be converted to it before publishing but in my view it is the poor inadequate cousin that we should be moving on from. sRGB is not good enough!
Search this topic at Ken Rockwell's web site. He makes the point that Adobe RGB compresses colors into a smaller range and thus there is more chroma quantization noise when the file is opened. He argues that for the vast majority of folks there is no perceivable benefit to using Adobe RGB and that most color mismatch errors arise from the use of Adobe RGB. His own real world tests show zero to minimal benefits when Adobe RGB is used correctly, and his earlier work at TRW on the world's fist dedicated digital colorspace converter chip indicates that he knows what he's talking about. In other words, if you have any question at all about using Adobe RGB, you should be doing everything in sRGB.
http://kenrockwell.com/tech/adobe-rgb.htm
His article has also been written in 2006...
I hate SRGB. It looks artificial and dull, like clay, plastic or CGI, and it's the only thing availaible unless you have a lot of money or are using a plasma TV for most of your multimedia.
Thank you so much! I didn't know any of this. Came here wanting to know why my colors where washed out and got out so much more!
Thanks for the article Zach. Now that I have some understanding on this subject matter, there are bunch of new questions in my mind.
So, let's say I have decided to go with Adobe RGB (and then convert to sRGB as the final step before saving the picture for web), do you think these steps are correct?
1. Set the color profile to Adobe RGB in the camera
2. Set the Photoshop color profile to Adobe RGB
3. Open the RAW image in Adobe RGB, using Camera RAW
4. Edit the image and convert it to sRGB in Photoshop (using "convert to profile")
5. Save the image for web
Is this the right process?
Step 1. is an obvious thing, but what about 2 & 3? Don't we have to keep everything consistent in Adobe RGB until we save the image for web? What are the effects of failing to do step 2 &3 ?
I would really appreciate your help here. Thanks much !!
TJ,
1. If you are shooting RAW, then it really doesn't matter what color profile you pick on your camera, as it only applies to the JPEG version of the image. The RAW image doesn't have a color space associated with it.
2/3. When opening the RAW image in Photoshop, you are using the Adobe Camera RAW engine to convert the image from RAW into a working color space. Depending on if the image is destined to be printed or only displayed on the Web, that's what should determine your choice.
If you are going to print the image then you should use a color space that includes the colors that can be represented by the printer you are using. ProPhoto RGB has an enormous gamut and is likely a good default choice for the print workflow, as it encompasses a huge portion of colors that the eye can see (This is probably why Kodak invented it in the first place). However, you must only use ProPhoto RGB when there are 16-bits per channel, otherwise it will suffer banding/posterizing artifacts.
If your image is destined for a screen, then AdobeRGB should probably be sufficient as the color space.
In any case, when opening a RAW image in Photoshop, you should keep it in 16-bits per channel while you are working on the image.
4/5. Edit the image, then when done ...
If you are printing, save it as a 16-bit TIFF file and make sure the embed the color profile checkbox is checked.
If you are going to the Web, use File > "Save for Web..." and select JPEG and make sure the Convert to sRGB checkbox is checked.
sRGB is the safest bet for output to Web. The browsers currently support color profiles, but there is a bug that if there is no embedded color profile then they won't color manage the image (e.g. PNG or JPEG files that have a metadata tag for color space specified but no actual embedded color profile). This is what results in those images with apparently muted tones, since In the absence of a color profile, most browsers assume sRGB. Thus the most reliable method for Web output is to save for sRGB and embed a color profile.
- Grayson
Still confusing.
On one hand it is said that Pros use SRGB for true colour prints. Yet it is claimed to be the opposite here stating that RGB will render MORE VIBRANT AND ACCURATE COLOUR PRINTS?
Witch one is it? Wished you Pros make up your minds.
Thank you so much, I have always thought about choosing which color space at what times.
Misleading, YES! My Canon 40D captures in Adobe RGB when in RAW mode. Makes no difference what space I choose. Just tested it to be 100% certain.
i use adobeRGB when i shoot TIFF form my d800 tiff is 24bits vs sRGB 16bit collor dept and TIFF can use adobeRGB since adobeRGB has mor collors BUT THE HOLE CLUE is you must use pc screen that can display adobeRGB 90%cant my does orelse it is all waysted if Your PC sreen cant show adobeRGB,
What make and model of screen do you utilize?
Great article, and accurate.
My problem is that Lightroom shows only Adobe RGB, and you need to export to get sRGB, or you can change to sRGB one image at a time (I haven't found a way to do a batch conversion to sRGB). This is a problem because when I adjust my image I look at the RGB values and for my portraits I usually aim for an R value between 220 and 230. The problem is that a value of 220/230 in Adobe RGB, once converted, is more like 240+ in sRGB. Therefore, I can't really do any accurate adjustments since I won't know the value of my reds until I look at the exported file. So if I want to use Lightroom, then I need to convert each file into sRGB in the develop module in the soft proofing mode and then I can make my adjustments and get the R values I'm looking for.
I hope you're following my train of thought here.
Any suggestions/comments anyone?
Thanks
Pierre