My buddy and Germany-based Photoshop World instructor Calvin Hollywood has created a site called Photoshop Freaks which gives countless post-production tutorials. Recently he posted a video about how to give your photo that extra textured look and feel in a matter of seconds. It like a slight "high-pass" appearance without all of the messy glowing contrast lines or over-sharpening.
I like this technique because not only is it simple to apply, but it truly does offer a really unique feel to your final image without applying a messy global contrast or sharpening adjustment.
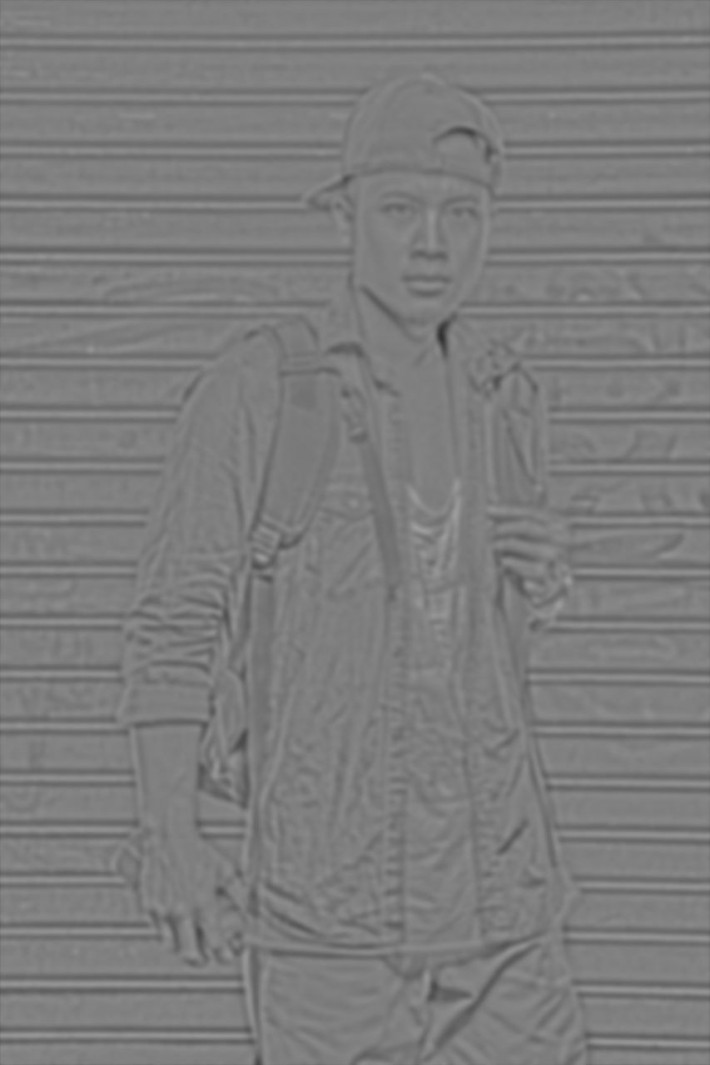
Below is a copy of Calvin's "dodge and burn" layer he used to overlay his original photo:
If you want to see more of Calvin's easy to comprehend and creative Photoshop tutorials, you can check out his site: www.photoshopfreaks.com


![[Pics] Manipulated Photos Of Notable Historic Figures Before The Digital Era (Before And After Images)](https://cdn.fstoppers.com/styles/small-16-9/s3/wp-content/uploads/2012/03/3.jpg)


Or just use Speedlights zoomed in at 200mm, high-speed sync, and shoot at f/20-f/22.
I'm hoping this is a joke. Why would you shoot a portrait at f/22 and why would you use high-speed sync at f/22?
To achieve the same effect without photoshop?
I don't see how doing this would achieve that effect. All you'll get is a bunch of hard light from an underpowered speedlight at an aperture that delivers an image with lots of diffraction.
Have you actually tried it? Nope.
I don't have to try it to know that it won't deliver the above result. Using speedlights at f/22 makes no sense let alone putting them at high speed sync. I would have to put my ISO to 6400 to even need high speed sync at f/22 in a studio.
Give it a try. I used three 600 EX-RTs set at full power zoomed at 200mm, iso 400, at f/20. Shot outside of a loading dock on a overcast day.
Yeah, this is not a good idea lol
First of all, you're shooting way above the diffraction limit of any camera I know of. So your images will actually lose detail. Plus, using speedlights all the way zoomed in is going to give you really harsh lighting, and tons o contrast. So again, you lose detail in your shot.
It's far better to create the dodge and burn look by actually dodging and burning. Nothing good can come from shooting at f/20+, On my 5d markII, I never go higher than f/11. Anything past that is strictly filter territory for me.
You're really arrogant Micheal. How can you assert his claim is false if you haven't even tried it? You argue based on what you have been taught and not on what you've experienced. Diffraction is one of the things everyone gets so hung up on. I've seen many landscape pictures shot at f22 and they looked sharp to me.
have you tried it? post results...?
I don't have to stare directly into the sun to know that it's not a good idea, either. All your "technique" does is create a very soft image with harsh light.
I have in real-life situations, shot portraits at rather high apertures. Usually in full sunlight, but still. Detail is better at hight F-stop. just that a tripod and a still model are kinda recommended...
Detail gets worse after f/7 as diffraction starts to creep in. Sure we can shoot portraits at f/16 but it never creates a dodged and burned look. It just increases DOF creates softness in the image. Generally the optimum sharpness is achieved at 5.6 on most lenses.
Pretty close... diffraction has more to do with the size of the pixels on your sensor. A sensor with larger pixels generally has a higher diffraction limit. It has to do with the way light focuses on points. If the pixels on your sensor are larger, then even a slightly out of focus point will look exactly in focus, because all of that light is still hitting just one pixel, rather than two or four.
I know I'm a little late to the party, but I can tell you why: for depth of field. There's been a surge in the past few years of using very large apertures and getting small depths of field to blur out everything but the subject. But that's relatively easy, because then you don't have to worry about composition. It takes a lot of skill to take a portrait with everything in the image in focus, where you still can draw the viewer's eyes to your subject. But when pulled off by someone who knows what they're doing, the photograph has much more visual impact than one simply where the background elements are thrown out of focus so the photographer doesn't have to deal with them.
Now, there will be diffraction with an aperture that small, but let's not forget that the vast majority of viewers of our photographs will not notice a difference in image quality when comparing f/4, f/8, f/22, or any other aperture. The first thing these viewers notice is composition. I'm not saying this is always the case. For instance, you definitely have a point if you're client is an international fashion magazine. But most of our viewership does not require that.
Sure for DOF but unless you're shooting it at 300mm or in macro then you don't need f/22. I shoot at f/16 and I have front-to-back sharpness. The main point is that combining high-speed sync with f/22 is just stupid. High speed sync doesn't work at f/22 since the power output of a flash in high speed sync is next to nothing. Unless you use an ISO of 1600 in the studio which seems pretty pointless.
I'd like to see results of that ;)
I can (almost) see the math behind tihs, but I would guess that this won't actually work IRL. Maybe with film and a slow-closing/sticky shutter.
So cool! and love Calvin's accent hehe
The hyper real high-pass look isn't my style but I'd like to try it out on the right image. Gotta shoot more boys.
That was great!
Gives a good vantage point for further D&B as has been said in the vid.
Too slow dude.
tautological too
Thank you for your video. I like the effect for some portraits and it opens up an interesting set of options for tweaking.
I think this is a really nice technique! It would be great to have a Photoshop Action for that, where it prompts for the settings for the blurring and whatnot. Definitely not for everything, but for some photos, it really makes things pop!
Excellent tutorial! Thanks Calvin/Douglas.
Top tip, Calvin's a great teacher.
Thanks a lot..this will sure help speed thing up!
I have to admit that looking at the side-by-side pic, I really can't tell much of a difference. I appreciate the video, but right now I can't concentrate because his voice sounds too much like this one...http://www.youtube.com/watch?v=gjwofYhUJEM
I thought the exact same thing hahahaha
Doesnt seem to be much difference between doing this or using the detail slider in Lightroom.
Nice technique.
Thanks for posting!
Nice post.. another option to help speed up process
I really enjoy Calvin's presentation and style. His voice and his humor help keep the topics fun and interesting. Not to mention the techniques are very useful. I'm saving actions based on the videos for future use. Thanks a bunch.
What a super freaky video!
This technique is meant to enhance details. It's used by some landscape photographers to bring out detail.