This past week we have seen a lot of gear come out, including a brand new outdoorsman-style bag in the Lowepro Rover Pro series. We got our hands on both versions of the bag, the 35L and the larger 45L and sent Mike Kelley and Mike Wilkinson off on separate excursions to put the bag to the test. Mike Kelley reviewed the 45L, while Mike Wilkinson reviewed the 35L.
Lowepro Rover Pro 45L Review by Mike Kelly

As a self-proclaimed bag-a-holic, I was incredibly excited to learn that Lowepro would be announcing the RoverPro line, a backpack made for those who are looking for a solution to take their camera gear on hikes that might be a little more intense than the usual "park the car and walk a few hundred feet to that riverbank." If you're a photographer who also happens to be into long day hikes and overnight trips, I have a feeling you're going to be very, very excited about the RoverPro line.
For many landscape photographers, action sports photographers, and adventure photographers, schlepping gear to a location can present some serious issues. For the longest time, there really weren't that many options for photographers who had to load their packs with both their cameras and everything they needed to sustain themselves on the long hikes in and out. I know that this is something I've struggled with in the past: do I use a hiking bag and stuff my cameras in there alongside the sleeping bag and food, or use a purpose made camera bag and find some way to deal with the rest of the odds and ends? Or do I cobble together some combination of camera padding blocks from an actual camera bag and stuff that into a hiking bag? And there are plenty of awkward hip bags and shoulder bags available, but none of them are really well-suited to hiking, at least in my experience. I know that there are a couple of bags out there that have tried to do what Lowepro has done here, but the bags are either backordered to kingdom come or prohibitively expensive at an amateur/enthusiast price point (F-Stop, I'm looking at you), but I digress: the outcome is always the same: hard to get to your cameras, hard to get to your food and clothing, and a long walk with an uncomfortable bag that wasn't made for what you're trying to do.
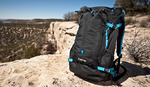
Long story short, the pickings are slim for a backpack that pulls double duty as both a hiking bag and a camera bag. But finally, Lowepro has heard the clamoring for a bag that can fill both roles. I took the new RoverPro 45L out for a couple of hikes in Southern California and put the bag to the test. I'll make it clear before the review that I'm a rather picky bag tester: I demand quite a bit. I'm one of the types that views my camera as more of a hammer than a museum piece, my gear tends to get used and abused. Same of course goes for my bags and cases: they all look like they've been to war. And I've also got an amazing condition in my lower back known as a herniated disc. Due to a snowboarding injury sustained a few years ago, I have a pretty low tolerance for bags with poorly designed support or iffy weight distribution. I've had a few bags that I had to get rid of or stop using because something as simple as walking through an airport would cause me lower back pain.
First impressions:
Upon first receiving the bag, I was initially struck by the size, but also the light weight. Make no mistake - it's a pretty big bag, and it will definitely haul a lot of stuff if you need it to. There is ample room for a camera, a few lenses, sleeping bags, extra clothes, and food if you can pack smartly. Absolutely enough for a day hike in temperate climates, and while I didn't use it for any overnight hikes, I'm sure you could work it out so that you'd be able to get everything you needed packed into it. A nice touch is the 2-liter reservoir pouch built into the bag, a rare feature in camera bags. Perfect for those of us who use CamelBak systems or similar, and the pouch looks like it will accept all of the common reservoir systems on the market that are the proper size.

My regular hiking setup with this bag consisted of one camera body, a 70-200, 17-40, 50mm and a couple of filters. I still had ample room left in the camera compartments, as well, and could have easily fit another body in there, but on most day hikes I'm not too interested in carrying more gear than necessary (I should note that I hike without lens hoods, as well, to save space). In addition, there is a tripod sleeve that is easily accessible without taking the bag off, as well as a series of clips to secure a hiking pole or monopod. You'll have no problem fitting a typical landscape set up (wide, tele, filters, remotes, tripod) in this bag. You can probably even get away with a speedlight or two if you wanted to bring some small lights on location. If you're really into bringing all your camera/technology gear with you, there's also a laptop pouch built in that will accommodate up to a 17" laptop. Pretty cool if you're just using the bag for traveling or business.
I had no trouble getting the bag set up to my liking: anyone who is familiar with adjusting a backpack to the correct size will be familiar with the way it works, the usual plastic clips and loops are present, and I was able to get a great fit in about five minutes. The straps seem long enough for pretty much any body type imagineable, as well.
In use:
I loaded up the bag for about a six-hour round trip day hike with the aforementioned camera setup, a bit of food, an extra layer of clothes, and about 24 ounces of water. The terrain was rather steep and varied, and it took a few minutes of fidgeting with the bag to get it set properly once I began to walk, even though I adjusted it at home before leaving (though I am sure that this is pretty common, as the bag will behave differently with and without weight in it). One of the first things I noticed was the support system that Lowepro has built into the bag. While I didn't have an enormous amount of weight in the bag (granted my 1D isn't exactly a feather), I was surprised at how easy it was to maneuver with this bag on. Lowepro has clearly done their research into support and balance, and I felt pretty nimble even with this relatively large bag on my back.
While I'm sure that there are many, many bags that are comfortable to use in this type of moderate day-hike environment, like I said, I still haven't seen a camera bag that can do it. I felt like I was wearing a purpose-made hiking bag (and I was!) that also held my cameras without being incredibly awkward or overly cumbersome. Many camera bags are designed to fit as much stuff as possible, without too much thought given to comfort or support, and you'll pay the price in either fatigue or worse, injury, if you try to bring one of those on any type of serious hike.

Which segues me into my next point: this is the first camera backpack that I've owned that didn't ruin my back. I own a few different backpacks by a few different manufacturers, and they all have one thing in common: they don't play well with my herniated disc (which is in my lower back, between L4 and L5, for those interested). Just a couple of weeks ago, I remember agonizing over just this as I lugged a huge camera backpack through a bunch of airports on the way to Iceland. I would have loved to have the RoverPro instead of what I had then. After six hours of hiking, there was no soreness or stiffness that I usually experience with other bags. It goes without saying that this is my favorite 'feature' of this bag.
But what about that whole 'photography' thing?
Of course, this review wouldn't be complete without a mention of how well the bag does its job: that is, to make it easier to pack, remove, use, and repack your cameras in an outdoorsy situation where we don't have the luxury of bringing perfectly divided Pelican cases or rolling luggage. Your cameras, lenses, and accessories are easily accessible through a pouch on the rear of the pack. One quick zipper pull and you're in. However, this leads me to my one and only real gripe with this bag, if you can call it that. Because the camera blocks aren't sewn to the bag itself (a good thing, as this lets you move them around and reposition according to your tastes) they tend to become enveloped by the outer shell of the bag, and sometimes it can be tricky to wedge your fingers in there to find the zippers on the camera blocks. Of course, you can just pull the blocks out and then go at it, but it is more logical to leave them in the bag so everything stays organized. I imagine that with some more time, I'll get this more dialed in, and I'll admit that it is very nitpicky of me to point this out, but it was the one thing that stuck out at me as not perfect. On the flip side, the free-floating camera blocks allow you to take them out and reposition them according to your needs. You may want to pack them towards the top of the bag to keep an ideal balance (heavy things at the top!) or remove one and just travel light with a single body and lens, and use the free space for more supplies.
There is also one feature that I haven't yet mentioned, which I think is incredibly clever. There is a built in reflector, diffuser panel, and waterproof cover. Yep, you read right. I didn't even notice it on my first hike because it was so cleverly concealed, but only after sitting down to go over it and gather my initial thoughts. If it starts to rain, feel free to cover the bag and keep the contents dry. Since it basically never rains here in Southern California, I never got to test the rain cover, but it is there. Looking to do an impromptu portrait shoot of a hiking buddy? No problem - just unclip the rain cover, hold it up to the sun, and you're in business. For real - a diffuser and reflector built right into the bag. Way, way too cool. Lowepro gets big points for this one. While it's rather minimal, it does the job, and if you're a hiker, I'm sure you're used to small, packable things. The diffuser/reflector will definitely work in a pinch and get you some cool photos if you're off the beaten path.
Of course, you also have the built-in tripod straps, which would pair perfectly well with a lighter Gitzo-style tripod. Like I mentioned earlier, the bag will carry most realistic hiking setups - a body or two, a few lenses, tripod, and accessories, without much of a problem, on top of all your essentials, such as food, clothing, and a sleeping bag or tent if need be.
Final thoughts:
I feel so fortunate that I was able to get my hands on this bag. As someone who likes to get out of the city and into the wilderness, this is the perfect companion, and it will certainly make it easier for me to do so. Most regular camera bags are a chore to hike with, and hiking bags don't really cater too well to the photography community for a number of reasons. This bag is the perfect combination of both: the comfort and storage capacity of a purpose-made hiking bag with the camera hauling capability of a camera bag. Most importantly, however, is the incredible comfort and mobility that this bag offers for its size. This is especially important to me with my herniated disc, as I'm sure it is for many other camera and outdoors enthusiasts. While I can't promise that it will magically make your back not hurt after a long hike, I would definitely recommend that you try it on at a local store and see what you think. It may just be the ticket that those of us with wonky backs have been searching for.
Of course, the bag is chock-full of neat little features: the drinking water reservoir holder, the tripod straps, hiking pole straps, and that really neat diffuser/reflector/raincover that is tucked away in the bag. The more you use the bag, the more you'll discover. There are a handful of little stash pockets, as well, which are perfect for the little doodads that always seem to get lost - chapstick, keys, and so on.
I can say with 100% certainty that this bag is going to replace every other bag that I'm using regularly, even when I'm not hiking. I can load this bag up with food, clothes and my laptop, a couple cameras, and fill up a pelican case with lights and stands and go shoot a paying gig, or I can reconfigure it for hiking and take it on an overnight trip. I can load it up with cameras and lenses and take it on a flight, and there will still be room left over for food and whatever trinkets I pick up along the way. The comfort and versatility is second to none here, and I'd have no problem recommending it to any photographer who is constantly on the go and looking to consolidate their bag collection. Take it hiking, take it traveling, take it to a slumber party - I promise you'll love this bag.
Lowepro Rover Pro 35L Review by Mike Wilkinson
Initial unboxing impressions:
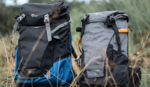
My very first impression was that it appeared very technical and of a decent size. I was still thinking ‘camera bag’ first, and ‘backpacking pack’ second, but it really is the other way around. The straps, compartments, fit, and look, are all that of a traditional backpacking pack. As someone who has crammed a DSLR and a handful of accessories into a large backpack for week-long trips in the backcountry, I was feeling pretty geeked about this pack.
Field Testing
You can read press releases and spec sheets for info on all of this bag’s features, so I’ll spare you and get right to the good stuff– field testing! To put this bag through it’s paces, I brought it along as my primary day pack for a video/photo shoot of rock climbers in New River Gorge, West Virginia. Most locations were well off the beaten path, and long, sometimes technical hikes were needed. I’d hike with climbing gear, food, water, photography gear, and on the day of the interview I’d take audio/video support equipment. Packing it up for each day I had the items seen in the image below, plus a few other things that had to be added at the last minute (this always happens!) such as a tarp, hiking pole, reflector, guidebook, and trailmix.

Hiking
Surprisingly the RoverPro bag held up and my back didn’t really hurt, even though the weight of my pack was almost 60 pounds in weight for the first two days! It sagged a little bit from the heavy items swinging from the back, but was surprisingly comfortable still. I’m used to backpacking with a heavy load, so I was able to manage leading a group of 6 through several miles of trail, ranging from dirt roads to backcountry ladders and rock scrambles that were so technical there was no way I could have done them with my pack on (or any pack for that matter). After the first two days of trekking with the overloaded pack, I ditched a few heavy items on the third day, while packing another camera body. This reduction in load made a notable improvement! The pack fit on my back better, and when it felt like it was pulling, a few easy adjustments on the shoulder and waist straps lightened the stress on my shoulders. It appeared that I had loaded the pack to it’s appropriate fill, and this thing felt great. Snacks and water were easy to get to, and the material felt strong and durable. My only critique would be that the waist buckle itself seems small when compared to backpacking pack buckles. I really crank down on those straps and it seems to me that a larger buckle would be more durable.

Once the approach hike was complete, I’d find a good spot to throw down my bag and get to my gear. Opening the front zip to access the camera insert worked like a charm. I was able to quickly get my rig out and set up without having to unpack all of my other gear. The inserts kept my filters zipped and secure, and smaller lenses/viewfinder from rolling around.

As someone who is used to doing weeklong backpacking trips, I’m no stranger to a heavy pack, while taking only essentials (no camping hammock this time!) but this also means that I’m used to hiking with a 50-65 liter pack for these and other outdoor adventure trips. I severely overloaded the pack on days 1 and 2, and had a hard time zipping the pack up, in addition to the pack pulling on my shoulders, which was expected. What I didn’t expect how well it would hold up to the abuse! My back didn’t complain about it either, my legs were simply tired from the weight. Once I offloaded some gear and had another climber take my rope, the pack fit GREAT. I think I’d dig the 45L bag as it fits my style better, but your adventures may vary, so consider what you would bring on your trips when deciding on a pack size.

I really liked using this pack, and I’m already planning to use it again on a trip in a few weeks. Personally, I’d like to upgrade to the 45L model for the amount of gear I take on my outdoor projects, and you should consider it for yourself before making a purchase of any bag. There wasn’t any rain so I was unable to test the rain cover, and while it stretched to fit my bag just fine, the bendable ring it came with to make it a reflector didn’t play or pack well. Also, the material for the rain cover/reflector won’t replace a good reflector for me, as a small 3-1 is small and light enough to not omit. I’m used to large waist buckles, and like the security and build quality of those found on multi-day backpacks. I’d love to see a 65L-70L version of this with a sleeping bag compartment underneath the camera insert compartment, so that I could use it when I go backpacking on longer trips.

If you like to take pro gear out on the trail for an entire day of hiking, climbing, geocaching, or other mountain activity, then you will definitely like this pack, as there are a lot of smart features that you will use. A comfortable all-day hiking pack that keeps your gear safe while in transit, and lets you get to it quickly is a definite winner. If day hikes with a DSLR, tripod, and lens is all you need, get the 35L. If you want to pack a long lens and take heavier gear for something like rock climbing, go for the 45L.


dig the soo brew hat. How heavy was the pack? Did you pack one tripod? Nice review
Soo Brewing is an awesome microbrew on the state-side on the Soo, on the way to Canada!
I weighed my back before adding the last minute items, and it came out to 48lbs. I packed an Induro CT014 tripod each day, and a small Manfrotto as well on the third day.
For most of your qualms, it sounds like essentially what you're looking for is an F Stop bag. One of their bigger ones.
But $400+ for a bag...yikes.
sick bag, I really like my gregories, hmmm
Who cares about the bag...
That last shot above the lake is very nice indeed!
Legit. Looks like a solid pack! Nice work guys.
Thanks for the review fstoppers. I think that there are a lot people out there, which are waiting for exactly such a backpack. But I'll never take a climber serious who is carrying his climbing gear at the outside of the back ...
Hi As there appears to be no separator between top and bottom of the pack (where the removable camera packs live) am wondering if this will be a pain for me. I sit for hours at a time photographing amateur sport events so always have a few items of food with me and a drinks bottle (may use the hydration bladder if I get this pack of course). So if I store packet of sweets, biscuits, sandwiches, in the top ....will any stray sweets fall between the camera packs?
Craig,
Hope this reply is not too late, but I haven't found that to be a problem at all. Everything is made with tight enough tolerances that nothing really falls between the cracks, so to say.