
A few weeks ago, I flew to Los Angeles to shoot a commercial project for Mitsubishi. They had a custom Outlander built by RIDES Magazine and were in need of press shots. Studio shooting can be among the most challenging of all types of photography, but with a little patience and some care, its really not that difficult. Here's how we did it.
Before we start, let me say that obviously this is not the only way, or even a recommended way... more just MY way. Take this and build from it and it will result in YOUR way of lighting in the studio.
Make no mistake, shooting cars in a studio is incredibly difficult. You're starting from absolute zero. There's no sunlight to act as a main light while you fill in the shadows with strobe like you would on location. On top of that, the car behaves like a giant mirror, reflecting everything around it, while the white studio walls bounce light everywhere and rob your light of directionality. A successful studio shot will require you to control your reflections and use your lights to accentuate the car's shape.
Planning
Making a studio shoot work involves some planning. My planning started by locking down a studio near where the car was stored. Luckily, the car was close to Thunder Studios in Long Beach, CA. Thunder Studios is one of my favorite car studios, due to their extensive selection of rental gear and number of stages. They have a studio size to accommodate just about anything. Securing two awesome assistants to help out on the shoot was my next on my list. For this project I called two good friends who are also amazing photographers, Richard Thompson and Nate Hassler. Having a few extra hands (and eyes) around, definitely makes a shoot run smoother. From moving lights around to consulting on angles, assistants are a tremendous help in the studio.
You'll also want to create a shot list, if one isn't given to you by the client. Knowing what specific shots you need beforehand will help you budget your time. Especially since studios charge some pretty hefty overtime fees if you run late. Our shot list included a front 3/4 angle, profile, and rear 3/4 angle as well as all of the custom details that had been added to this Outlander. Giving thought to the overall look you're going for will also help you with your time. I knew from the start I wanted a raw studio look with some lights, cables, and tire tracks left in. I felt this would give the photos some character instead of just floating on white.
Lighting
Once you've arrived to the studio on the shoot day, it's time to start lighting. I almost always prefer direct lighting on cars, especially in my location work. However, in the studio, I'll use bounced light off of a flying flat if there is one. A flying flat is exactly what it sounds like, a large white panel suspended from the ceiling that you can move and angle around the car to reflect light. In the case of this Mitsubishi shoot, we used bounced light. Bounced light provides a softer quality of light that helped us really sculpt the shape of the car.
We used some old school Mole-Richardson 2K and 1K hot lights, which I always get a kick out of because they're so retro. We placed two to the driver side of the car bounced up into the flying flat and another off the front end also bounced into the flat to light the nose of the car.
One last note on the light setup, the lights in the rear that are flaring the camera can be controlled by your cameras aperture. The smaller the aperture, the more pronounced the star shape will be.


Reflections
If you've been hired to shoot in a studio, chances are you know how to light. Controlling reflections will be the biggest challenge you'll face. On location, circular polarizers are the best choice for reducing and removing reflections. However, in the studio, circular polarizers will not work as well as they do on location. You can sit there and rotate them all day and it won't give you as good a result as it will outside, believe me...I've tried. In the studio there's a better way, and it's easier than you think.
My favorite method for controlling reflections, a method that's left assistants to stand and stare at me with puzzled expressions almost every time I do it, is to completely line the floor around the car with black foamcore, black fabric, black flags, or honestly anything we can find that's black. You're simply removing anything that the car and its shiny metal body can reflect and it works EVERY TIME.
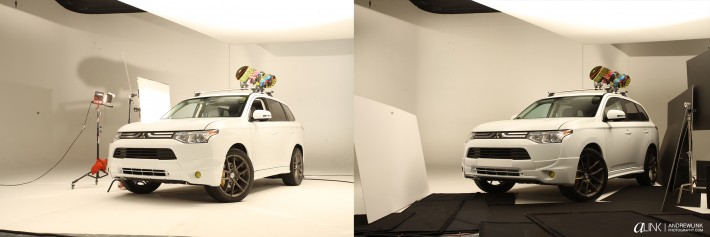
Pay close attention to the side of the car and the bumper underneath the driver side headlight in the two photos above. They were taken right after each other and the camera settings didn't change. You can clearly see how the car reflecting the black boards sculpts out the shape of the body, while in the frame without the boards, the car reflects the white room and the shape gets lost.
Retouching
For the purists, there used to be a time where studio shots like this were completed in one shot, however, now it's far more common to construct the final image out of a few different frames. For example this shot is made out of about 6 different frames. The background and shadow are from one base frame, and the car body, headlight, grille, wheels, and fog lights are from different exposures to ensure that each part is represented as well as possible.


That's it, enough to get you through a studio situation should you ever find yourself in one. Remember, the best part about shooting in a studio is a chance to play around, experiment, and really create something.
I could blog day and night about shooting cars and there would still be questions left unanswered. That's why I love to stay available. I'm always reachable, whether it be through the comments here or through my Facebook page. Drop me a line on Facebook if you have any questions at all, or even just to talk cars! I get back to everyone!


There goes Andrew schooling us again. I loathe shooting in a studio, but you make the images look so fresh, great job! I love how you left the lights in the shots.
Thanks Clint! I appreciate that coming from the guy thats about to drop a shoot thats going to send us all back to the drawing board!
Would you recommend the same techniques for outdoor use?
I would think wind and other factors would inhibit this. CircPols (for me) seem to change the color and make it hard to get things with with my passport color checker right... and if you throw in strobes... uuhhh...
Big headaches outdoors.
Doc, this is more specific to in the studio where you have full control. Outdoors strobes and a circular polarizer are more than enough to pull out reflections and give the color a nice amount of 'pop'.
I've never seen a CP change the color too much... nothing a few quick adjustment layers can't fix. Fixing color in post is still better than removing reflections ;)
I was waiting for a post like this, extremely helpful. You guys did an amazing job on this. The retouching looks perfect.
It astonished me that that you mentioned you're friend with Richard Thompson. He was my first automotive photographer idol years ago and has been much of my inspiration throughout the years. I spoke with him last November back when I was considering changing my major to photography and focusing on cars. Alas, I didn't decide to do that. I'm sticking with transportation design (car design) and minoring in photography. I'm still a highly active photographer though. I just finished my first real photoshoot with a Ferrari 308 GTS, which turned out relatively decently. I already have another shoot lined up with an AC Cobra in two weeks and the week after that is a Ferrari 458. I'm not much of a studio photographer. I prefer to rely on purely natural light, but i'm progressively integrating more flashes and forms of continuous lighting. Thus, I found this article quite intriguing. I hope to eventually do some studio work such as this, but at the moment i'm just an extremely enthusiastic amateur.
wow that's a long message...
love the story
I really like the tutorial on shooting, especially since I've been asked to do something like this recently. I guess I just fall on the purist side though. Really, if it can be done in camera, and you even said it could be, why not? Just because it's common now to do composites, I can't buy into them. This comes from learning smaller scale studio work on a 4x5 and printing the final image in the darkroom probably. I guess I just get more and more loathsome at having to sit in front of a computer when I could spend a fraction of that time just getting the setup done in camera.
stunning
Hey Andrew! What a nice article. I'm a real beginner on photography and have just gone through a lot of stuff about it. Car photography is my aim. It's what I'm trying to get more informed and skilled about. It would be awesome to have someone like to talk cars. Big hug.
The retouching is amazing. how did you do the texturing on the car?