
One of the first very important skills I acquired in my Australian Photography course was the ability to breakdown lighting and determine approximate camera settings in images taken by other photographers. If you understand how the direction of light and its degree of diffusion are controlled and how they affect images, it should be easy for you to train yourself to "read" lighting in the images you see in magazines, on billboards and in your favorite photographers’ portfolios.
It's like speaking a secret language. It's fun and very helpful for your ability to set and control lighting in your own photos. In other words, it will be easier for you to successfully select your camera settings and set up correct lighting to get what you envisioned to achieve, or what your client is asking you for.
It is not difficult at all and you can train yourself to do it well if you are familiar with the mentioned above photography fundamentals. The more you challenge yourself and practice guessing lighting setups and camera settings in other photographers' work, as well as shoot and analyze your own images, the easier it will become.
Although, if something really falls out of your understanding of lighting in a photo there’s always a chance that you’re looking at a photo-montage, or the lighting was significantly altered in post-production in it. And again, it will be easier for you to identify such things the more you shoot and analyze your own pictures and lighting.
I will share my list of cues, which help me breakdown lighting setups and camera settings in photos, in two articles, and today you can read the first part. But before we begin I'd like to remind you what we're dealing with.
What Every Photographer Must Know
I am a strong believer in the power of mastering the basics in any art or craft. The basics is where it all starts, and how well one knows and understands them will often determine the quality of work he or she produces. Just as much it is important to understand highlights and shadows rendering and know human anatomy for a professional classic portrait painter, understanding the light behavior and the basic elements of exposure is necessary for any photographer.
Direct light creates hard-edged dark shadows. The smaller the light source (relative to the size of the subject) or the farther away it is from the subject, the sharper and darker the shadows will be. The hardest light is created by a point or spot light source - a light small enough or far enough from the subject that its actual size is irrelevant. Think the sun in a clear sky, a spotlight on a performer on a stage - the shadows are dark and hard.
Diffused light scatters onto the subject from many directions, the shadows are very bright or absent altogether. The closer the light source to the subject or the larger it is (relative to the size of the subject), the softer and brighter the shadows will be. Think a heavily overcast sky, when entire sky becomes the source of light. Or light coming in through a big window on the northern side of a building - the shadows are very bright and soft, you can barely see their outline.
Practical implementations:
- Use diffused - reflected or direct fill - light to soften shadows in your images.
- Brighter shadows help visually even out bumpy or aged skin, so use this quality of diffused light to your advantage when working with clients or models whose skin is not very even.
- Side lighting emphasizes facial features and reveals textures like that of skin. Make sure to avoid it when shooting female portraits, or in the mentioned above situations. Otherwise you will add post-production time and cost and create problems that you could have easily avoided by the correct choice of lighting.
Make sure to educate yourself on the purposes of and differences between light-shaping tools – light modifiers, flags, diffusers, grids, reflectors, etc. – and what you can do with them. The truth is, in order to consistently set up beautiful lighting you need to know the basic principles of light behavior and absolutely do not need to buy expensive equipment and props, because you can replace them with DIY tools that can help you shape the light just as well.
How to "Read" Light
Allow me to share the main cues that will help you to "read" lighting and exposure settings in photos taken by other photographers:
The Size and Shape of Catchlights
This will help you to identify what light sources were used, how large or small they were, where and how close to the face they were placed.
This is what catchlights created by a strobe or small flash look like:
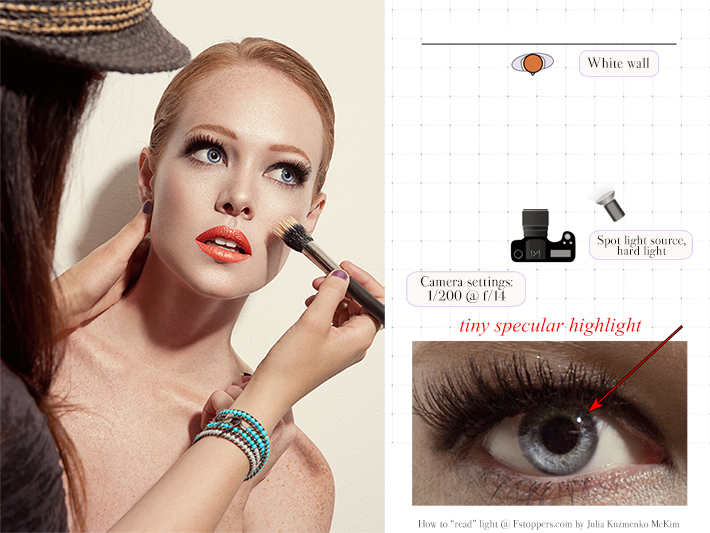
This is what catchlights created by a beauty dish with a diffuser sock on look like:

You will also sometimes notice an even darker spot in the center of the round catchlights - that's a reflection of a beauty dish with no diffuser on, and the hardness of the shadows on the model's face will usually confirm it.
Also, you will often see only a half of the circle of the round catchlights - that's because normally the main light is placed higher than the model's eye level, so the upper halves of the catchlights are cut off by the eyelid and eyelashes.
Needless to say, that the circle of the catchlights will be smaller or bigger depending on how far or close the light with a beauty dish was placed to the model's face.
This is what catchlights created by a large softbox look like:

On a side note, if the model’s pupils are very dilated it means that the photo was taken in a very dark studio/room. The speed of the strobe light is too fast for the pupils to contract before the picture is captured, and even if the modeling light was on, it must have been too weak for the model's pupils to react to it and contract.
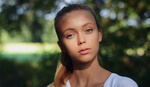
Approximate Aperture Size
This will help you to identify how wide the aperture was open when the photo was taken. The focal length and the distance between the camera and the subject will also affect the width of the focus plane, so remember to take this detail into account. Look for cues to determine how wide the plane of focus (depth of field) and how blurred the background is when looking at a photo.
Click on the photo to enlarge it:

As you can see in my example all three photos were taken at f/1.6, but the focus plane is much wider when the subject is farther away from the camera.
In the first photo the model's further eye is already out of focus, while in the second photo the model's entire face, hair and most of the body are in focus. Notice the details around the model: there's a little bit of the grass and the foliage behind the model that are still in focus, and everything further back and closer to the camera is out of focus (i.e. outside of the focus plane).
And finally in the third photo, not only the model is entirely in focus, but even a little bit of snow and the crack in the asphalt are still in focus further behind the model.
Ambient Light Conditions and Fill Light
This often can be determined by the darkness of the shadows in the shot. If the shadows are very dark it may suggest that there was no fill light (reflector or any additional lighting) used, and no bright walls or other reflective surfaces around the subject in the shot. If the image is also very sharp throughout the frame it also tells you that a higher f-number was used (small aperture).
The opposite lighting conditions and camera settings (a lot of fill light, bright surroundings and wide open aperture) will result in the opposite outcome - bright or no shadows in the image.

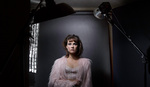
Rim Light
You can judge the output power of the light source pointed at the model's back (not necessarily a controlled light source) and its positioning by the brightness and the width of the rim light. Check out my recent article about shooting with color gels, I talk about the placement of strobes behind the model and how that affects the width of the rim light among other things there.
Click on the photo to enlarge it:

To successfully identify whether or not any rim light was used, what light source it was and where it was placed, I usually also look for other hints besides the obvious rim light itself. Shadows and highlights in reflective surfaces are the best helpers.
For example, in the first photo you can see very apparent highlights on the bottom lip and in the further eye created by the rim light, and the subtle light on the model's cheek, chin and the hair confirms the use and direction of rim light in this picture.
In the second photo you can see the sconces, so it is a no-brainer. But even if they were out of the frame, you could tell that there were two light sources behind the model by the direction of the shadows on the bed and the model's body, as well as the visible rim lights. But if you look at this picture a little closer, you will also notice that there was light coming from above - just look at the model's fingers above her head.
So, now you can tell that there were two lights behind the model, one light above her and, and, by the fact that the shadows are not completely black on the front of her body, you can determine there was either fill light placed in front of the model or a bright surface (a wall or a reflector), off which the existing light bounced back onto the model.
And finally, in the last photo, the direction of the sunlight is obvious from the light and shadows on the grass behind the model. The rim light on her hair and outlining her body is also caused by it. But if you take another second to breakdown the lighting in this picture you will also see the rim light created by the diffused evening light on her right as well... did I say evening? How would you know that? By the length of the shadows in the background, and also judging by the fact that the rim light on her hair is created by the sun that is in a lower spot in the sky, not above the model, otherwise the top of her hair would be lit by it as well.
Lastly, the big catchlights in her eyes and the direction of the shadow on her chest behind her hand suggest that there was a large source of light in front of the model as well. Most likely a reflector, considering the large aperture (shallow depth of field) that was used when taking this picture.
UPDATE: Part 2 of this article can be found here: How To “Read” Light In Photography – Part 2
All images in this article are photographed and edited by me.
To see more of my work visit: www.juliakuzmenko.com
Check out my full tutorial on beauty photography to dive deep into shooting and editing at the highest level. You can also check out these incredible Photoshop tutorials and plugins that will speed up your workflow and help you create stunning, professional work. Save 15% by using "ARTICLE" at checkout.


You are awsome!! love your work and tutorials, when you come to Brazil??
Wow, the photos are incredibly good! The articles, so far, are really good and keep me doing more reading than shooting. In my case, this is a good thing. I am already see some improvement in my skill set.
How do you shoot at such a low aperture I the image? ND filter or the strobe must go very low? Or only fill used at distance?
now thats sth worth reading!!!! Well done, dear.