
Most photographers know that a cloudy or overcast day produces really soft light that can be flattering on the human face. But many of my wedding clients naively say "Oh it's overcast today, the photos will turn out much better!" Sometimes Most of the time overcast light is actually pretty boring and removes any and all contrast from your scene. There is a little trick I explain in our Wedding Tutorial that has saved me from producing boring, flat images on a cloudy day, and I think all photographers should have this technique in their bag of tricks.
Overcast light can be a great life saver when you are forced to take photographs in the middle of the day. Typically mid day light is not very flattering because the contrast between the shadows and the highlights is pretty much nuclear. If you don't have natural shade to place your subjects under, then the next best thing is an overcast day to save you from having to battle noon skies.
If you were smart (and your client is flexible time wise), you would schedule your shoot during the final hours of the afternoon when the light is more directional and interesting. But what happens when you step outside to find out the beautiful light you've been expecting is dull, overcast, and boring? Here is a simple lighting technique I use all the time to help fake a sunny day and add interesting light to my subjects.

This is Victoria and Patrick. They recently got married here in Charleston and unfortunately their wedding day was very close to becoming a monsoon with crazy storm clouds all around and a forecast of 80% chance of thunderstorms. Luckily the rain never hit and we were left with dramatic skies and soft overcast light. This photograph above is a simple one light setup where I exposed for the sky and then lit them from the front for a standard portrait any photographer would think to take. This works well when your couple is out in the open and you are using something bright as the background. You just quickly expose for the ambient sky and balance your strobe to bring up the light on your subject. Simple stuff I know.
But what happens if your background isn't brighter than your subject? On overcast days, you can run into some big problems in shaded areas where you have less control over the lighting. Unlike big open areas, shaded areas can get dark quickly when you lose the specular highlights caused by sun-rays shining through leaves and bouncing off buildings. I have found that when I place my subjects in an area with the most flattering light for their faces, sometimes my background becomes way to dark to show up (inverse square law at work). Basically I'm left with a background that looks overcast and often depressing. You can see what I am talking about in the image below. Patrick and Victoria are properly exposed but the light falloff on the background leaves a lot to be desired.

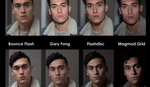
If you've watched our tutorial How To Become A Professional Wedding Photographer, you might already know one solution I take to solving this problem. Usually on my wedding, bridal, and engagement shoots (and most general portraits for that matter), I'm only carrying one single light with me. That light might be a strobe, speedlight, or monoblock and it is usually fitted with my favorite light modifier, a small softbox. For a portrait photographer, the most natural instinct would be to use that single light as a key light and place it somewhere in front of their subject. In these overcast situations, however, I've found my light to be much more effective BEHIND my subject. By placing my flash high above my subject and behind them I can add a nice rim or kicker light to my photos that helps add some definition lost by the lack of contrast in my overcast background. Essentially it is like I have gained a second light because I have a HUGE soft box on my subjects (soft overcast sky) and a second rim light behind them created by my flash. Here is a diagram showing the results.

Another awesome trick is you can move your kicker light really far behind them so it actually lights up a larger area and emulates sunlight. Since most sunlight would not just land on your subject, by placing your light farther away, you can give the illusion that nice, late day sun is spilling through your entire frame even though we all know it's just a speed light. This is where having a more powerful monoblock comes in handy because you can really crank the power and set the light 20, 40, sometimes 60 feet away and create a nice large spill of light on your background.
So next time you are shooting in overcast light and your background is looking dull and uninspiring, try using your flash(es) to light the background instead of your subject. In most cases you will find that the production value of your images will skyrocket from this little trick and it only requires a single speed light.
 Click the image above for more info on How To Become A Professional Commercial Wedding Photographer


Great tip!!
Love this tip. How do you handle the catchlights? Do you still keep a flash on-camera?
In the before & after photos that were posted, the catch lights were more than likely from the sky.
The author states: "Usually on my wedding, bridal, and engagement shoots (and most general
portraits for that matter), I’m only carrying one single light with me."
Honestly unless I'm shooting beauty in the studio, I'm never really that concerned with catchlights. In other words, I'm not going to ever use a pop up flash or direct flash just to get a little white light in someone's eyes. Usually in full length portraits you can't see that detail anyways. The catchlight in my images is usually from the large sky in front of them (like in this example) or from the light I'm using as a key (first example of Patrick and Victoria). Other than that I'm not really concerned with catchlights when someone's eyes are so small in the frame.
Thanks dude. That exposes a larger problem that I have. I'm always looking at everything so granularly that I get concerned about something like catchlights on a wedding portrait.
Nice one
In these situations, using a half or full CTO gel helps create that illusion of warm, afternoon sunlight. I use this a lot. It's worth pointing out however that when doing this, making sure that there isn't any sky in your image is important, as a white overcast sky is a dead giveaway that the backlighting looks fakes. Nice post Patrick.
Agreed, the CTO is essential for making that more believeable when the light is coming from the side like that.
CTO would add orange high lights against blue ambient key light. I would prefer to match my artificial with my ambient in this specific situation THEN change my white balance to warm the WHOLE scene.Boom. The idea of gelling is to color balance mixed light scenarios or intentionally using a contrasting color.
Great post...this what I come to Fstoppers for.
I've been employing this type of technique for a while but only with a speedlight. I love how the larger more powerful light has lit up the tree and ferns above..makes the illusion all the more believable.
I hate to say it because I get where you are going with this post, but I like the couple in natural light much more than with the softbox.
Totally agree with you; prefer the natural light.
Yeah when I first looked at the photo I thought it was After THEN Before. The couple is well exposed from the background, which pops them out more. The background becomes more distracting in the 'After' photo. That, and the light looks more harsh and 'fake'. But, it's probably just another bad example/photo to make a good point. As usual.
I'm with you. That lit background is distracting and the image lacks that nice, deep blacks. I used same technique to build background light in the image below. Red and CTO gels, front flash is 5400K. The image was shot in the middle of winter, indoors, overcast sky.
Everyone can have their own opinion about whether they like the background more or less but the idea is to give you more control over the background. One could say you should shoot against a completely black background to let the couple "pop more" but when you are getting married in Charleston you want to take advantage of the locations as they are as much a part of the wedding as the people.
I've included another example showing this same technique.
You strobed them frontally here, yes? The incident bounce reflecting off the fence is a bit distracting. I'd opt for lighting the fence on camera axis from behind them. And edge lighting them separately from the fence.
Nope, the front of them is lit by natural shade. Here is a video showing this entire shoot: http://www.youtube.com/watch?v=ljFdmsmpkeA&list=PLFA3FDB62CDA6E15C&index=1
Great video Patrick!
I do understand and see the pros of that technique. I flash the background A LOT. I still don't see the point of making that perfectly visible, nice, deep green foliage and lighting it even more, to the point where green looks yellowish and unflattering fence becomes visible. Adding background light is perfect for balancing the highlights and shadows of background in a situation where dragging the shutter is not enough or unwelcome. Great idea, but for me, pointless examples. Here, you could place the light directly behind them or overhead, getting the rim light and leaving the background untouched. But this is me, notice the "I" used several times :)
Not so keen on the red gel. It looks very unnatural and out of place.
It looks like the black point is intentionally darkened in the before image. His tux is much more blocked up, and it should match. I think the BG in the before image had much more shadow detail to begin with, but was doctored to accentuate the after image.
I simply synced the settings from the flash image to the natural light image in LR but now that I look at it again, it looks like the shadow slider was 5 clicks lower but the blacks were the same. the difference is very small and the shadow slider doesn't affect the added highlights caused by the flash. Thanks for pointing that out, I def don't want my examples to be misleading
Not to sound obtuse or anything, but wouldn't you WANT to use off-camera lighting while shooting outdoors? Whether it's a strobe, flash or reflector or some sort, i would think you'd have to have that in order to provide lighting needed to wrap your subjects in light, whether the sun is out or not.
And a tip i read on a forum a while back regarding catchlights is to shine a low powered flashlight where it won't affect their facial expression- you could also create a basic gobo using a flashlight to create whatever pattern you want.
Since when does sunlight come in through a softbox? Your lighting is fine, and the shot came out nice, but if you wanted sun at that angle, you need a hard, warm light. Just sayin'...
Hard light is defined by the size of the light source relative to your subject. When you place a small soft box 10 or 20 feet away, at some point it begins to looks small and act as a hard light source. The difference between say a 12" x 12" softbox and a 3" x 2" speed light at 20 feet away becomes insignificant.
Also, in this photo, the sunlight would have been hitting between leaves and trees and believe it or not but it begins to act much softer than if the sunlight was hitting straight on say at the beach or in an open field. I see what you are trying to explain but in many cases a small softbox far away looks hard enough to fool the eye into thinking it's natural sunlight.
This site has degenerated, like all other sites that allow commenting, into a vicious cycle beginning with someone sharing some knowledge that they thought was worth sharing, moving into constant counterpoint by people who did it a "better" way, finishing with the OP rebutting the troll. Why? Can't we all just get along?
Thanks again, Patrick.
It reminds me of a joke about graphic designers (and can apply to most crafts in general), "how many designers does it take to screw in a lightbulb?" The answer being "twelve, one to do it and the other eleven saying they would have done it differently." Precisely why I tend to disregard internet comment advice, of 'course' everyone else would do it differently.
I have some such pictures of my friend’s wedding. These tips seems me worthy, I will try to correct them with these tips.
Wedding Venue In Essex – http://www.spainshall.co.uk/weddings
Great trick. Softboxes are amazing, and to tell you the truth I have never thought about putting them behind the subjects for a sunlight effect. I will definitely use this :). http://bluehausstudios.com
woo, only just stumbled upon this post. Obviously everyone has their own style and preference to a photo, but deffo prefer the before shots in every case down this post. the little bright light covering the back of her shoulder is just annoying and detracting. It looks like it should have been a nice rim light but instead just all got plonked onto her shoulder.
This is so true! Read this guide for more info! http://www.adoramapix.com/blog/2016/09/29/cloudy-or-a-bright-sunny-day-p... This is such an important photography tip!
Personally i think the original is lit far better and simlly underexposed.
How is removing limbs improving anything his thumb is enormous and his hand looks back to front.
Why not a simple adjustment to the ligbt in software rather than going crazy cutting or stretching body parts .
The 'after' shot is tragically botched.
And forget real lights you put any light any
where in 20 seconds with Lightroom.
,its fine, the guy who invented McDonalds couldnt cook either.