
As Adobe continues to grow its customer base with its easily accessible subscription plans, other companies are looking to capitalize with their own software solutions. Luminar has been around for a while, but their new 2018 version introduces some amazing features. Regardless of how you look at it, at $69 for a perpetual license, it’s a steal. Nevertheless, how does it really compare to industry standards such as Lightroom or Photoshop?
Macphun (soon to be Skylum) first introduced Luminar just over a year ago after having previously only concentrated on standalone products for specific uses such as Aurora HDR, this year’s version of which just won Apple’s App of the Year. But pushing out their first all-in-one editor with Luminar wasn’t the only major shift: Macphun’s name change to Skylum, which will take place early next year, is indicative of the fact that their software is no longer Mac-only. Luminar 2018 is now available on both Windows and MacOS platforms completely subscription free at $69. It’s hard to imagine what would make someone not switch from Lightroom or Photoshop at those prices. But can Luminar really be a replacement?
Understanding Luminar
Luminar has a significantly different layout compared to Lightroom. Most notably, Luminar has support for layers. In its current form, at least, it’s also a single image editor. You can save edits as a preset to use on other images, but each image is opened and edited in its own, separate editing window. This makes it more comparable to Photoshop.

Luminar opens each image in a different editing window.
On the other hand, there isn’t a single destructive edit available in Luminar, and all of the various types of edits (“Filters”) feature extremely user-intuitive sliders that create a very Lightroom-esque experience… if it’s set up properly. Personally, I prefer to think of Luminar as a sort of “Lightroom with layers support.”
Upon first opening Luminar, Mac users especially will immediately be familiar with the app design. It feels like an Apple-designed application in its simplicity. Something I don’t particularly prefer is the presets panel that is open by default. But this is easy to hide (and if you have your own presets built into it down the road, I could see this being something one might want to start with on a regular basis). Additionally, there are no filters in the sidebar by default. Essentially, imagine Lightroom’s Develop module without any of the sliders — just blank. So Luminar naturally takes a few minutes of setup to get just right for your own use.

The Filters Catalog will probably only be out at certain times once you get everything set up the way you like it. But also note that every filter limited in its application by Brush, Radial, Gradient, or Luminosity masks. Lightroom only lets you make certain adjustments with these masks.
Clicking on “Add Filter” brings up an additional Filters Catalog sidebar with around 50 options from Develop (essentially akin to Lightroom’s Basic editing section with exposure, contrast, highlight/shadow/white/black, and clarity adjustments) to lens correction or special effects filters. My own gripe with this section is that some of the names for these filters are relatively arbitrary. It takes a moment, for example, to try out Brilliance/Warmth, Golden Hour, Image Radiance, Orton Effect, Soft Glow, and more to understand what each really does relative to the other. Even once you try them all, it’s not always clear which creative filter would be the best for a particular situation. But I imagine users would find their favorites and stick to that.
Thankfully, you don’t have to worry too much about the setup of your workspace if you don’t want to. Lightroom switchers might want to try the workspace drop-downs “Professional” or “Essentials” for a good starting point with the filters they would most use. After this, you can still add other individual filters that suit your editing workflow.

Starting out with the "Professional" workspace is a great way to get to a Lightroom-like basic editing experience with the click of a button.
Benefits
Overall, the editing features in all of these programs really do the same thing. A lot of people will scoff at that statement. And of course, each company has better algorithms for certain things and worse ones for others. But to try and distill these differences quantitatively — that’s just not going to happen here. And for the most part, you really do get the same features, which begs the question: why not just stick with Luminar for a one-time $69 purchase? Well, of course, there are bigger differences. And we’ll get into those. But there are certainly a few amazing features with which Luminar really hits it out of the park.
Sun Rays is a new filter to Luminar 2018 and is easily the most impressive standalone upgrade. We’ve all seen those YouTube tutorials of creating sun rays through trees in the park by brushing a warm, increased exposure setting in ray-like patterns in Photoshop. You could arguably emulate a similar effect in Lightroom with an adjustment brush. However, Luminar 2018’s Sun Rays is pure magic. First, you can use the X- and Y-axis sliders to position a burst of rays in any location within the image. But completely inexplicably, Sun Rays automatically masks itself out of the foreground where the tree's branches would obviously block the sunlight behind it. You have control over how intense, warm, and numerous the rays themselves are. And you can also change the size of the light source, which is also impressive. Sun Rays will only make the absolute, brightest areas between the leaves brighter or larger as you play with the size settings. The leaves are unaffected; you’re not adding a giant orange sun in front of the trees that you then have to manually mask out.
Seriously, this feature alone is worth a download of the trial at the very least to play around with it. Moving the sun with the axis adjustments feels so real because of the automatic masking that it feels like you’re a god, just moving the sun wherever you want it with its rays truthfully adjusting around the foliage in your image. Absolutely amazing.
Having layers in Luminar is also great. This isn’t new to this year’s version, but it’s worth mentioning that there’s no real way to merge two images on top of one another in an application like Lightroom. Having the ability to do sky replacements without leaving to something like Photoshop is a nice feature. The same goes for Free Transform, which Lightroom should at least let you do in a basic way, but doesn’t.
The sheer number of filters is great as well. Although it is a bit annoying to me to have so many similar filters, it’s not really an appropriate complaint that there are too many features, which is the reason for this. Each filter, obviously, has a slightly different algorithm behind it that effects elements in the image differently. At the end of the day, having access to these different ways to tweak your images is what’s going to give you the greatest flexibility. “Did Clarity not quite give you what you’d hoped in this image? Perhaps tweaking the sliders in the Details Enhancer will get you what you’re after for that particularly tough spot, today.” That’s the kind of situation where Luminar is great; They throw all these options at you so you’ll have access to them when you do need them.
Overall, it's very easy to get to a great basic edit with Luminar, and not much more time-consuming to go all-out if you need to.
The Accent AI filter with its single “Boost” slider is really just an automatic enhancement filter that, in theory, is a one-slider-edits-all function. Of course, this simply didn’t work well for me on a number of occasions, and especially with film images where it doesn’t seem particularly well optimized. In fact, Accent AI seems to be somewhat of a magical HDR adjustment. I have seen great examples of it in action, however, which is why it deserves a spot here. Sometimes, for a simple landscape shot, throwing a bit of the Accent AI boost into the shot is all you need before you’re ready for a quick export and post to Instagram. If it saves me time at least once, I’m happy.
Ease of use is something that professionals all too easily dismiss. I believe this dismissal comes from the hasty assumption that something that’s too easy to use or that looks too simplistic can’t possibly be as powerful as its more complicated counterpart. However, that’s simply not the case with Luminar. Its ease of use makes it approachable for everyone, but its overall feature set is powerful enough for any professional user. So while there might be other reasons this doesn’t work for your workflow, it’s a silly error in your own psychology to be put off by Luminar’s easy user interface. And for those that are new to the editing game, this is something that really makes it easy for me to recommend to anyone that’s starting from square one and is choosing their first editing application.


It's hard to quantitatively measure the power or effectiveness of each filter. But with noise reduction, it's slightly easier. Still, setting each to the same number is far from necessarily an apples to apples comparison. But in this case, the noise reduction power was fairly similar. Both applications do allow for a good control over how strongly your reduction is applied.
Performance
A quick word on performance, since performance isn’t exactly a benefit, but it’s not something that’s bad, either. For this, we really have to compare more to Photoshop than Lightroom, since Luminar is still really opening each image individually and isn’t (yet — more on this later) managing an entire catalog in the background. But it’s worth noting that Luminar worked seemingly as quickly as Photoshop in most instances. Sliders and the changes they make occur instantly. It might, however, take a bit longer to load the image initially, and the amount of RAM used per image in Luminar is “up there” compared to Photoshop. So while it might behave similarly, Luminar was using about 2 GB of RAM while it had a 200 MB TIF file open while Photoshop barely broke 200 MB extra once it opened that image. Of course, that increased for both programs as edits were applied. But that’s a massive difference in resources. While you might be able to open several dozen massive images in Photoshop, I could never recommend more than a handful of large TIFs in something like Luminar.


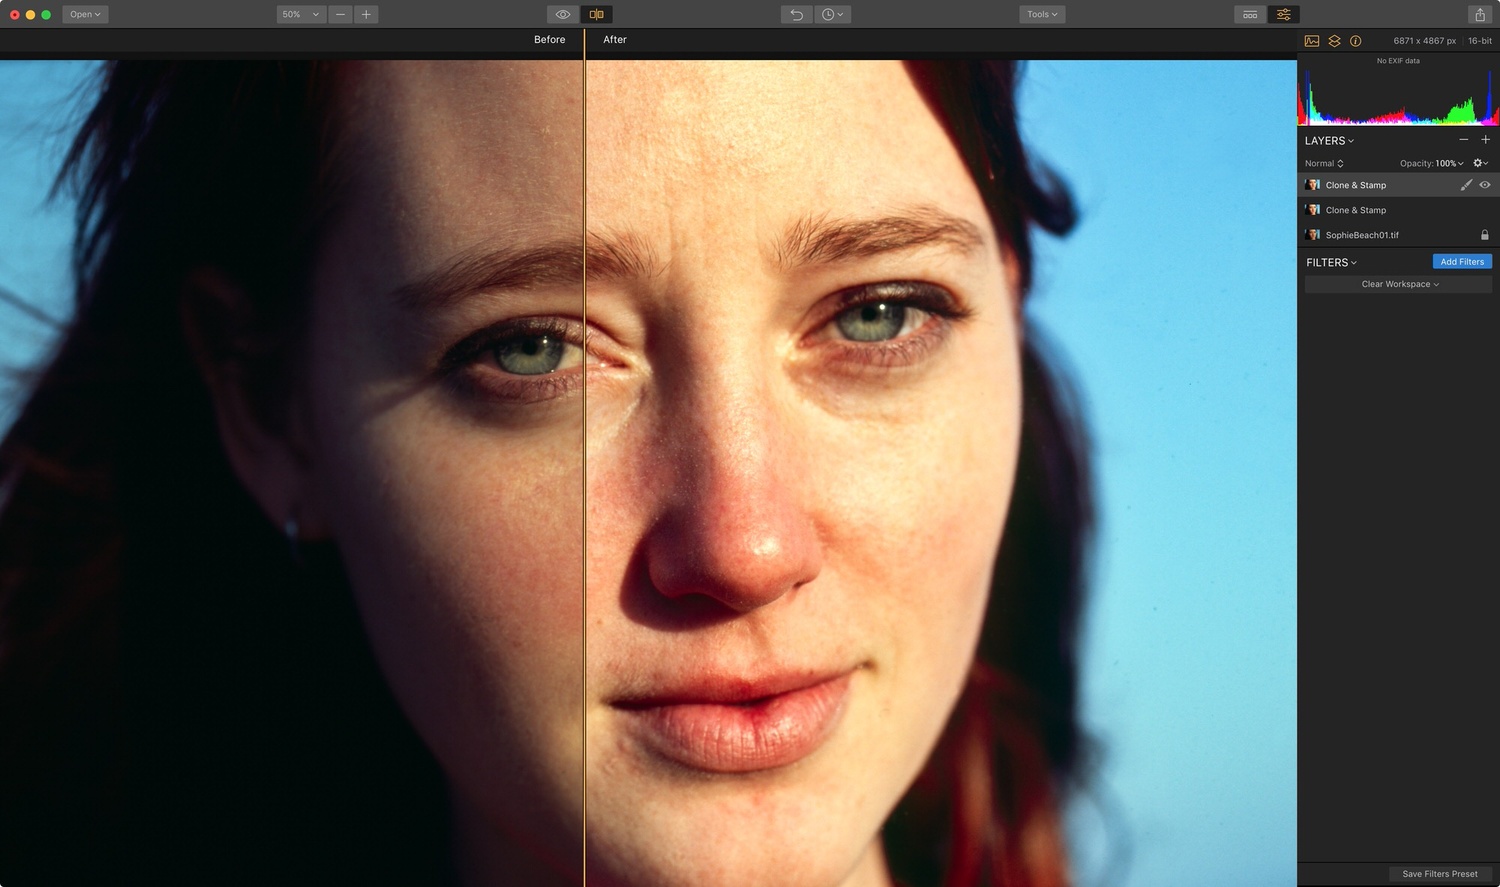
I noticed next to zero bugs in Luminar 2018. The only strange thing would be the occasional hiccup, especially when undoing a change such as a Clone and Stamp adjustment. In this case, every time I would undo any of my changes, the brush would quickly “activate” each previous adjustment all in a second or so and then would jump back to my cursor where I had left it, finally undoing the change as requested. This all happened very quickly, but it wasn’t an instant undo and was a bit of a strange behavior.
Unfortunately, there are also some waiting periods while the image process when you go into certain tools such as Clone and Stamp, etc. It just takes several more seconds for some processing to take place before Luminar will let you start to use that tool. Not a huge deal, but not the most fun.

The file preparation wait time before some edits isn't a deal-breaker, but it's slightly annoying. Still, it's no different than the way Photoshop behaves for some edits, but it does it in areas you might not expect, as in Clone and Stamp.
Drawbacks
I’m not too happy with Lightroom’s spot removal feature. It works really well, honestly. But it bothers me that Adobe can’t include the powerful features in the Content-Aware Healing Brush that is still only available in Photoshop. That said, I do like its function better than that of the Clone and Stamp function in Luminar. First, there is no magical content-aware-type healing brush in Luminar, either. Second, the content pasting preview that shows what it will look like within the circular outline of the brush is something I (and many editors) have come to rely on. I feel blind when I can’t see that well, and the inside of Luminar’s clone stamping tool has a sort of low-opacity overlay on it in addition to an orange-colored feather-indicating circle. Both of these factors disrupt the view of what is being cloned in behind the brush, making it more difficult to use. It does work well, but it’s just not as nice or smooth in practice because of this lack of real-time preview capability.
A new High Key filter is again something that I’ve seen excellent examples of, but in the images I was trying to use it within, it seemed a bit too overzealous and would create a bit too much of a high-clarity look to the point of being grungy. Used sparingly, it could be nice for landscapes, but I just couldn’t get it to be as amazing as it looked in the example photos for portrait use.
Being limited to opening one image at once and not exactly having something akin to Lightroom’s timeline is the main drawback for me, personally. I’ve gotten incredibly used to this format, which allows me to batch edit and “single edit” side-by-side from the same import or shoot. This is important since I usually have a few panoramic images or subsets of images that in one way or another need to be merged or processed together, while all of the rest of the images need to be culled and treated separately on their own. Lightroom makes this easy, but Luminar doesn’t — yet.
Asset Management
Luminar 2018 doesn’t currently have any kind of cataloging or asset management system, but it has been announced and will be a free upgrade coming to users early in 2018. This is another reason why it’s fit to compare Luminar to Lightroom. Unfortunately, though, we have next to zero information about this new system and how it will work. Will it be simply like Adobe Bridge, which is honestly on its way out for all that didn’t start with Bridge early on, before Lightroom was ever a thing? Or will it be as or even more powerful than Lightroom’s catalog and collections features? There’s really no point in speculating, but if Luminar gets this right — well, that’s what it needs to become a true Lightroom replacement. And then it absolutely could be just that.
Plug-In Capability
The thing is, the beauty of Luminar is that it doesn’t have to be a complete replacement. As-is, the Sun Rays feature is honestly enough for me, personally, to use Luminar’s plug-in feature. From either Photoshop or Lightroom, I can easily export an image for editing in Luminar, where I can use specific filters that suit my needs to quickly make changes that the other two just can’t cover in the same way. Why bother painting in all my sun rays when I can use Luminar’s seriously awesome automatic filter for that (honestly, girls and boys, just try it out already)? Why bother opening Photoshop when it’s honestly a three-click and quick brush process to do a sky replacement in Luminar?
Final Thoughts
I can tell you honestly that I won’t switch for my uses until and/or unless this asset management really works. And even then it’s a big “if,” since it’s already a hassle to think of switching my entire workflow and my existing system in general. I also don’t think professional retouchers will make the switch. But for 99 percent of the population, Luminar is a great alternative and an even better supplement to your current workflow. And as a supplement — well, I’m already using Luminar that way plenty. It’s not like it’s expensive.


I was having a problem with it crashing on PC. When that happens it didn't remember what file I worked on and all the work I did..Got frustrated and haven't opened it since cause for all the little things I don't like about LR, I know I can get my work done with no issues like those.
Hi Brian, would you be so kind to send us your PC info, original photo and the crash report at support@skylum.com? Also, please specify the exact steps you perform before the crash occurs. Thanks!
I am a Lightroom user, but I purchased Luminar just in case Adobe does "something" to really abuse their monopoly. I do not like the "process one image at a time" issue. Therefore, I really can't give the product a fair assessment until they come out with the upgrade. I also conduct seminars for those interested in improving their photography, and I get a major push back from students who don't want to spend a monthly fee for post processing. So, I am hoping that this product will enable me to introduce a cost effective product to students that I am trying to get off the jpeg bandwagon.
Hi Ed, we'll add a supercharged DAM platform to Luminar 2018 as a free update later in 2018. Also, the Batch processing tool is available in the Mac version, which allows you to process multiple photos at a time. The Batch processing tool will be added to the Windows version of Luminar 2018 in the mid-January update.
Unfortunately, I am working with windows.... thanks
I've been using Luminar for a few weeks now. It crashed regularly before the recent update which seems to have repaired the issue. I too find the single instance editing frustrating. I am also not a fan of the so-called lens correction compared to Lightroom. I have adopted a workflow where I open my raw files in Lightroom and use the plugin after I do the lens correction, shadow, highlights, whites, blacks, and sharpening then export to Luminar for tweaking followed by a quick trip to Photoshop to convert from a 16bit tiff and a little more tweaking and sharpening. I hate the time it takes for this process but some of the results are so stellar that I can't help but go through it. Welcome to my new hell. Also, Lightroom doesn't recognize the raw files from my Canon 5D mark iv so I use the single instance of Luminar and then fine tune in photoshop. Adobe and Canon can both kiss my collective buttocks and I let them know every chance I get. Heres to hoping Luminar grows into a full grown program one day. I'll be keeping Affinity Photo on my radar as well.
Hi Mark, we're planning to add the Auto Lens Correction tool in one of the future Luminar 2018 updates. Currently, you can use the Manual one. Also, we'll keep improving Luminar 2018 performance in the upcoming updates.
All those are user specific, most software let user specific folder and files alone when uninstalling.
So you think that all software should delete all userspecific data thats been created by that software?
What about MS Outlook, MS Excel, Words... or what about Oracle DB, MySQL, Sqlite, or other software that use databases to store user data and settings, should they delete everything?
Or is it better that they leave it, and let the user delete it manually if needed...
I know what I like, I like to keep my data and my settings and metadata...
Hi Bob, currently, Luminar 2018 doesn't support Sigma cameras. However, we're planning to support them in the future
"It's understandable for a Sigma RAW file to take time to process because they hold so much more data."
Your local "White Pages" holds a lot more data than a PIM but nobody uses that, either. ;-)
~ Sorry. I couldn't help myself! :-D
I used the :-D emoticon just for your benefit and you STILL didn't realize I was joking. :-(
I'm sorry I'm ignorant. It's my parent's fault. They couldn't afford to send me to college so they never let me study. :-(
It has one MAJOR flaw that they don't appear to want to address, you can only export in pixels. You have no way of exporting in cm's, inches or anything other than pixels. How they can ignore this is beyond me. It's a lovely bit of software but it's not PRO for me. It's the same thing with Aurora and they still haven't added it in that so I have zero confidence it will ever be added.
To be fair, a lot of software exports in “pixels,” since it’s the pixel dimensions that determine the actual resolution of the photograph. Sizing units such as inches or centimeters are arbitrary, since at the end of the day, you can always print any file to any size print you want. The quality of that print will still be determined by the pixel size. So I’m personally a bit unclear on what functionality you’re trying to replicate that you find useful. Do you have an example of software that does what you’re looking for? Just curious myself...
I have clients that regularly specify they need an A5 image at 300dpi for an advert for example. EVERY piece of software that I've ever used including Photoshop, Capture One, Pixelmator Pro, Affinity Photo and on and on will allow me to resize a document in a few clicks for the client or export with these options. Macphun are the only software company I've ever come across that doesn't allow this basic feature. Everything is in pixels only. We work 90% with print and this is a basic feature.
My biggest issue with Macphun is the PRO badge. They just aren't. Serif and Pixelmator react to feedback like lightning and I can see both of those companies really giving Adobe sleepless nights but Macphun, no, sorry.
It would be nice if it showed the size that it would print out to at the given DPI, but you can actually set the dpi and long- or short-edge limits in pixels upon export. But you're right, you'd have to manually do the calculation if it was important for you to get the perfect output so it's the physical size you need it to be at a particular resolution. But at least you can change the settings in one way. Still, hopefully they update that in the future so it's not quite so annoying to do the math, even if it's simple...
I just began using the demo of Luminar 2018. Please correct me if I'm wrong-- there's not an option to apply watermarks or to set different color spaces when exporting, is there? I looked in the user manual and didn't see any mention of either.
I noticed that my exported files - whether they are JPG or TIFF - are desaturated compared to how the image appears in Luminar. This is even the case when opening the TIFF in Capture One 11 Pro.
My opinion of the default presets that Luminar offers is that they are waaaay overdone. In the same way that say a Thomas Kinkaide painting that basically glows in the dark. It's good that Luminar enables users to dial down the preset strength, but I wonder who they have in mind with this software...photographers who want their photos to glow in the dark due to such exaggerated colors?
For watermarking, you can actually import another photo (i.e. your logo) as a layer over the image. That's how I'd do it in Luminar. But I'm not aware of a watermark-specific feature (which would definitely be nice to have in the export dialog).
For setting color spaces, you can actually do this upon export, where there's a drop-down menu just for that (offering Adobe RGB, ProPhoto RGB, and sRGB). Of course, depending on how you export it, you want to make sure you're opening it in the same space or properly converting if you're working in a different space in another application. Photoshop by default asks if you're bringing in a file with a different color space than the one being used in the current workspace and lets you decide to convert colors or not right then, but I believe that dialog can be cleared by the user... It might be similar for C1.
Also, yes, the presets at 100 are overdone, but that's because you really are supposed to pull them back. I think it's done that way by default to help show the effect in the small thumbnail preview before you click on it. But sure, it would be nice to have it automatically pull back to something like 30-50 once you apply it until you adjust it later...
At the moment I'm not convinced by the colour management engine inside their products. The preview display for Aurora HDR 2018 on pc is not fully colour managed. It seems to assume an sRGB monitor, but not use the monitor profile. Is Luminar different?
See Windows screenshot Luminar 2018 and Photoshop CC user interface: my image is sRGB, but see the colors: eg. red is different!!! (You can use pipette and measure). Luminar use something else than sRGB profile and it seems that Luminar 2018 not understand my monitor ICC-profile.
PS: (Keep in mind that the colors just look different, they are not r e a l l y d I f f e r e n t !!! When I return to Photoshop, colors have not changed. However, editig this image is "annoying" because the colors do not look right.) Or did I understand something wrong?
Thanks for the reply, Adam. I looked for color space options in the Export dialog and didn't see them. Even checked the user manual and didn't see mention of them.
Could anyone explain where exactly this selection is?
There's a photo above that I sent to someone in a reply to exporting with different dpi options. It's one of the options there as well. Hope that helps.
I have to agree with Ben D here.
The option you state exist in the Mac version. In the Windows version you do not have those options (no color space). You could go on the Luminar Web site and compare this feature in the Online guides they put at our disposal. You will see that the Windows guide makes no mention of what really exist in the Mac guide. I find that quite aberrant.
It also seems that you can't save files in the .lmnr format in Windows. This format, in the Mac version, enables you to open the file and reedit, if desire, each of the filter settings you did. There's no such thing under Windows. The best way to get around this is to work in Photoshop and then call Luminar as a smart object. Again that's quite aberrant.
I just can't understand why there is so much differences between the Window version and the Mac one - and nobody seems to have pick up on this.
If someone from Luminar can give me some answer about this I would be please.
That's a bummer, Rejean. I didn't know there were so many differences for the Windows version. Sorry to hear that. Hopefully they bring feature parity with future updates...
Just did an Update and now all the Options in Mac are now available in the Windows version. And the speed of the software is much much faster. Please share!
Thank You!
I honestly feel that I got carried away with my purchase of Luminar 2018, after watching a few clearly sponsored YouTube videos (from "unbiased" photographers). Unfortunately it then took a week longer for me to get the download link after the promised delivery date, and only when I wrote to the customer service. My activation code was simply rejected for the download pages and the registration in their 2 account systems didn't get me the download either. Luckily the customer service wrote back on the next day.
Now to the program itself, because I feel that a lot of reviews are very one sided.
First, why is everyone suddenly so obsessed with fake sun rays? I agree that it was fun to play with that feature, but almost every picture ends up looking just like the next tacky Instagram post.
It also surprises me that speed issues seem to be always minor in reviews and articles, but much more frequent in comments. On my late 2016 core i7 laptop, Luminar takes as long to open a single picture as Capture One takes to pre-render ~25. Edits and especially undoing them on raws is painfully slow, and that's for small sized ones (Sony 24mp and Panasonic 20mp sensor).
All in all, I would recommend the trial version and a close comparison with other alternatives such as Capture One, which gets a lot of new functions with every update and has an incredible raw engine. If you're using Lightroom, but you're up to discover all your pre-sets/filters anew, Luminar might be an alternative for "filter on that, now upload to Instagram".
So far I honestly doubt that a lot of studio or journalistic professionals will switch, but that's probably also not the target group.
If you are a studio or any other kind of professional and can't afford to spend $99-120 a year on Photoshop/Lightroom then you should quit your job, cause you aren't doing it right. (I know there are some religious non-Adobe fanatics, but I don't take those seriously, companies want money, bohoo)
That said I have bought both Luminar and Aurora, and also Affinity Photo (another Mac based Windows late comer) and they are all far from replacing Photoshop in their respective fields. (my reason for buying them is that I have CC through work on can only have it on my work PC and home desktop, not on my Cintiq Companion).
My feeling on Luminar is that it's a light Lightroom with some Photoshop filters and layer functionality on top. I have played around with it a bit, and I'm by no means a good photographer, but Luminar made me realize how good a job I had done in Photoshop when I originally processed my images. In Luminar it feels like even when I tone things down it's always "turned to 11". I think with time and training I can get around that and produce some decent results, but it really does too little of the "pipeline" to replace anything imo. And it really is quite slow, it has the feeling of a web tool. But that's Windows, though on i7 6700k, 32GB RAM. I haven't bothered to check if they do any GPU acceleration though.
If the primary reason to buy this is a sun ray filter, and it certainly appears to be what the reviewer thought was the most important thing, then I can't see bothering with the trial version. There's got to be something a little more useful than that unless it's aimed at the selfie crowd. And if that's who it's aimed at, it should be an app for $3.99
I’ve been using luminar, aurora and intensify for some time. They all have a place in my workflow and have produced nice results. But their technical support is horrible. They only provide email support and you will wait weeks for a reply. When you receive the reply it will be simplistic and the reviewer will not have even read the thread of emails that went before.
I bought both Luminar and Aurora when the 2018 PC version was released. I am a retired software engineer and am used to support working with engineering to fix problems in a methodical way. These people are rank amateurs. Somebody showed them how to send autoreply emails that sound folksy the first time. They brag about how many issues they receive a day as if that's a virtue. They refer you to a FAQ that has nothing at all useful. I've been complaining for a couple of months that when the user interface of either product is close, the process is not terminated. Run a program 10 times and you get 10 instances of it. When calling Luminar from Photoshop, the result is not sent back to Photoshop until I seek out the errant process and kill it manually. They don't seem to believe me or don't know how to fix the problem.
Often amateur support organizations undervalue the power of information sent in by customers. They assume that the customer is stupid and don't realize that we all run other programs that don't have a problem.
I've clicked through to send my information to support@macphun.com but in these comments I see support@skylum.com. The folks at support@macphun.com haven't got the memo about a corporate name change.
Now when I get emails from Macphun/Skylum/DontCare, they are about all the theoretical things you can do with their products, assuming that you have no issues with their software.
I think their support organization is hiding and hoping that "problem" customers will give up and go away and stop bothering them.
I really HATE Lightroom and want to uninstall it from my MacBookPro Retina, if I can. As soon as I opened Lightroom, it seemed to highjack all my images and stick them in Lightroom's own file system, so now I can't find my photos in the folders I had originally assigned them to. And for those of us who don't have time to get an advanced degree in Photoshop (nor want to keep paying Adobe fees for the rest of our lives), the Lightroom interface is frankly a mess. When I was still using a PC every day, ninety-five percent of what I need to do with my photos I could accomplish using Thumbs-Plus Pro (a family-owned, richly featured software program available at Cerious.com; creating thumbnails is the least of what it can do). I'm interested in Luminar primarily because Dan Bailey recommends it, but I need something simple enough that I won't die of old age before being able to master it.
>> As soon as I opened Lightroom, it seemed to highjack all my images and stick them in Lightroom's own file system<< You have done something really wrong and don't understand LR. LR doesn't have its own file system. It can't move photos on its own, and when you move them, you have to choose a destination. Once again, it has no file system so there is nowhere for it to move your images.
>>he Lightroom interface is frankly a mess.<< How much time did you spend on it? It's very intuitive (far easier than Photoshop) and cleanly laid out. What, specifically, is a mess?
"Overall, the editing features in all of these programs really do the same thing. A lot of people will scoff at that statement. And of course, each company has better algorithms for certain things and worse ones for others. But to try and distill these differences quantitatively — that’s just not going to happen here. And for the most part, you really do get the same features"
Precisely - that's why I don't rely on any one program. Although Adobe's moving on & leaving me behind, I do still use PS to print my photos - and for a few other minor edits, including cropping. Mostly, now, I'm using a range of others, depending what I'm trying to fix. Fortunately, when you try hard enough with the cam, you get shots that don't need anything major, most of the time.
I think you also learn something about post processing, when you use several different products. A skill set, perhaps, that doesn't come with sticking with the one product.
Several comments about to leave Adobe products refer to the subscription model and “I don’t want to pay forever a fee” however Macphun (or now Skylum) releases a new upgrade of its software every year that is paid and immediately cancel support to any previous version pushing users to buy the upgrade. At the end it looks like the same subscription model but paid in a yearly basis.
So, if you bought Luminar v.1 but you got a new released camera or would like the announced DAM, you have to buy Luminar 2018, same policy applies to Aurora HDR. If you own both programs, at the end you will end paying more that a year subscription of LR/PS to get the upgrades.
Hi, I am new to photography and I am interested in purchasing this software but before I do that I have a few questions. 1. I have a Panasonic GH4, can I still edit my pictures with this software? 2. Does the software work alone or do I have to purchase a membership like Photoshop and Lightroom? 3. is it compatible with a Mac desktop and Ipad? 4. and last one, can I do jpeg files or does it only work with raw files?
Thanks!
Thanks, Cecilia. To the best of my knowledge, any modern image editor should be fine with GH4 files. With Photoshop, Lightroom, Luminar, and many other applications, both JPEG and raw files from nearly any modern camera of the last 5-10 years (or more) is supported. Most editing software works on one of two business models. Option 1, like Luminar and many others, has a one-time purchase fee, and smaller updates are included in that. But major version changes will require paid upgrades (at a discount from buying in full again if you already own a previous version). Other programs such as Photoshop and Lightroom work on entirely subscription-based plans where you might pay a lower monthly fee, but both the fees and any updates are perpetual/constant over time.
One is not always cheaper or more expensive than another, so look through the plans to decide what's right for you based on how often you might need/want to upgrade to new features, to continue new camera support if you update cameras often, or to maintain the latest performance upgrades to help speed up a high-volume workflow. Each person will prefer a different method depending on his/her needs...
Hey guys, does Luminar have Lens correction like LR? I'm new to editing, I just purchased the Luminar 2018 and Sony A7III, I hope they'll support the A7III Raw files before I get my camera :)
Thank your for the review. Regarding the Libraries / DAM, i wrote to customer service and apparently it will not support KEYWORDS and CAPTIONS. Hard to know what is the utility of a DAM if you can not search text strings / terms in the caption or keywords fields. I am looking for a Lightroom alternative, as I do not like the subscription model, but it seems Capture 1 is still the only other option. Luminar seems to cater to amateur crowd, the images on reviews often look overbooked with HDR, and the sun rays feature seems really a gimmick that no photo journalist needs. I am going to purchase Fast Raw Viewer that I just discovered as it allows me to check 100% magnification focus almost instantly and it is faster for culling images than Lightroom, but Luminar does not seem worth evaluating on a trial. Customer service's replies have been generic, if they target professionals they most likely provide a roadmap of features. No captions / keywords ability is a dealbreaker for me in a Lightroom alternative.