
ACDSee's brand new edition of Photo Studio Ultimate has arrived on the scene and offers a powerful new tool to revolutionize color editing in your photography workflow. With plenty of fantastic new features, upgrades to old favorites, and a few time-saving innovations, this software is a strong contender in the world of photo editing.
For years, a couple of key players have monopolized the photo editing software scene. There have only been a handful of companies offering robust, reliable, and innovative photo editing programs. Like many professional photographers, I have relied on Adobe products for the bulk of my editing for years, but I have a feeling that may change soon. Now that I've tested ACDSee's 2021 installment of Photo Studio Ultimate, I'm excited to restructure my workflow.
The first thing I noticed about using Photo Studio Ultimate 2021 was the startup speed. If you're used to sitting and waiting for what feels like forever for your Lightroom catalog to load, you'll love the speed and efficiency of this software. There's no need to create catalogs, upload, or import your photos. Just start the program and choose the folder that you want to work from on your computer or hard drive. All of your images pop up in thumbnail form, ready to go. Users of previous versions of Photo Studio Ultimate will be excited to know that this new version loads up 100% faster, meaning you can get to editing with zero lag time. Raw images are decoded quickly (50% faster than previous iterations of the software), so when you click on a thumbnail to start editing, it's up on the screen and ready to adjust right away.

Here's what you'll see in the file management module of Photo Studio Ultimate 2021. The software was able to read all of my previous LR xmp info so images I had previously flagged, rated, or color coded were ready to go.
One of the cool things about this software is that it combines the functions you might have previously used in Lightroom (called "Develop") and Photoshop (called "Edit") into modules within the same program, so if you're looking to streamline your workflow this is a great option. Switching between modes (from file management thumbnails, to Develop, to Edit) is incredibly fast as well (again, 50% faster than previous versions) and you'll be prompted to save when necessary so there's no risk of losing any of your work.

The layout of the Develop module is very straightforward and well organized. There are lots of tools along the left-hand side, so while it will take some time to explore and learn them all, you definitely have plenty of control.
The layout of the software is pretty straightforward. There are left-hand and right-hand control panels that can be arranged and customized a bit to your preference. Develop Tools are located on the left so settings like exposure adjustments, white balance, curves, and color wheels are all available in collapsible menus. I edited my photos by going through the tools from top to bottom and that seemed like a natural and successful workflow. On the right side of the screen, you'll find the histogram, presets (yes, you can make your own), and edit history. An Info Palette with your image's EXIF data hovers in the bottom right corner, but you can choose to hide it or dock it with another menu.
One of the features I was most excited to test in Photo Studio Ultimate 2021 is the brand new Color Wheel feature. One of my biggest frustrations with other photo editing software is feeling like I can't get enough specificity with color editing. Adjustments either feel too global or require too much deliberate manipulation of certain areas and ranges. The frustration factor is high. In editing my images I prefer to stick to what the scene looked like at the time of shooting, so I require software to offer a certain degree of specificity and subtlety. Photo Studio Ultimate meets that challenge.
ACDSee has released a couple of tutorials on how to use the Color Wheel, but here's a step by step of how I used it to edit photos taken last year in Arizona:
Step 1: Select the First Color You'd Like to Adjust
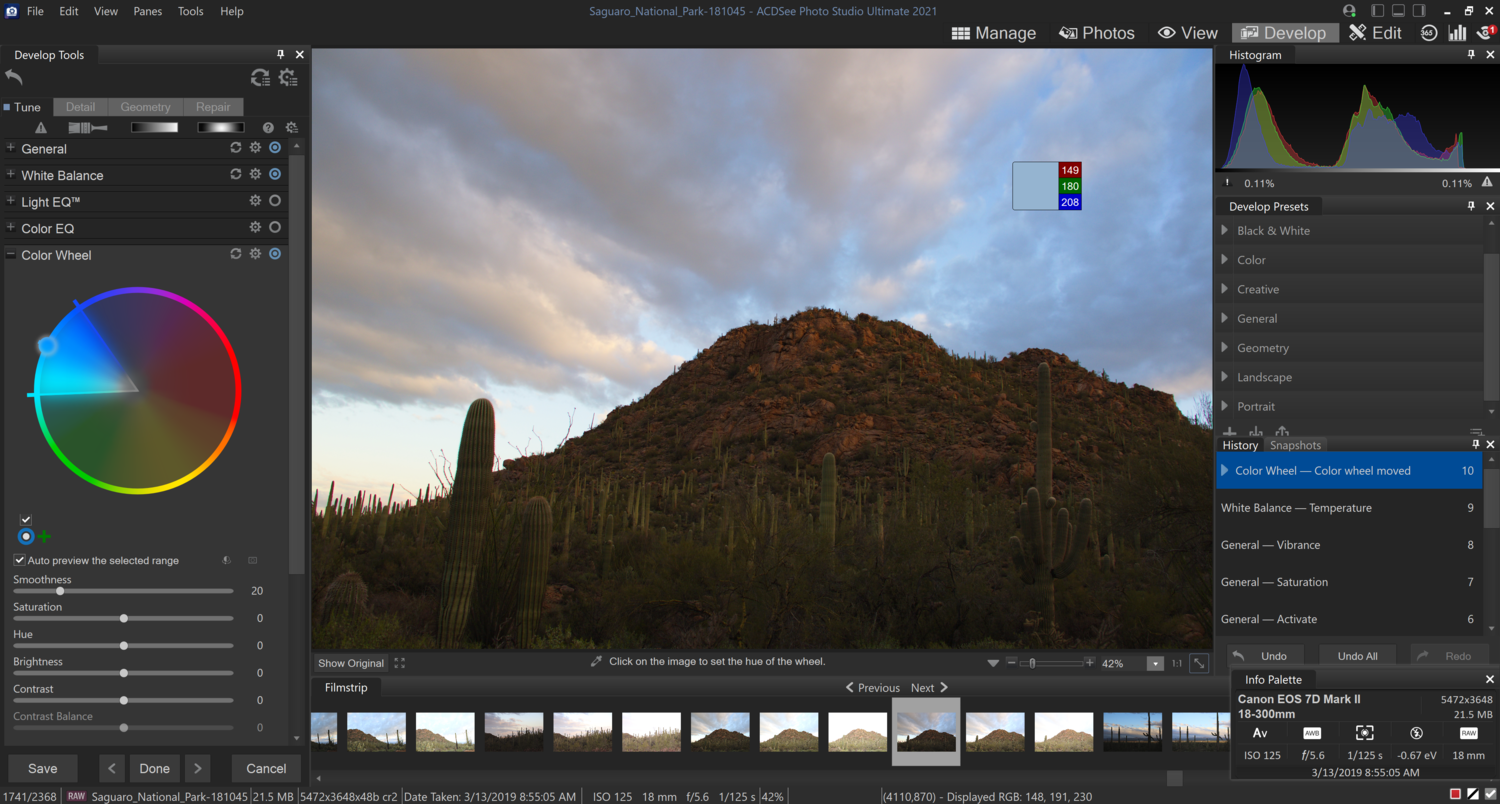
Click the plus sign in the menu to collapse other settings and bring up the Color Wheel tool.
When using the Color Wheel you can adjust colors individually within the image. Hover over any portion of the frame and you'll see the color picker pop up with the identified color in a small box. For this image, I started by adjusting the blues in the sky. When I found a blue I wanted to tweak I clicked on it and the color wheel in the left panel immediately selected a range of related colors with the color I picked at the center of the range.
Step 2: Adjust the Selected Range

Here I'm working specifically on the blues in the sky.
You can click the boundaries on either side of the selected color range and drag them to increase or decrease the size of the color range. I increased the color range a bit to include more of the purplish blues that were in the sky. As you adjust the range, the image will become grayed out in the areas unaffected by your changes. This is a great preview so you can really fine-tune what you're doing and make sure you're not adjusting unintended portions of the image.

The color range selection is really customizable. You have a crazy amount of control with the Color Wheel.
One of my favorite features with the Color Wheel is that you can adjust the color range selection even further by dragging outward from the center of the circle, or drag inward from the outer edge of the circle. The outer edge of the circle represents the most saturate tones in that color range and the center of the circle represents the least saturate tones. This allows you to refine that selection even more. Once you're happy with your selection, you can go ahead and play with settings (like hue, saturation, brightness, and contrast) of just that selection.
Step 3: Move on to the Next Color

Time to move on to the oranges and reds
To edit the next color, click the plus sign next to your first color adjustment in the left side menu. The color adjustments will be color-coded for ease of editing later on if you decide to make changes. You can see in the above image that I started with blue and moved on to red/orange. Click on the image to select the next color you'd like to work with. Drag any of the borders of the color range just like before to include more or less of a range in your selection. As you make changes, you'll see a preview of your color range selection on the screen — this is a great help to make a very specific selection.

For the reds and oranges I wanted to target the rocks specifically and not the clouds, so I decreased the size of the range by dragging the border out of the yellows.
Once you're happy with the color range selected, make your adjustments on the sliders until you're happy with how that color range is looking. You can adjust the selection further at any time and your slider adjustments will be preserved and applied to the new color range you select.

I could have continued to tweak those color range borders and the slider adjustments would only apply to the newly selected color range.
Step 4: Keep It Going With Any Other Colors You'd Like to Tweak
The last color I adjusted in this image is the range of greens. Because they were in shadow I felt that I was losing a bit too much color. To bring them back I selected the plus sign and clicked on a cactus to sample the range of greens.

Time to adjust the greens...
You can keep fine-tuning colors by clicking the plus sign and sampling new color ranges. The software will allow you to adjust up to 10 selected ranges. If for some reason you need a bit more specificity (like if I had wanted to adjust one cactus in particular) you can use the brush tool at the top of the left panel to paint your adjustments in a precise area.
Once you've finished with the Color Wheel you can go on to other adjustments to finalize your image. ACDSee has also added a similar tool called the Tone Wheel that we'll be addressing in another post - it's just as powerful and nuanced as the Color Wheel allowing you even greater specificity in your editing.

Here's the finalized image!
Overall, I really enjoyed editing with the Color Wheel and all of the other tools available in Photo Studio Ultimate 2021. The more I explored it the more I discovered clever things ACDSee has incorporated to help streamline your workflow. They have brand new keywording options, a batch file renaming tool with lots of potential customization, a brand new text tool that allows you to overlay text on a curved path, and one of my favorite features that doesn't even require you to have the software open: the ACDSee PicaView. Right-click on any image thumbnail from any folder on your computer or hard drive and ACDSee will give you a preview thumbnail complete with all of the important EXIF data. I used this shortcut many times while organizing a couple of hard drives and it was a real time-saver.

The ACDSee PicaView is an awesome add-on with the software installation.
For more information on the Color Wheel check out this tutorial:
Photographers looking to break free from subscription editing services without spending a ton of money will be excited to see how much functionality ACDSee has packed into their Photo Studio Ultimate 2021. Give it a try and see if it can help adjust your workflow, save you some time, and help you avoid some of those editing headaches of the past!


That sounded interesting enough to download a trial until I realised it was Windows - only! :D
And although I do have a Windows laptop as well most of the time now I use my MacBook.
So just beware of that when you think this tool is interesting. :)
Actually this new color wheel seems to be a blunt copy of the color editor found in Capture One. Even the design of the handles for changing the color ranges looks exactly the same.
This is almost excactly what Capture one looks like :) I don't get it?