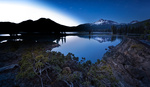
“This shot just looks flat.” Even an image shot during dramatic lighting can look dull after global adjustments. But with some inspiration from light painting, you can bring the image to life in post-production.
Light painting traditionally refers to a night photography technique for lighting up parts of the scene during a long exposure, usually with a flashlight. Before light painting, the scene starts out underexposed and cool, and during the exposure, the photographer carefully lights different elements in the scene.
In post-processing, we can mimic this technique by lightening and darkening parts of the image. Although this is usually referred to as “dodge and burn,” it doesn’t capture the spirit of its long exposure counterpart. When dodging and burning, you start from an image that’s close to completion. With light painting, you intentionally start out with the image too dark and cool.


I tend to light paint in five phases:
- Identify the composition, shapes, and lighting in the scene. Light painting can potentially make an image worse if it enhances the wrong areas, so it’s crucial to first identify the important subjects and relationships between them.
- Darken and cool the image globally, then repeat on smaller details that scream for too much attention. It’s easier to downplay unimportant regions rather than force the primary subjects into a shouting match. If you’re having trouble identifying distracting regions, turn the image upside down.
- Dodge large regions with neutral density and radial filters. Don’t use detailed brushes too early: large shapes and gradients are much more forgiving. Exposure isn’t the only way to light paint: different hues tend to pop forward or recede, so paint with a warmer temperature to bring one forward or a cooler temperature to make it recede.
- Identify and exaggerate the light’s natural direction and shape. If it’s a cloudy day, you may have some creative liberty, but make sure to be consistent throughout the image.
- Paint in smaller details. It’s easy to go overboard and ruin the image’s believability, so stick with forgiving adjustments like whites, shadows, and contrast instead of exposure or saturation.
Although I use light painting most in landscapes and architecture, it isn’t limited to a particular genre. Light painting is a general but powerful technique to guide your viewer’s eye to the important subjects in an image.


Turin! My city!
Yes it is! Torino at Christmas! I there in November a few years ago. It was my first time shooting at night, and what a place to shoot.
I have to agree with your last point. Be very, very careful as to not go overboard. Light has to come from somewhere, a believable source. Painting light here and there out of nowhere just looks unbelievably fake. Max Rive is a prime example here, he is notorious for just dodging and burning things that just dont make sense.
Don't get me wrong, he is quite famous at this point, and I respect what he does. But I cannot stand his work, personally. Once you notice it, you can never un-notice it.
Nothing will ever replace good light to begin with. You can save a shot by enhancing the light that is already there, but as I said, painting light that comes from no source looks bad.
Absolutely, William — when looking at my earlier work, I definitely notice I was too liberal and too fine with my light painting. Rather than starting with big shapes and focusing on the direction of the light, I went right into "dodge the cool parts" mode.
And although light painting occasionally turns some flat photos into keepers (as in this tutorial), it always has the most power on photos that already had great light, and just need to get from 90% to 99%!
Great video - I'd been experimenting with this kind of thing but this gives an idea of what's possible with some practise.