In 2021, one of the astronomical targets you may want to challenge your photo skills on is the lunar eclipse occurring on May 26 (the evening of May 25-26). While lunar eclipses are generally not hard to see, since half the world can see the moon at any instant, not everyone can see the full extent of the approximately three-hour event. For this one, Pacific Ocean hemisphere residents are favored, but the west coast of the U.S. gets to see totality followed by the still partially eclipsed moon set opposite the sunrise.
As everyone has learned in school, a lunar eclipse happens when the Moon passes through the shadow of the Earth when the Sun, Earth, and Moon are lined up. This doesn’t happen every month because of complications such as the period and tilt of the lunar orbit. Furthermore, the Moon doesn’t always pass directly through the center of the Earth’s shadow. This month, the Moon is just barely within the Earth’s shadow. Another upcoming lunar eclipse (November 11) has the Moon barely poking out of the shadow, so it is technically a partial eclipse.
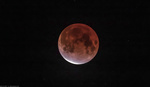
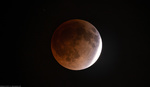
Anyone who has casually glanced at a lunar eclipse probably has thought that it was no big deal — a dim, orange-colored moon. But photographically, the challenge is in the dynamic range of the change from a full moon to a fully eclipsed moon. In addition, a setting eclipsed Moon presents an exposure challenge against the brightening sky.
During full eclipse (totality), the Moon’s brightness dims enough for stars to be visible, making it important to make the effort to view the eclipse from a dark site, away from the glow of city lights.
Lunar eclipse exposures range from 1/4,000 sec. (left) to ¼ sec. during full totality. HDR processing was used in the center image during the transition from partial to full totality. All photos were taken telescopically at ISO 800.
Considering composition, focal lengths you may want to consider cover the whole gamut from 1,000mm+ for a lunar closeup to very wide lenses, which can show the progression of the eclipse phases against the landscape below. Time-lapse sequences are a good choice too for modern digital cameras, which can shoot hundreds of frames during the eclipse. And since the Moon will set still partially eclipsed, you may want to consider your location with a specific foreground in mind.
To get an idea of the camera settings you will need, see a special guide published by Nikon specifically for lunar eclipse photography: This guide dates back to the days of film photography, but still provides a good starting point. The eclipse progresses slowly enough that with the benefit of the instant feedback, you have time during the eclipse to refine or bracket your exposures.
Besides consideration of the foreground during moonset, the other point to think about is the backdrop of stars during the totality. In this eclipse, the Moon will be in the head of Scorpius, one of the brightest and most prominent constellations of summer. Consider shooting with a lens wide enough to accommodate the entire constellation.
Stellarium can be used to visualize the Moon's position against the stars and landscape during the lunar eclipse.
To visualize the eclipse against the stars for your location, use a planetarium program such as Stellarium (free for all PC platforms). Put your location into the program setup, then set the date and time to match the eclipse to see where the moon will appear in your sky. The program even allows you to customize the landscape by adding your own 360 x 180-degree panorama into the program so you can see your own actual horizon.
Special Equipment
For the most part, a lunar eclipse sequence can be shot with standard photo equipment. Using a photo tripod, you will want to adjust your framing to keep the Moon centered unless you’re using a wide lens. However, if you are centering the Moon at fairly high magnification, during the course of the eclipse, you will find that the Moon rotates in the frame, as shown below:
If you want to eliminate the rotation of the Moon in your frame during the eclipse, a specialized piece of equipment you may want to consider is a tracking mount, such as an equatorial mount used for astronomical telescopes.
An astronomical mount is used in lunar tracking mode to remove the need to contantly re-frame eclipse photos.
A tracking mount will largely eliminate the nuisance of re-framing each shot as the sky moves by as well as eliminate the rotation of the Moon in your frame. For this to be effective, the tracking mount should be set up with the polar axis pointing at the celestial pole. The longer the focal length, the greater the accuracy required, but for the duration of the eclipse, if you don’t get it exactly right, it can be remedied by simply periodically adjusting your framing.
During the eclipse, you will have a choice of tracking at the star rate (sidereal rate), in which case you will photograph the moon moving against the backdrop of stars, or at the lunar rate, which will keep the Moon centered as the background of stars moves. Of course, this assumes you are using exposures long enough to show the background stars.
A single-axis star tracker can be used to track the Moon during the lunar eclipse. The camera should be positioned to yield a level horizon if the Moon sets during the eclipse.
Tip: If you plan to have your last shots with the Moon on the horizon, place your camera on the tracking mount with a ball head. Center the moon, then rotate your camera to the western horizon using the polar axis movement only. Take note of the point on the horizon at the center of the field of view. Now, level the horizon in your camera frame on the ball head, keeping the center point constant. Finally, rotate the polar axis back to begin tracking the Moon. You may have to repeat this a few times to set the framing properly.
One Last Element: Luck
Lunar eclipse in clouds.
Despite all of your careful preparation, you can still be thwarted by bad weather. But unless the sky is completely clouded over, don’t give up. Clouds could provide an extra element of interest in your shots.
Good luck, and post links to your results in the comments below!