Last year I had an exciting opportunity to shoot what I am told is the first combined Jaguar and Land Rover USA ad campaign now that they are both under new combined ownership. The goal of the campaign was to create content that would appeal to the users of both car markers and promote brand loyalty. It was as if we were to say: "If you have a Land Rover, you need a sporty Jaguar for the ultimate garage!" (and vise versa). This campaign came together very quickly and the client had specific production requirements. Learn how I did it below and feel free to ask any question about the process in the comments section.
Pre-Production and Location Scouting
Upon winning the bid and having the clients return the signed contract, my first mission was to find our location. Time was tight and the client had a specific vision, so I did not hesitate to call a Washington D.C./Maryland/Virginia-area location scout to help with the process. The goal was to find a modern home with a garage in front with space to put a Land Rover Range Rover SUV and a Jaguar F-Type sports coupe/convertible. This was a challenge because the Washington D.C. area doesn't have very many of these types of homes (many nice homes in the region have a very classic or colonial design), let alone ones that would allow a production to rent it out for a shoot.
I started calling various luxury real estate companies to see if they had any locations in their roster, but no luck. I then reached out on social media where I received great suggestions, but no solutions. The location scout I hired knew of a possible home that would fit our needs, but it was not on her official list of approved locations. It actually took her having to drive directly to the location and knocking on their door and asking nicely. It ended up being owned by a legendary, retired athlete and his family. With a little bit of negotiating with the home owner's sport agent, we came to an agreement and they were nice enough to let us shoot there. What a huge relief.
The Shoot
The shoot itself was fairly straightforward. I captured everything with my Phase One IQ140, Schneider 55mm leaf shutter prime, and Schneider 75-150 leaf shutter zoom. Each lens had a circular polarizer mounted onto them to minimize reflections on the vehicles when photographing them. It also helped that the weather was overcast, which is very helpful when photographing big reflective surfaces such as cars. I kept the camera on a tripod and tethered it to my laptop sitting on a Tether Tools Tether Table for easy review for myself and the clients.
Our first step was to plan vehicle placement and framing for the subsequent photographs. For each setup, we would place the camera and cars first. Next I would take bracketed exposures of the background and cars with varying exposures. I would also rotate the circular polarizer filters (CPL) to remove reflections on different portions of the vehicles. Unfortunately, it is nearly impossible to get all surface reflections removed on every side of a vehicle in one shot with a CPL.
Next, I had an assistant walk around each car with a Profoto D1 Air 1000W/s strobe with a softbox mounted onto it and light different parts of each car. I used the strobe to give a soft, yet dynamic directional light on the cars to show off their most attractive design lines. In post-production, I created a layered composite and combined all of the elements of each plate I photographed (as explained in the description above). You can see how the image came together in the animated GIF below.

The post-production process.

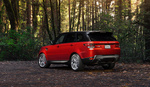
One of the ads we shot in the flesh!

One of the shots used in a mailer campaign.
Ask Your Questions
Have more questions about how this campaign came together? Whether it be about the production, photographing, or post-production process, just ask in the comments below!
CREDITS
Behind The Scenes Video: Seannie Camera
Photography Assistant: Ed Mantell
Location Scout: Carol Fleischer
Ad Agency: Brand Aid


I'm curious. What method did you use to remove the reflections in the car bodies? Did you just under expose when using the flash?
* I so missed the use of CPL in the post, which makes way more sense.
exactly!
Hi Doug, great campaign. One thing that is always a bit confusing/messy for me is the combination of CPL and additional lighting. So here are my two questions if I may:
1) Let's say you only have 1 car in the scene to keep things simple. Do you think you need more than 2 shots to remove the reflections from the car? Because usually in one position of CPL it removes reflections from the side (doors, fenders etc.) and in the other position of CPL it removes reflections from bonnet/windscreen. More shots not needed IMHO?
2) How do you combine CPL with strobes? When you adjust the CPL for the front (bonnet / windscreen), do you also shoot the light at the front?
Thanks, Ondrej.
1. yes. just check out the animated gif above of the image coming together. I probably used 3-4 different shots of each car while moving around the light and rotating the CPL filter accordingly.
2. multiple exposures. When the CPL removes reflections from the side, I also use the flash on that side. THen i will rotate for the front, for example, and then light the front.
Same question as james johnson
read reply. CPL filter
I wonder if the original image really can't be better than this, with this kind of camera and lightning. Lots of post in my opinion.
so youre saying you like the original shot (the first one in the GIF above) with the reflections and everything? hey i mean that's certainly your opinion
i think he meant your original foto in the gif is a bit too rough, and you had to do way too much on post.
Exactly Ariel.
certainly a valid point. my only response to this is that I shot it a certain way to create this final appearance in the final edited file. I can also shoot car photos in a single image without needing to do photoshop composites. For example: http://www.sondersphotography.com/Photography-Portfolio/Transportation/2 and http://www.sondersphotography.com/Photography-Portfolio/Transportation/8
Also, it would have been hard to do this shot all in one take because the environment/location had a lot of trees and reflective objects, even if I did pack 10 lights. This way I created a car ad that the cars had clean dynamic lines. Some may not like this style, but for me, I was happy with how it came out
I support your way of thinking. The original image doesn't have to look perfect. It needs to be a solid base for the other photos to work off. The quality of the final image shows how good the original was for its purpose.
Love your work and videos Douglas, always great to see a new one up.
HI Doug, thank you for sharing...I was more interested in How you shot the ad Campaign.. as to placement of the lights, challenge had to over come, technical aspect. and post processing as well. if you can share that on your next post.
hi Patel, did you read the article and watch the video? I cover most of this
Doug, In the short video, I was wondering if you removed the reflection out of the side of the Land Rover with lighting and panels, compositing several shots together, or was it done in post with a gradient or something?
Thanks
Hi dan. Did you read in my description how I used a circular polarizing filter?
Hey Douglas, Thanks for responding. In my ADD, I must of missed that paragraph.
What kind of softbox did you use?
Off the top of my head, I believe I used a strip box, meaning a narrow rectangular-shaped soft box. I usually use that for my car shots. A gear tip some of my fellow car shooter friends taught me
Why not cgf ?
With the result it looks like more faster way with more control .
Hi Robert. I am unfamiliar with what a "CGF" is. Upon google search, I found these results:
Chlorella Growth Factor
Computer Generated Forces
Charging Gateway Function
Centre Généalogique du Finistère
Crystal Growth Furnace
Children's Glaucoma Foundation
Central Gas Facility
Coast Guard Foundation
Charitable Gift Fund
Credit Guarantee Fund
Doug, I suspect that Robert meant "CGFX". I interpreted his question to be: "Why not just create the shot entirely on the computer without using any real photography at all?"
Good question. The easiest answer, this was a client decision
I want you to know that I logged into FS right now just to like your CGF Google results.
haha same here
Sorry cgi
Awesome article Mr Sonders!
I wish Fstoppers had more automotive photography posts because it feels like the hardest to find information on although the pros seem to be super helpful and willing to share information.
My question is about using bare strobe vs softbox. I hear a lot of conflicting information about which works best for cars. How do you decide when a softbox is going to work best vs a bare light?
Sure, this was an overcast day and light was not very directional... it was more diffuse, so it would make sense to use more of a soft light...the kind of light that comes from a softbox. I use bare strobe when the sun is out giving hard shadows and it also offers more power output. You can also use bare bulb for dramatic hard shadows and pops of color off the paint. I'm sure there are more reasons to use one vs the other, but that's the reason I use one vs the other :)
Awesome images Douglas!
If you were just starting your business, and wanted to shoot this type of commercial work for big car manufacturers/ad agencies, where would you start? Obviously, you have to have a portfolio that shows that level of work, but how do you go about getting these assignments? Do you simply research and find the art director who is hiring photographers, and send them promo material? How often do you have to contact them before you land an assignment? At your level, with your impressive resume, I'm sure you get a ton of referrals. Any advice?
So weird! I literally JUST stumbled upon your video through a google search and you posted it here as I check back on FS. Great Video BTW. (I see a couple duplicated patterns in the left pavement)
Michael,
Very weird! I guess, you were meant to see it lol. Thanks for the info, I'll take a look at my final version, I may have taken it out by the time it got to my portfolio. Sometimes, I go back and tweak images, even after I've made a retouch video. Always good to go back with fresh eyes! Thanks again Michael
I haven't researched your career but when you started photography did you focus on the shot itself or the shot to work best for post production? How did you pre-thought the finished image while or before shooting it? Do you have a set formula of just do X, then Y and then Z? (like contrasty dark feel editing on X parts of the image?)
Hi, Douglas!
Very nice article. I understand almost everything, the only thing that i can't figure it out is the position of light let's say for the surface on the left side of the image on gray car and also second one how you got that nonshiny surface without reflections. Can't be just because of CPL? Did you use some other stuff, so the light is evenly spread?
thanks