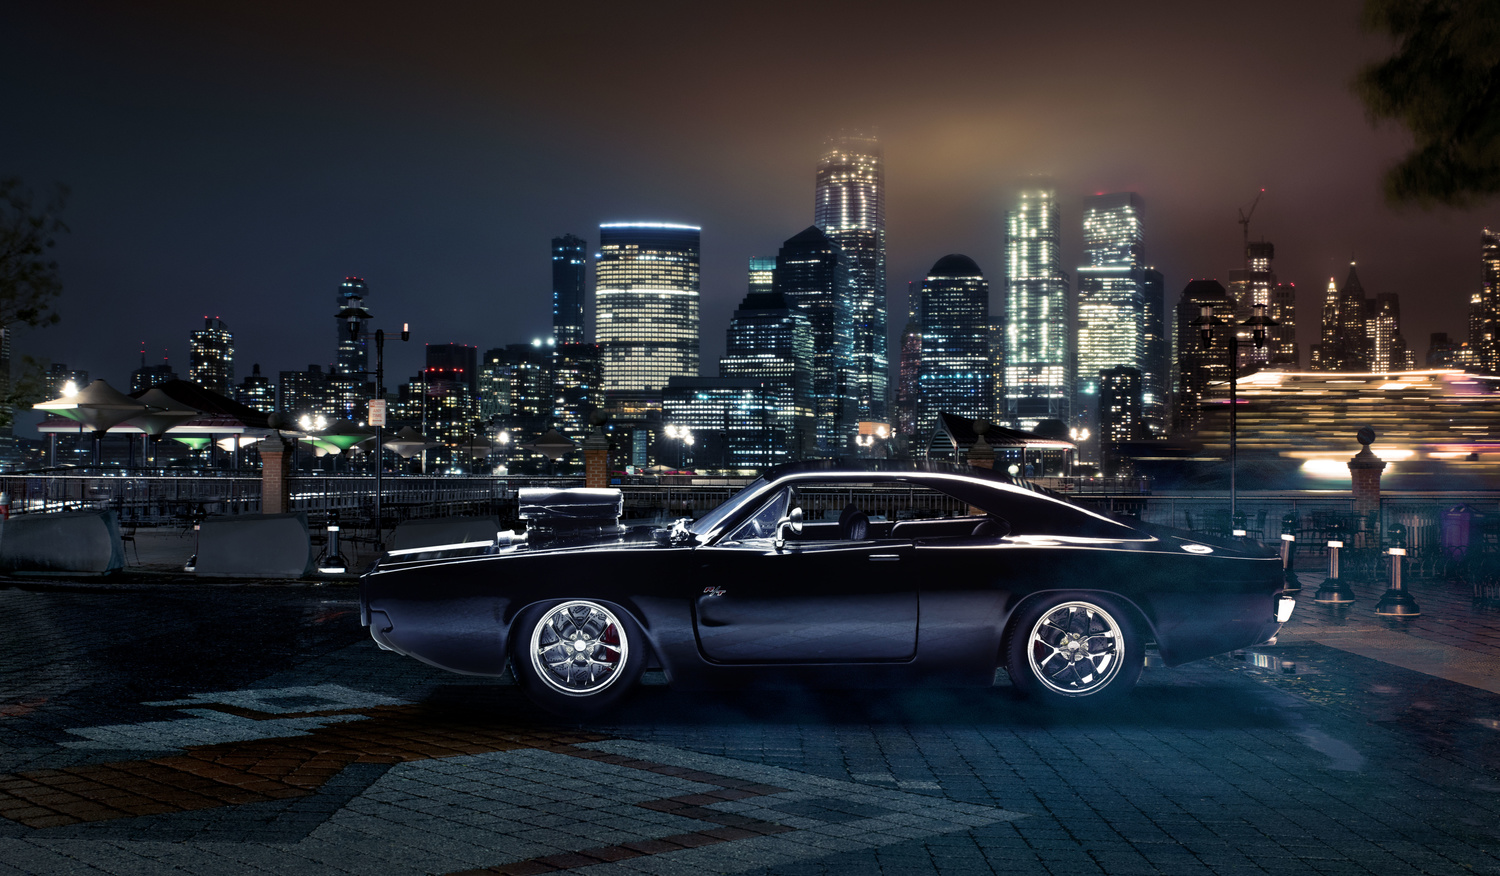
A few days ago, I decided to challenge myself by attempting to photograph a toy car and make it look real.
I've been watching incredible photographers on Fstoppers like Felix Hernandez and Pete Tapang, who have been taking incredible pictures of miniature products that look totally real for years, and I've always been impressed with their work.
I wasn't even sure where you can buy realistic-looking toys and models, but I decided to check out my local Target. They didn't have many realistic-looking options, but they did have a "Fast and the Furious" car that looked pretty decent for $15.
I wanted to try to keep this shoot as simple as possible so that anyone could replicate it easily. For a "set," I simply placed the car on a white piece of foam core (white paper would work fine) and for a background, I used a piece of printer paper. My camera was a Nikon D750 with a Tamron 90mm f/2.8 macro lens.
For lighting, I used the Litra Pro, an incredibly small LED panel. This light is extremely bright, it can color shift, is dim, waterproof, and can be controlled wirelessly with your smartphone via Bluetooth. I am really impressed with the versatility of this light. The only negative thing I can say about this light is that I did notice a pretty extreme magenta shift. I was able to tint-shift this out in post, but it was still annoying. I reached out to Litra about this, and I don't think they plan on fixing this issue before launch.
To take the image of the car, I set the camera to ISO 100, f/32, and a one-second exposure. It's not ideal to take photos at f/32 because of diffraction, but I needed the car to be in focus from front to back and I didn't want to deal with focus-stacking. I then set the camera to automatically and continuously take pictures every second. While the camera was shooting, I moved the Litra Pro back and forth over the car to get a range of different lighting effects on the car.
Watch the video above to see how I composited the car into a background plate of New York City in just a few minutes using Photoshop.

I had a great time on this shoot, and it was much easier than working with a person. I look forward to trying this again in the future with a higher-quality model car or action figure to see if I can get an even better result. If you're interested in this sort of thing, you may want to check out our tutorial with Brian Rodgers on product photography.


Why not just use a strip box above the car to emulate a Chimera?
Because I don't have a small enough softbox and I wanted to do it with a minimal amount of gear. Plus shooting multiple images where each one was different gave me more options without having to walk back and forth to the camera and set.
Gotcha, thanks.
Hmm, maybe use a regular size softbox and just flag it?
Or for minimal gear, try lighting it with your iphone flashlight :D
Great work! I love toy photography myself. I try to make them look as real as possible too
You saw I mentioned you in the post right? Big fan of your work.
Yes I did!!!! Thanks for the mention! I originally saw the video, then read the article
Damn, Pete those are mighty fine.
Thanks!
Looks fun. I’ll have to show this to my son
Excellent result especially in the time you completed it in. Any chance, Lee you could make the files available for readers to have a go at comping? They might like to add their own spice to it. I think this would be valuable to a lot of the compositing newbies. You could even turn it into a COMPetition ;)
Cheers in advance!
I'll give the files away the next time I do this.
Pretty good go at it I think!
Great job Lee.
Fun little exercise, gonna try it out!
Love it!
Being a toy collector, I have been wanting to do something like this and thanks for the video as it is inspirational for me. As for your edit, couldn't help but noticed off the bet, you may have missed the back bumper when you clone for ground and would have like to see some of those skyline reflection on the more of body too. All in all, the video does it shows that it is very "doable". Thx.
A big fan of FS since the iPhone shooting, but please, the editing is just not your field.
Super tutorial, I just found back my childhood Ferrari GTO, I need to try this ASAP
Love toy car photography. Small light it's better than softbox.
Really great tutorial and BTS! That is why I like to watch your videos, althought you have all bunch of equipment available, you are still trying not to complicate and show people how great images can be done with minimum of gadgets and high end gear. You should also make again project with Mike :). Best regards!
Great tutorial, thanks. It answered some questions I had about this type of photography.
Have Fun,
Jeff
i came accross this post today on youtube and directly went to try it out here.. the only think is i used speed light attached in 80cm octabox.. have attached my bts as well..
Awesome! I think your light source is too big. That is the size of the sky which would work for a daytime shot but not night. If a real sized car was being lit the light source would be much closer to the car making much harder more contrasty reflections in the car.
A couple of references on this subject:
https://alphawhiskey.slickpic.com/photoblog/American-Muscle
https://photographylife.com/photographing-scale-model-cars
In-camera, three lights, —one on tree, one on car, one for winter storm— one hour, no post. Shot outdoors on a sunny day.
There is a weekly photo critique I used to participate in, every Thursday at 5:00pm. The challenge for me was, I would spend one week thinking about my image, then start the shoot at 400pm on Thursday. This was deliberate, not procrastination.
That gave me only one hour to set up, shoot, process, post-process, upload. This was one of those shoots. (Yes, the car was deliberately on a tilt, to give the impression of a sloped parking area).
Cool! glad I found this video. I'm doing similar work. Check out my series!! IG @oscargarfia