
Most of us love natural light and feel comfortable shooting with it – but how well do you really know how to utilize it effectively and to control it with precision? I just spent the day with Erik Valind, a New York City-based lifestyle photographer in his 'Controling Natural Light' workshop. Here are 17 simple ways to help get great results from better understanding and utliizing natural light.
Erik is a commercial and lifestyle photographer based here in NYC. We worked together last year when he was shooting for a client here in the city.
One thing I realized about Erik on that job is that he travels a lot, has a huge and diverse range of clients he shoots for and has a great and adaptable tool kit and knowledge set around having light work in his favor. He specializes in lifestyle, and what makes him great is he is just as happy and adept at shooting natural light outdoors as he is shooting speed lights or strobe indoors. He really loves working with natural light though, and the more organic feeling it provides for his clients lifestyle images. Importantly, he's also a great teacher and packed a huge amount into this one 6-hour long session.
The Importance Of Versatility
Being versatile when using only natural light is key. For Erik, it means he can travel with a lightweight array of gear and adapt fast to changing lighting conditions.
Erik uses an array of Sunbounce natural light modifiers which allow him to shoot even in the most challenging of times throughout the day (most of the workshop shooting took place between 1 and 5pm on a very bright, clear day.

Some classroom instruction with Erik before we hit the streets
His three main natural light tools include reflectors, diffusion panels and black panels (to act as flags or to add contrast into a shot in place of V flats).
Natural light is such a joy to shoot in. There are no max sync speeds, no strobes or electronics to damage when shooting close to (or in) water, and it allows models or subjects to move more freely (an assistant panning a reflector gives more flexibility than a subject hitting a mark for a strobe). But we don't often realize just how versatile it is, or how we can better control it.
Over the course of Erik's 6 hour workshop, I distilled down some of the key tips he shared:
- Backlighting works best when the sun is lower in the sky. Put your subject with the sun behind them and have the light wrap around and reflect back on to them for beautiful rim and backlighting
- Use covered or open shade to keep the exposure on your subject even and reduce the contrast of the light falling on your subject. Putting your subject in shade and paying attention to the exposure of the background will help you create an outdoor high or low key image, which will help provide separation for your subject and reduce distractions in the background

Making use of covered shade
- For really strong overhead sun, create covered shade where you can, by simply flagging the overhead sun. You can also use a small diffusion panel and use a reflector underneath as fill. The light coming from the overhead diffuser is a great sculptor for the cheek bones and jaw, while the reflector underneath will provide fill, and catch lights. Playing with the angles of both the diffuser and reflector will change the quality of light and direction it is falling on your subject

Create your own shade with 2 friends and a black panel

Diffuse and fill
- Under covered shade, don’t forget to move around your subject, or have them change their position to the natural light. By moving around, you can create broader light with less contrast, or shorter light, with more contrast between light and dark areas, particularly useful when doing head shots. A basic way to demonstrate this effect is to hold your fist up by the light source, and rotate your arm, to simulate your subject and their face. As more of your fist rotates away from the source of light, you get shorter light, with more contrast.
- Your diffuser becomes a light source when diffusing overhead light. The closer you can get it to your subject, the larger the source relative to your subject, and the softer that source will therefore be. This is why distance of diffuser to your subject is important
- Add small reflectors underneath your subject to bounce light into the eyes and create catch lights. You can use a V formation, with 2 reflectors either side to do the same thing by sandwiching the subject which provides more fill to carve out the face, jawline and cheek bones
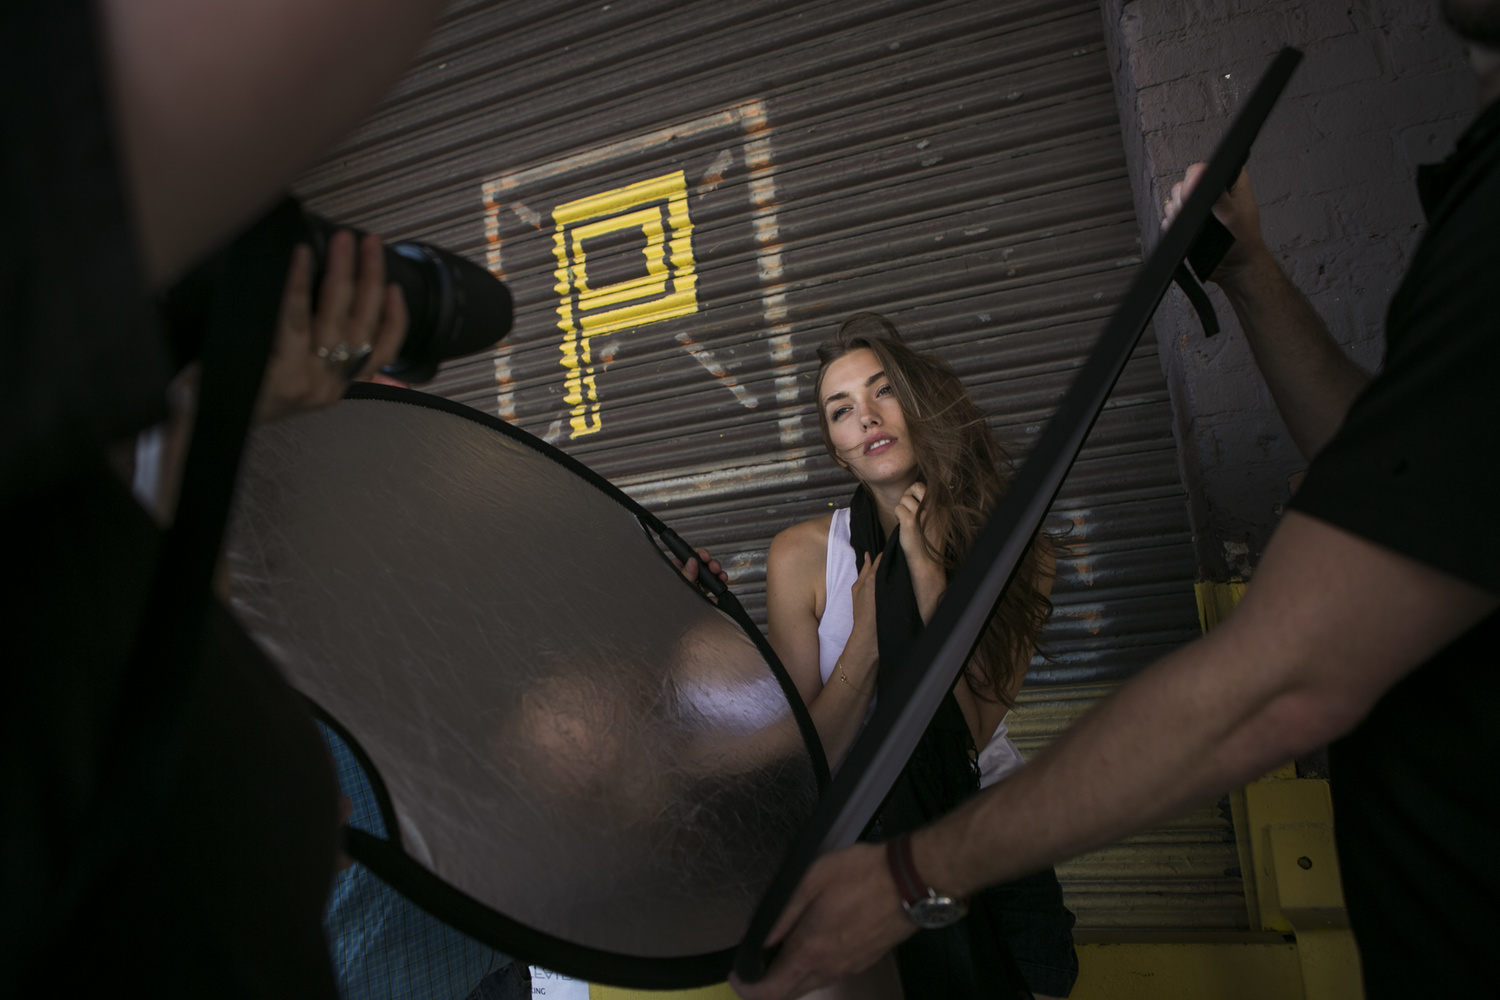
V formation for reflectors to bounce light and carve out cheek bones and jaw line as well as pop catch lights into the eyes

POV shot showing the results of the V shaped reflector fill
- If you’re getting dark shadows under the eyes because of harsh sun, simply have the subject turn their face up towards the light source. Position yourself above them (if possible), or have them sit on an object to shoot down on them to be able to photograph more of their face. Changing angles in these small ways helps create more even exposure
- Reflector material type makes a lot of difference – silver will act more like a key light and provides much more contrast than white. White raises the level of the shadows, acting like a very subtle fill, which can be great for close up beauty work where you can crop tightly and push the white reflector closer (silver may also be too harsh for this)

White side is less contrasty, softer quality of light than silver, but you have to get in closer because the light is not as intense and powerful as when using silver
- “Twerking your reflector” changes the quality of light. Pulling the center in towards you creates a spot light effect, flattening it leaves it neutral, and pushing the center away from your body spreads the light producing a softer effect. With a silver reflector, twerking the reflector like this can easily produce a difference in light intensity by two stops or so, so be sure to experiment. Be aware that when having assistants use larger reflectors in tight spaces that they may end up unintentionally bending and contorting them simply to fit - and this “unintended twerk” can change your quality and intensity of light

Twerking his reflector, Erik demonstrates how the shape can affect the light quality and intensity

Twerking outside
- Gold reflectors are generally not conducive to natural looking light. Although some might say they work nicely on darker skin tones, Erik is not a fan. Instead he uses the gold and silver weave (mix) which warms skin tones nicely without giving a very overly saturated unnatural golden look
- Oil blotting sheets are a must have when using reflectors outside in harsh sunshine and warm conditions. If you want to manage specular highlights on the face, the blotting sheets help reduce sheen while preserving make up
- Light ratios with reflectors work with your background – you can still create high and low key images, just as you can in the studio, by controlling background exposure and the ratio of your subject relative to the background. Low key backgrounds with a silver “key light” reflector on the subject can reduce background distractions by keeping the exposure lower on the background in comparison to your subject

Subject is shot against a dark, lower key background (thebuilding behind the truck) with silver being used as a key to separate her here

Black panels together act like black V flats, subtracting light and creating contrast

Here the panels have been positioned on either side of the subject for a low key look, with beautiful soft main light from the window directly in front of the subject drawing us to the face.
Image courtesy of Erik Valind
- To remove reflections of in glasses, you have three options if you don’t want to mess about doing it in post. Firstly tip the glasses down the nose, or have the subject hold them with fingertips to change the angle. Secondly, change the angle of your subject’s head and/or body relative to the reflector. Finally you can move your own position around/up or down on your subject and simply shoot from a different position
- A moving subject is much easier to track if your assistant is tracking them when using a 4 x 6ft larger reflector compared to a strobe, particularly if you have a large modifier on the strobe head. Unless you have a human light stand, you generally will have your strobe set in one position. Reflectors allow you to easily pan and track your subject

Tracking a moving subject for this exercise lifestyle shot with the large reflector allows the model to move much more easily and naturally than if stationary to pose with a strobe


More movement and tracking with the smaller reflector


- If you can’t find where your reflector is reflecting the light (which is more common on the larger 4x6 ft models in a large open, light surfaced space, simply reflect the light at the ground in front of the reflector, then slowly move the light towards where you need it to bounce
- Gobo's ("go betweens") or cookie-style diffusion panels can create interesting dappled light, to either fall on your subject, or a wall or surface in the shot, to add variety

Prepping a leaf-style gobo diffusion panel

Gobo panel in action
- Combine everything - remember that a natural light tools amount to more than a simple reflector to push light into a scene. By combining simple diffusers, reflectors and black surfaces all at once you can diffuse the light falling on your subject, create a key / fill with the reflector itself and then create contrast by building in shadow for a more dramatic look using a black panel.

Combine diffusion (far left) to even exposure, reflector (right) for key and to add pop and black panels (left) for cutting light to add contrast
If you think of these simple natural light tools and play with them on your shoots, you’ll quickly find your ability to produce the look you want is easy to achieve, possibly without the need for additional speed light or strobe sources during daylight shoots.
Thanks to Erik for sharing the knowledge. Erik is a Kelby One trainer and you can read more of his work on controlling light for portraits in his book, “Portrait Photography: From Snapshot to Great Shots”.

If you guys have any questions, feel free to fire them over to him on Twitter, contact details here:
https://twitter.com/ErikVPhoto
If you like articles on natural light, or just want more of this sort of stuff, let me know in the comments and I'll work to bring more of these articles to you guys.


This was a good shot in the arm for me. I need to start trying new things when I'm filming interview head-shots and this got me thinking. Sweetness.
Matthew that's awesome. Comments like this are what inspire us writers to push out content to the readership. Thank you for taking the time to let me know it hit the spot :)
I love the concept but man....he's got like three assistants holding all that stuff. I don't know if many of us can get that many people to stand around in the hot sun all day holding reflectors.
Really good point Jason! All of the "shade" techniques and concepts can be achieved without any equipment at all. Most of the reflector scenarios only require one person (an assistant, friend, family member). Then for the more intricate setups you can use grip heads to fasten the sunbounces and reflectors to standard light stands instead of using people.
Thanks for the reply Erik. I think having at least one "assistant" is manageable in most scenarios and I was probably over-complicating things thinking I'm going to use 4-5 light sources as if I'm building some kind of studio strobe setup.
The pictures on this article speak for themselves and I think the big win is not having to worry about sync speeds or flash power, light-stands that you have to move or any of that stuff...sounds like it would be liberating to shoot like that.
Natural ligth can look real horrible. But when it's done rigth, it beats everything else.
The tips are great... but most of us don't have huge crews or the desire/ability to carry around a ton of equipment. There is no doubt that Erik's photos are fantastic, but to be honest there is no way I can carry around that much stuff. The results are so nice that I'm sitting here trying to figure out what I can use in place of all that equipment and without 3 crew members.
Hey Jennifer I answered this exact same concern in the comments above: "All of the "shade" techniques and concepts can be achieved without any equipment at all. Most of the reflector scenarios only require one person (an assistant, friend, family member). Then for the more intricate setups you can use grip heads to fasten the sunbounces and reflectors to standard light stands instead of using people."
On top of that everything you see in the photos, plus some, fits in an affordable Tenba bag (http://www.bhphotovideo.com/c/product/53948-REG/Tenba_634_513_T538_TriPa...) and weighs less than 30lbs... so no big crew and no tons of equipment required :) That's why I like to share my natural light approach with people.
Really handy tips in the article, but I think the link to that Tenba bag takes the cake for me. I've been looking for something exactly like that for years. Thanks for the recommendation Erik!
Same! Then I realized B&H keeps these in-stock and they were the perfect length for even the largest Sunbounces.
any final results using the leaf-style gobo diffusion panel?
Yes please.
Sample provided by one of the workshop attendees.
Awesome post David, very informative.
Thanks Sid, appreciate that, glad you enjoyed :)
Sample provided by one of the workshop attendees.
Hey Erik! First, your work is really good and I love the chance we have to be in direct contact with you guys! Well, I am a fan of natural light for the simple reason that it simply makes things look more natural. I'm a beginner and hope I can use natural light most of the time. Again, congrats!!!
great article learned some new techniques to apply with my reflectors.
Thanks Jared, appreciate that and really stoked you got something out of it you'll apply on your next natural light shoot!
I attended this Workshop. Erik is a great instructor. Loved the fact that he discussed various scenarios in detail and how to concur them with or without reflectors. I ended up purchasing a mini reflector with a grip head so I can apply his technique without a friend or an assistant.
Great tips. Many are complaining about not having equipment or crew. You don't need those. All you need is you. Other things are just bonuses to make your workflow faster. If you look around, you'll find a bunch of different reflecting surfaces – start collecting and exploring with them.
Loved the article. Like some of the others, I have no crew nor the funds for the modifiers. However, I try not to let being a poor amateur from stopping me from obtaining the kind of images that I am after. Because of the this, choice of location and time of day have become most important to me. In addition, many DIY modifiers are easily available. I already have a 30" x 40" reflector made from foam core; one side left white while the other side is covered with strips of silver reflective Duct tape. It may not by pretty, but it works. Soon, I hope to have a large diffusion panel simply made from PVC and a frosted shower curtain. Your article had a ton of information. I look forward to trying to adapt it to my situation.
Glad you liked the article Randy, thanks man. Limited resources force us to be creative and to construct things that best work for us. I actually think having limited resources is what makes us better, forcing us to be creative or to get more out of the limits of what we have. Your solution sounds like a great DIY workaround!
Great tips! I really like the bending of the reflector, I feel really dumb for not thinking about doing that :\
"twerking" the reflector ;)
Whoops sorry, TWERKING that reflector
No Miley reference in the article? lol
Baam! love natural light and tweeking it like this are cool!
Unfortunately you need an army of assistants (or at least one) to use reflectors like this. Especially when it is windy...
Great article, loving the images, some amazing ideas I can use here. Anyone know where I can get the music from?? Just love the mix..
Did the gobo not work? No pics. :'(
I love reflectors, as i own a ton of them in different sizes, I especially love the Sunbounce reflectors and how they're constructed and would own tons of them if they weren't so prohibitively ex$pensive! :(
Great article. Can you tell me where to find similar leaf gobo style diffusers. Such a simple but brilliant idea.