As a challenge to myself, I wanted to shoot every single day in January, a way to start the new year off right. This is what I learned.
The Gear I Used
For every single shoot, except one, I used the Fujifilm X-T3 and switched between three lenses. The 56mm f/1.2, the 90mm f/2.0 and the 16-55mm f/2.8. For the one shoot I didn't use this combo on I used the Mamiya RZ67 and wrote another article about that shoot specifically here.
For lights, I used the Cactus RF60x and two Cactus RF60s triggered by the V6ii. I used three different lighting modifiers depending on the day. My most used modifier, which I used every day, was a parabolic softbox. The second most used was a flashbender and, lastly, I used a MagMod MagBeam kit. These are all in conjunction with rarely using just the bare-bulb of my flash. Another item I used was a 5 in 1 reflector, usually on the silver side or the black side for negative fill.
Lastly, I used different colored backdrops from Superior Seamless that I could quickly and easily use the same lighting setup multiple days and not get bored with creating the exact same image over and over; I could have different backdrops.
How I Found People
Shooting every day is a different challenge depending on the type of photographer you are. As a portrait photographer, I had to find as many people as I could to shoot. To do this I contacted a local modeling agency I've worked with before, BnM Models, and asked for them to help me out by sending me a bunch of men. This still left a small gap or two in my schedule so I reached out to Facebook modeling groups and, finally, some client work filled up the last few days.
Now you may be wondering why I specifically chose men, and that is for two main reasons that can both be summed up with three simple words "male beauty standards." The first reason is that men generally need less makeup. Some lines on the face, no eyeliner, and no lipstick are all pretty standard looks on men so it was quicker to set up a shoot and not worry about bad makeup.
The second reason is retouching. Men need less retouching for the same reasons they need less/no makeup. The beauty standards for men generally look down upon heavily retouched skin much more than on women resulting in less post work for myself which is the only way I was able to get this project done.
So a combination of client work, collaborating with a modeling agency, and filling the days without people with products meant that every single day I was shooting, sometimes twice in one day. While I did have 31 shoots in 31 days, there were two days I didn't shoot, but made up for it with days where I shot twice.
What I Learned
I learned a lot in the 31 days of January. I got better at directing models, something that can only come from shooting more, quicker at post-production, and learned the importance of go-to lighting setups. Especially ones with a single light. Doing the same lighting setup day in and day out allows you to really fine-tune it and play with it. Really master it.

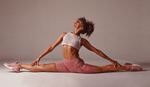
Utilizing just a single light directly behind my model was one of my go-to setups
My favorite go-to lighting setup from these 31 days is a single light, directly behind the model, blasting light straight into camera. I shot almost half of my models with this particular lighting. It's easy to set up, lots of room for the model to move around, and twist and pose. I tried a lot of different small adjustments with this particular setup. With a bounce, without a bounce, and playing with the placement of the bounce.

From my last day, where I finally got the perfect setup with the behind-the-subject light
It took me until the very last day to get to where I would say this setup was "complete" and repeatable by putting a bounce right next to the subject and this way I get the all-important eye light. If you look above and at this one it's hard to believe that they are essentially the same setup with just a bounce added.
This setup was also easy to go from simple and clean to much more complicated just by adding a gel and a fill light. By having a particular setup that I was using almost every day I really learned what looks good, what doesn't look good, and the exact type of model to use. For example, this setup wouldn't look as good on someone with a beard, but the stronger the jawline and cheekbones the better the setup looks.

The same setup, but with gels and a fill light
This is just one of the lighting setups I used as a go-to but this article would be pages and pages long if I went over every single setup so the biggest thing I learned in these 31 days was...
K.I.S.S.
Keep It Simple Stupid. this was a huge wakeup call in my lighting style. I often find myself using too many lights when I can get a better result with just one. So in the 31 days I tried my best to use just a single light the majority of the time. Sometimes I would add a bounce, sometimes I would use negative fill, but in general I just used one light about 85% of the time.


As you can see above, with just one light, and changing between negative fill (yellow) and positive fill (red) I can get two totally different photos just by changing the amount of fill but keeping the key light in, mostly, the same position.
Another setup that I would adjust ever so slightly each day was a nice simple short side light, I love lighting from the short side,I feel it look so refined, leaving the side of the face closest to camera in shadow. Some days I would bring the subject away from the background and other days I would bring them closer to it giving my options between a near-black backdrop some photos and a colored backdrop for others.


The Portfolio Shot
I actually thought that another shot very similar to this would end up in my portfolio and I did and entire post about it here. I broke down the lighting in detail in that post so I won't go into detail here other than saying I used a large softbox with a blue gel, and a Mag Mod Magbeam kit with the circle insert. Not three days after I posted that article, I was playing around with the lighting setup again and ended up with this image, which dethroned the green shot as my favorite shot of the year (so far).

The new entry to my portfolio
Conclusion
In conclusion, this challenge was something that I wouldn't necessarily recommend anyone else try this. It takes a lot of time, up to two hours a day, it removed all of my social life for the month of January and it was creatively exhausting. If I were to recommend this to anyone I'd suggest doing every other day, or every two weeks; a month straight was absolutely exhausting. I wouldn't do this again, but I'm glad I did. My first day took almost two hours and my last day ended up taking about half an hour to forty five minutes, more than doubling my speed in shooting and resulting in more images I'm happy with. It's an exercise that allowed me to grow a lot, both in speed and the types of images I made, but the cost energy wise, not being able to really have much social time, and being unable to have my evenings to myself definitely took its toll.