Understanding light is at the heart of photography. The topic of light is a vast one but there are some fundamental concepts which should be mastered before all others. One of those is the difference between hard and soft light.
Francisco Hernandez of FJH Photography is someone I had the pleasure of interviewing a few months back for a feature article. His work focuses on portraiture, but specifically the art of using high-speed sync flash which produces an incredibly dramatic effect. His Facebook Group Learn to Light is all about transparency and helping other photographers grow through shared knowledge. He also posts regularly to YouTube and his latest video was worth a watch in my opinion. It discusses the pros and cons of hard versus soft light and includes real world, behind-the-scenes examples of the comparison. While all of the footage is shot outdoors with strobe lighting as the key, the tips on lighting remain universal regardless. Here is a quick breakdown of the video.
Soft Light
For his demonstration, Francisco is using a 38-inch Glow ParaPop Octobox with a Flashpoint eVOLV 200 strobe light which is perfect for high-speed syncing outdoors. As is with most softboxes, they come with inner diffusion panels that clip on in layers to soften, or diffuse, the harsh light coming directly from the flash bulb.
By utilizing both diffusion panels inside the softbox, he is able to soften the light considerably which equates to softer edges as the light transitions to shadow. Furthermore, soft light reduces the appearance of skin imperfections considerably as well as the chance of “hotspots” which are very bright highlights on lighter toned areas of the model’s clothing or skin.

By placing my strobe very close to the models face and using two of the included diffusion panels with my octo, I was able to produce a very soft, flattering light.
All of these are fantastic benefits but they come at the cost of light output. Each consecutive diffusion panels reduces the amount of light output by approximately one stop which conversely means you will need to add a stop back to your exposure by dialing the flash power up, raising your ISO, or opening up your aperture. Shutter speed does not compensate for flash power in a strobe situation as it controls only the ambient exposure (i.e., the background).

Similarly in this shot, the octobox was place very close to our model with both diffusion panels intact. Notice the easy and gradual transition from light to dark across her face.
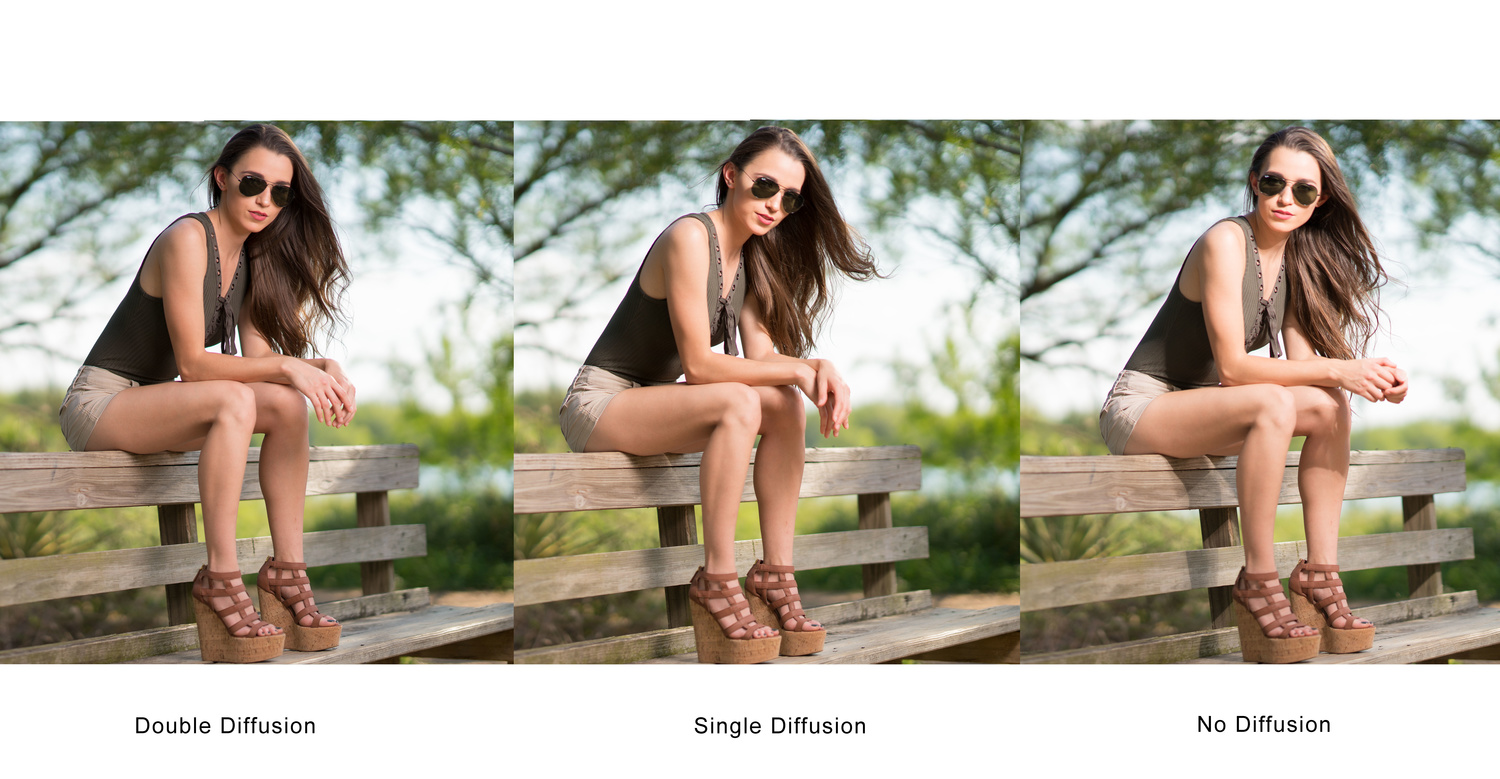
Here is a side by side comparison from Francisco's shoot with the light progressing from softest to hardest as you move left to right. The only variable is the # of diffusion panels used
Hard Light
Based on the above, it would seem that logical that you would always want your light as soft as you can get right? Well, it depends. Oftentimes it is a stylistic consideration. Hard light creates greater contrast with more pronounced transitions from light to dark, which can be desirable if you are shooting for a certain edgy look. Additionally, hard light is great at accentuating certain aspects of an image such as clothing or props, which may be desirable.
It may also be necessary depending on the situation you are shooting in such as outdoors in midday. As you can imagine, overpowering the sunlight requires an incredible amount of light output which is achievable with certain equipment only. By introducing diffusion panels you are reducing the total light output from any given strobe by one stop which is significant. Therefore, in certain instances hard light on your model may be unavoidable if you are using a smaller strobe with limited power.

This image was shot midday in the hot Texas sun. I wanted a shot that was dramatic and edgy which suited my models pose as well as the skater theme. To do so, I removed one of two diffusion panels from my octobox and moved the light further away.
The negatives of hard light are that is accentuates imperfections particularly on skin and clothing as well as creates hotspots.

In this image I purposely wanted to highlight the tendrils of smoke. To do so, I needed a hard light which accentuates details. It was as easy as dialing the flash power up and moving the light back a few feet until the desired effect was achieved.
Conclusion
Check out Francisco’s short video with great BTS footage of a simple shoot. His consistent effort to get out and shoot is inspiring and his willingness to share knowledge is refreshing in a field that is so often closely guarded.
You can find more of his work on his website.


on the hardlight part....there is no hardlight shown...
Nice!