
Dramatic black and white images are some of my favorites to create. Here is a step by step walkthrough of how I shot and edited this image in ON1 Photo Raw.
The Shot
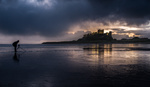
The process behind this shot was pretty simple. What happened was after taking a few portraits of the bride and groom, everyone was standing around waiting to get back on the party bus. At this moment, the bride was talking to a friend and I could see the way the hard light from the sun was hitting her dress and bouncing up into her face. Having already taken a lot of their time for portraits, I asked her just to stay where she was and look down her arm. I got a quick handful of frames and called it good. The trick here is that I knew exactly what I wanted to do with this image in post. So when shooting, I made sure to keep my image pretty underexposed in relation to what the camera's meter was telling me to do. I did this because I knew I was going to really only be wanting the highlight detail. And because highlight detail is the hardest to recover once its gone, I wanted to make sure I had as much data to work with. So here is the image right out of the camera.

Sony A7III, CZ 35mm f.2.8 lens, ISO 100, f/2.8, 1/1600th
The Edit
After opening the file in ON1 Photo Raw, I went over to the Develop module. The great thing about ON1 is they give you a ton of great pre-installed presets to work with. I knew I wanted this to be a dramatic black and white, so I opened up the black and white tab in the preset pane and scrolled through the previews for the best one. What worked best for my vision was the Ingrid Neutral preset.

From here I made some slight adjustments so that the bride's face was exposed how I wanted. Because the preset took care of most everything I wanted to do, All I had to do was adjust the exposure, highlights, and shadows.

As you can see above, we have some things we need to deal with. For one, the background is pretty busy and distracting. Also, now that the brides face is properly exposed, the dress on her shoulder is way too bright. In order to fix these issues, I’m going to use a few different layers. The cool thing here though is that unlike Lightroom and Photoshop, the ability to work with layers is built into ON1. So no need to use or pay for multiple programs. So the first thing I need to do is create another version of my image. I do this by right-clicking the image and selecting “create version.”

Now that I have a new separate version of the image, I can make some adjustments so that the dress on her shoulder is where I want.

From here I simply take the file into the layers section by clicking the layers button on the far right of the program. Once the image is in the layers module, I now want to add the image where the brides face is lit how I want. So I click back to the brows module, select the image I want, then click the layers module again. I get a quick pop here asking me if I want to start a new layer file or add this to my existing session. I click "add as layer," and now I have both images ready to combine.

Now all I need to do is combine the parts of the two images I want to keep. For this case, I want to combine the good light on the bride's face with the good light of the dress. I also want to start getting rid of the distracting background. If you look at the image where the dress is good, you can see that these distractions are pretty minimal. This is how I know I want to get a nice clean cut out of the bride's face. Thankfully, ON1 has some great tools that make cutting out masks extremely simple. So with the masking brush selected and the perfect brush set to on, I can easily brush away to parts I don't want while keeping what I like.


While the background of the image with the good part of the dress was better, it wasn't perfect. So in order to fix this, I added a color fill layer with the color set to black. To add this type of layer, you simply press the paint can icon that's found under your layers and then select your color and other properties you want.

I then used this layer with a layer mask to hide the rest of the distracting elements that were left on the background.

Where we are at now with this image is what I had envisioned when I took the photo. But the parts on the left of the frame seem to be pulling my eye a bit. I don't want to crop them out though because I don't want to lose any of the bride's face or dress. I also can't just paint that area to black because it would look weird having half a bride floating in the middle of the frame. So what I decided to do is right click a layer and merge all the layers into one single layer. I then added another black color fill layer. From here, I simply moved the bride to the left with the move tool.

I’m now done with everything I want to do in the layers module so I hit save and then click back into the develop module. The last thing I want to do is fine tune the image. Now that I have everything combined and I can see them together, I feel the dress is still a bit bright and the brides face is a bit dark. To fix this, I dropped my exposure down until the dress was where I wanted. I then used a gradient filter to brighten up just the bride's face.

Conclusion

The image is now where I feel like I can call it done. One thing worth noting is that it may seem like I just spent an hour editing this one image, but in reality, this only took a few minutes. The fact that I could jump back and forth from brows to develop to layers really made things feel more seamless. I also think the masking tools within the layers panel make cutting out subjects far easier than what you find in Photoshop. These tools and workflow improvements made this edit far simpler than it could have been.


That's pretty nice work. How long did it take?
Thank you! It took just a couple minutes.
I used to love Nik Silver Efex Pro - is this the best replacement?
Regards
Rick McEvoy ABIPP - https://rickmcevoyphotography.com/
I dont know much about silver efex, but i would say download the trial of On1 and give it a try!
Hi Rick, Nik Silver Efex Pro was in my opinion the best B/W program around, and disappointing when Google took it over (signalling its death-knell I thought). Interestingly it has been resurrected recently by DxO. The best alternative that I found was MacPhun's Tonality, but it appears it is being phased out in favour of their all-in-one Luminar program.This article is very interesting and I will definitely being doing more B/W manipulation with the On1 suite. Cheers Steve
This is great stuff. Thanks for the beautiful work, inspiration and instructions.
Thank you! Glad it was useful!
What a beautiful end result! The bride would be delighted with that photo. Great walkthrough article. Thanks
The link above is broken. Should be https://www.on1.com/fstop
Just fixed the links. thank you!