
I, like many photographers out there, don't have a studio, or don't have the money to rent out studio space every time I want to do a shoot. While shooting inside my house or garage is always an option, I found myself wanting to experiment more with ambient and natural light. Although I love shooting in a studio, a completely controlled environment, I learned shooting outside with backdrops was a great experience and taught me a lot about light.
I am always wanting to push my understanding of photography. While there are many areas to constantly push my knowledge, such as composition, how to provoke thought through imagery, camera gear, etc., I want to focus on the harmony of balancing strobes with natural light. I want to understand light better. I want to know how to shape it, control it, and use all types of light to my advantage. While I love natural light, I usually look for an excuse to bust out my strobes. I recently purchased some Savage seamless paper and a backdrop stand. I don't have a studio, and can't afford to rent a studio every time I do a shoot, so I wanted to experiment bringing my backdrops outside. I am a photographer on a tight budget. I also have a rather minimal amount of gear. I am always looking to get the most out of what I have. I believe this to be true for most photographers out there. I am hoping to show people how to get the most out of a minimal amount of gear. While I know I am not the first to set up a backdrop outside, I want to share my experience and help others out there understand light better.

It started with this Calvin Klein ad.
I was talking to a model who wanted to re-create a Calvin Klein ad for our shoot we had coming up. As I examined the ad photos we liked, I started to break down how it was lit. While there are many possibilities on how the photographer for Calvin Klein lit them, I came up with an idea. Since I don't have a studio, and didn't want to have to rent one for the day, I decided to drag my Savage seamless white paper out on a bright sunny day. Except for the firery hell we call summer here in Phoenix, I usually don't have to worry about wind, snow, or other weather conditions.
For this shoot, I didn't just want to unroll the seamless paper all the way and have her standing with a seamless background. Since we were outside, I wanted to incorporate a prop, maybe a wall like in the example ad photo. This was hard though because I was looking for a prop that was not in direct sunlight. I wanted something in shade, on a north facing wall (north walls generally provide even shade and lighting), and one that was on property I could actually shoot on. As I was driving I found a low, white dividing wall on the north-facing side of a building I could use.
The Setup
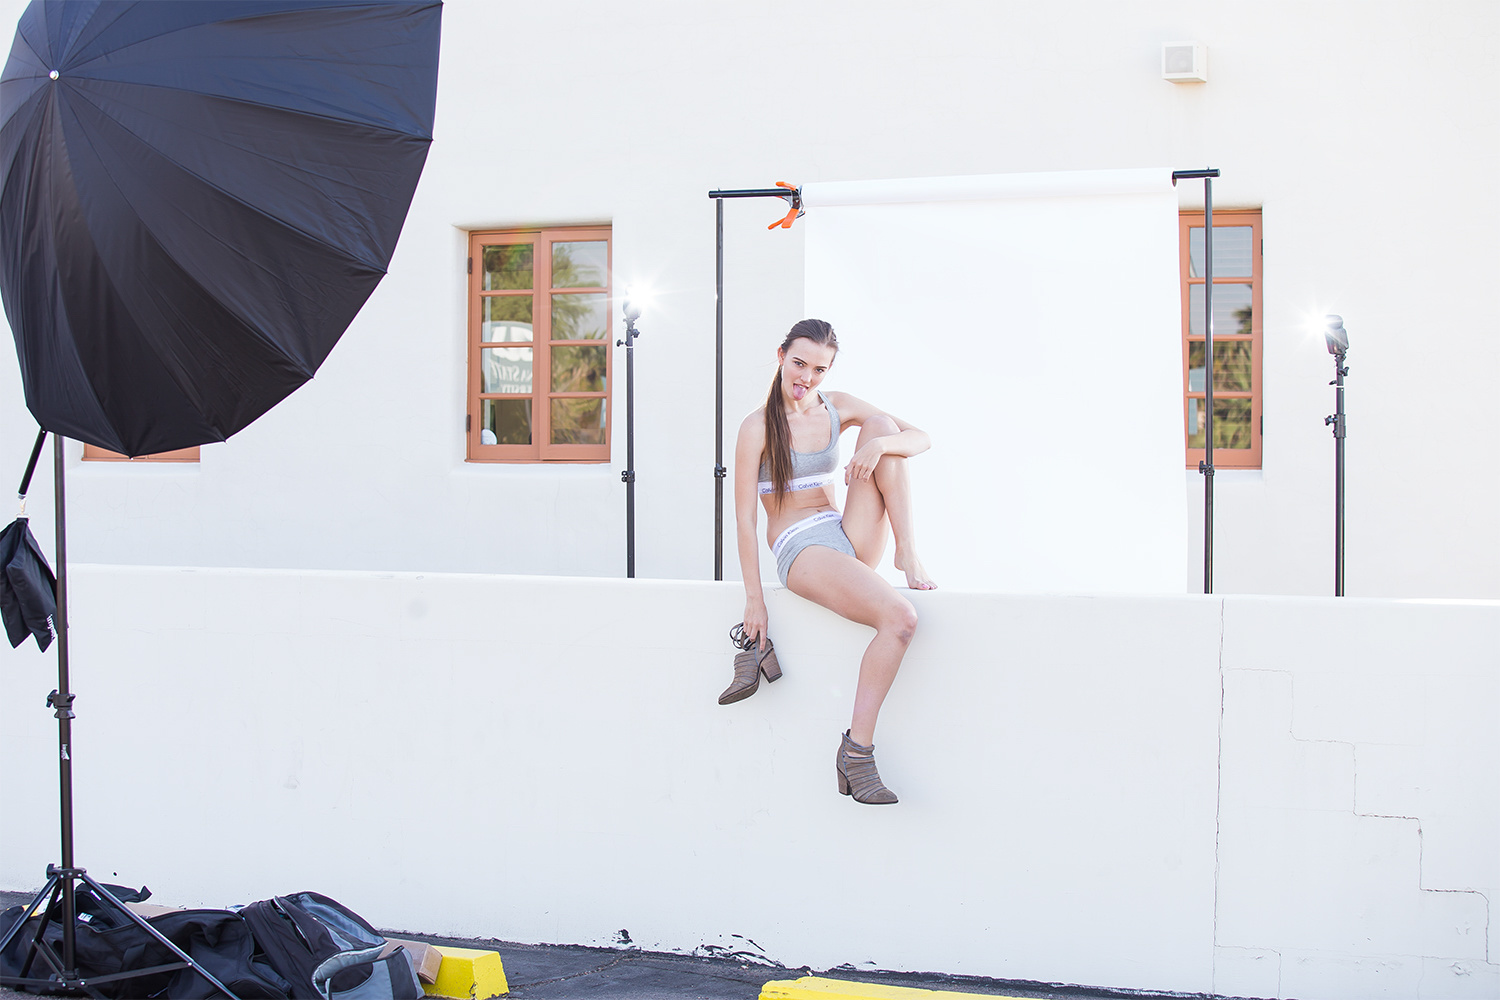
Since we were in complete shade, the lighting on the model was very pretty, but also really flat. The first thing I decided to do was to add some rim lighting on her. I set up two Canon 600ex-rt's, one on each side of the back drop. These 600ex-rt's had no modifiers on them. In retrospect, I wish I would have thrown my Westcott octobox's on them for a little softer of a rim light, but I am still happy with my results of them being bare. I raised the speedlites almost as tall as the light stand would allow them and had them slightly pointed down. I did this so the wall would not block all the light from reaching her lower body when she was standing in front of the wall.
Now that I had my rim lights set up, I was looking to add just a little bit of contrast to her face. I decide to pull out my Impact 7' PLM umbrella, and instead of putting a light in it, I decided to use the silver lining of the inside as a big reflector. It was about 2 p.m. and the sun was at the model's back. I put the big umbrella about six feet from her, and since the umbrella was facing south, it caught the sun perfectly and bounced just the right amount of light back at the model, giving her a touch of contrast. The giant umbrella also gave the model a beautiful catch light in her eyes.
I was able to get these shots with very low-powered speedlights and using an umbrella as a reflector. This is why I love the power of ambient light. I didn't need expensive lighting equipment, a studio, or a lot of modifiers to achieve this. Since we were in the shade, the light was very even and natural looking. I could have achieved this same look in a studio, but it would have been a lot harder to have the same soft, even light. The ambient light is what made this shot: it provided the perfect amount of fill for the look I was going for. Not only did this shoot teach me how using ambient light instead of strobes as a fill can look great, but it also taught me to step outside my comfort zone. I usually would think a shot like this has to be done in a studio, or with a lot of equipment. I would never have captured these shots if it weren't for experimentation.
The Results


Camera Settings
Since we were outside, the camera settings would have some subtle changes, but for the most part these were shot at 1/160th sec, f/4.5, ISO 160, and speedlight power was 1/8th power on both.
Camera gear used
Canon 6D
Canon 70-200mm f2.8
(2) Canon 600ex-rt
7' Impact PLM
Backdrop stand
Savage paper
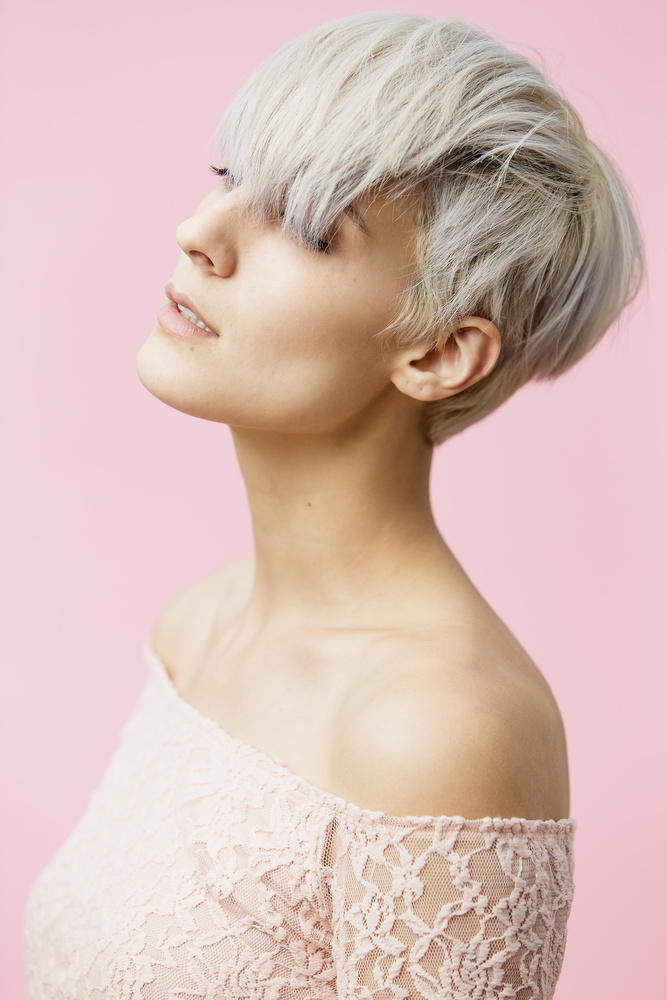
A few weeks later I was setting up another shoot and decided, since the first experiment with the outdoor studio went so well, I would try it again. This time it was a very cloudy day, so I did not have to worry about finding shade. The model had a very light complexion and sliver hair. I thought this would pair nicely with my new Savage seamless coral paper. For this look I wanted a very soft light with just a little direction to it. I decided to use my 7' PLM umbrella as my key light. I chose this light modifier because of the soft light it will give me. Its large size creates very soft window-type light. I placed two Canon 600ex-rt's in the umbrella (I used two at 1/16th power instead of one at 1/8th power for faster recycle times). The umbrella also had the white diffuser on it for softer light.
I decided to set up the paper close to a large white wall of a house. I did this because I wanted the large white wall to act as a fill from my key light. The umbrella is also feathered away from the model and towards the white wall. I did this to have less light on the background. Doing this also gave me more fill since the light is now pointing more at the white wall and bouncing light off the wall and back to the model.

Just like the last shoot, I was very pleased with how the mixing of strobes and ambient light created a beautiful, soft light on my model. While the giant umbrella is giving some soft directional light, the ambient light and white wall are providing the fill light I need to create this soft look. Again, these can absolutely be achieved in a studio, but I believe it would take a little bit more work.
The Results


In these last two photos, I feathered the light away from her even more, giving her face a little more contrast. I also brought the model a little bit closer to the light which made the background a bit darker. This is result of the inverse square law.

Camera Settings
Since we were outside, the camera settings would have some subtle changes, but for the most part these were shot at 1/200th sec, f/4, ISO 100, and speedlight power was 1/16th power on both.
Camera gear used
Canon 6D
Canon 70-200mm f2.8
(2) Canon 600ex-rt
7' Impact PLM
Backdrop stand
Savage paper
A photographer friend of mine (Matt Martian) who owns a studio recently experimented with setting up an outdoor studio as well. Matt went with a completely different approach, though. Matt only used natural light and went for a harsh look. Although Matt used harsh light, he set up a large scrim to diffuse the sunlight a little. The shots he got would be very difficult to achieve in a indoor studio. I love how he pushed his boundaries with light. The results he got are beautiful.
I moved the scrim around until I thought the lighting was good enough for me. I chose to go with natural light with this shoot because I wanted the lighting to be more on the dramatic side without over-complicating it. So I opted for the sun instead of using multiple strobes.
The Setup

The Results


Although I loved setting up a backdrop and shooting outside, there are pros and cons to it.
Pros
- Chance to experiment
- New way to shoot natural light
- Get to mix ambient light and strobes
- You can use ambient light to achieve really soft looks (as in my examples) or really harsh looks (as in Matt's examples)
Cons
- You are at the mercy of mother nature -- we got a little rain on the shoot with the pink paper
- Finding spots outside is more difficult than setting up inside
- May take some time experimenting to get a good shot
In Summary
This can be a great way to experiment with light. This can also be a cheap alternative to renting out a studio. You can pick up a back drop stand and some paper for under $200. Add either some Alien Bees or speedlights to that for another couple hundred, and you can have a whole studio set up for about $500. Or you can go with the all-natural light look and maybe a reflector or scrim for an even cheaper alternative. The outdoor studio has helped me further my knowledge in photography and lighting, and I hope it inspires you to do the same.
Fstoppers also has the new Groups feature to check out. One of the groups called, The Assignment, has challenges for you to participate in. The current assignment is to use a backdrop outside:
Description:
Who the heck needs four walls and a roof? Bring your backdrops and studio lights outside (backdrops and studio lights not required). If you’re a studio guy or gal, try to incorporate as much natural light as you can, and vice-versa for natty light shooters.
Goals:
Get out of your element, get into the elements. Learn to love the sun, maybe practice using a diffuser or using HSS on your strobes. Mixed lighting can be a beast. Shoot some fashion, shoot some portraits, shoot a friend, you-do-you. Bonus points for posting a picture of your outdoor setup.
Due:
The next assignment will be released April 17th, 2015, so try to get your images in before then (no sweat for later entries -- you're not actually receiving a grade).
How it works:
When you've shot your assignment, make a new post labeled, Assignment 1 [Your Name], and tell us how it went! Feel free to like, comment, and provide positive C&C on other entries unless marked otherwise.


That's Fantastic.
Totally sick thank you for sharing.
You'd never guess these were shot outdoors, necessarily. Nice work. Looks top-notch!
Today, Matt wins at Photography. This stuff looks awesome.
I love these shots. With the exception of the hard-lighting ones I would have believed they were done in a studio.
I really enjoy lighting articles like this...especially ones that use minimal gear!
Fabulous Thomas, fabulous.
Thank you Clay.
I'll be damned!
Looks just like what one would get out of a studio! Minus the rental ;)
I take exception to this article's title. Creating an outdoor studio __won't__ make you a better photographer. I can think of a ton of photographers that would still suck given Profoto everything and a H5D. Creating an outdoor studio will simply give you a chance at a distinctive look, but you still have to bring the chops.
My only point is going out and pushing yourself will make you better. I used the word can, not will. For some this will give them an excuse to go buy some paper and try something new, which in turn will hopefully make them better.
It can be said though that nothing can make you better, and everything can make you better, just depends on how you as a photographer capitalize on opportunities to expand your knowledge and never be content with what you know.
Great article, and behind the scenes images. I appreciate you sharing, as this is a dilemma that I face regularly.
Awesome Awesome. and Thank you
Really spectacular work, Thomas.
Thomas is like Jesus of Outdoor Studio Photography
I can't help but feel a little jealous that you don't even need a sandbag on that stand with the 7' umbrella! I have to use a sandbag and someone to hold the stand while shooting outdoors in Florida...
Amazing article! I've always loved outdoor studio images for high-key lighting setups, and will definitely be giving this a try!
Bravo!
shooting at night in an outdoor studio will really make you learn your lighting as there is nothing for your strobes to really bounce off of so you will have to make all the lighting decisions, shooting during the day you are augmenting the ambient light with strobe. when I shoot outside I will often make a black tent , 2 sides and top for the model to stand in I still see the background but can light the front the way I like it in studio either hard or soft but not much contamination from the ambient light.
Good article to get you thinking.
Great post! I'm inspired!!!!!
Love this! The pink backdrop look/styling rocks too
Great article Thomas. Very inspiring. Reminds me of the old fashioned photographer's studios that were essentially outdoor spaces with lots of glass all around and a tranparent roofs.I am thinking in particulars of the home studio of Darius Kinsey who even though he was a glass plate photographer is my inspiration for photography. Look up Darius and Tabitha Kinsey. Thanks again. I will be doing some experimenting with this.
Great Article! Thanks for sharing.
I really like the blending between ambient and flash light... It is really really soft and still contrasty! 7' umbrella should be very helpful...
Awesome awesome awesome!
This makes me looking forward searching such great spots and work like this.
Thanks, should bring backdrops more often outside! Fun idea!
killer post
Ace pics mate, great stuff!
This is a great article with some great ideas and I will add this to my list of things to experiment with. However, I really wish these articles would include the pix straight out of the camera. As we all know, you can significantly change (improve) the look of an image in post. When the article is about a lighting technique, it would be great to be actually able to see what was captured on set with that technique.
I personally find the Calvin shots to be completely over retouched with zero skin texture and almost no shape especially to her face. I would love to see what she looked like before the retouching work so that I could better understand how to adapt this approach to my work and draw some parallels to what I would see out of the camera at home.
Hey Geoffrey, you shouldn't need to see what the images look like out of camera. This was not a post processing article. You should still be able to get an idea of what the light looks like. As far as the Calvin Klein shots, I promise you there is 100% detail there in the skin. All I do for skin retouching is dodging and burning. But to help you out I will include one sooc pic, and one zoomed in pic of the models skin.
Thanks man. Seeing the SOOC shot is very helpful. All that shape and detail in her face is what I would have expected to see from your setup before retouching.
Nice work...
Killer article Thomas, really an ingenious way of shooting outdoors (especially in the Arizona heat).
Love this post man! Living on the coast in California I can count the number of days I could try this in the year without 1-2 assistants and that 7 umbrella! Yikes, the wind out here is such a factor most all day. Love the outside the box (pun?) thinking. Sunlight when used to out advantage is incredible... We can scrim it, bounce it, reflect it, subtract it and as long as we work somewhat quickly we can keep the space relatively similar through a serious of shots. I love using the sun, it's a challenge that's worth honing, you really never know when you are going to be in a situation where you need to use it, best to have the practice.
This is awesome! I wouldn't have thought to do this.
Curious how far away was the model from the background, and how did you get the background so evenly lit