
What happens when the sun is setting and you want to get a balanced exposure of the setting sun in the background and your subject? The reality is you can't without the use of a strobe and high speed sync. In this article, I’ll share with you how I was able to get a perfect exposure on my subject and the background using high-speed sync.
The Equipment
To start breaking down this shoot, let's first start with the equipment that I used. The goal I had when I was packing up my car with the gear, was that I wanted my setup to be lightweight, reliable, and something that can help execute the job as efficiently as possible.
When choosing the camera and lens for this shoot, I went with my Canon 5D Mark III and Sigma 35mm f/1.4. The reason I chose this setup is because of its lightweight low profile, and its dynamic range capabilities. One of the reasons I love shooting with wide angle lenses is the fact that I can get up close to the subject and if shot from below, makes them appear to be important and larger than life. For this shoot, this setup worked perfectly towards the overall look in the final images.
The next and final pieces of equipment I brought out, were the portable Godox AD200, and its Canon triggers. To modify the flash, I mounted one of my favorite modifiers to it, the 27” inch beauty dish from Impact. The reason this modifier was the perfect counterpart to the harsh sun that was back lighting the subject, was because it matched the hard light coming from the sun and also simulated the light that would come from a reflector.
The Setup
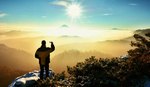
After an hour drive, I arrived on location for the shoot. The first thing that caught my eye were the incredible clouds and the setting sun in the scene. When I realized that the sun was about to go down, I knew I had to act quickly. To get a proper exposure where my highlights weren't blown and my shadows weren't crushed, I began by exposing for the background and sky. As expected, when I brought my exposure down to account for the sky, my subject was completely in shadow. That is when I had to bring out my flash to expose for the subject at the same time.
The Camera Settings
In order to expose for my sky and ambient light in the scene, the one thing I kept in mind was that I wanted the images to be as clean as possible. To produce the cleanest images, I kept my ISO to 100. By lowering the ISO, it also helped me cut down the bright ambient light in the scene. The next thing that had to be dialed in was the aperture. When assessing the scene, which consisted of dramatic clouds and a setting sun, I realized that my aperture had to be raised to f/5.6 or above to account for the details of the background. When capturing sharp light sources, the higher your f-stop number (the smaller the aperture), the more of a starburst like effect you’ll get from the light, or in this case, the sun. For these photos, that wasn’t what I was going for, which allowed me to keep my aperture at f/5.6. Another advantage this gave me was that when shooting on the Sigma 35mm f/1.4, on this specific lens, since the widest open it goes is f/ 1.4, this means the sharpest image will be produced when using apertures that range from f/5.6-6.3. The last aspect that had to be accounted for, was the shutter speed. Even with the ISO and aperture settings locked in, the ambient exposure was still too bright and my highlights were being clipped. So, I brought my shutter speed to 1/400th of a second. The only catch to setting my shutter speed this high was that it was higher than the average sync speed that my camera has, which is 1/180th of a second. In order to be able to fire the flash and resolve this issue, I enabled the high-speed sync setting on my flash.

This is the SOOC image without the use of flash. In this shot, I am exposing for the ambient, and making sure the details in the clouds and highlights are intact.
The Flash Settings
Before I dive into what the settings were, I think it’s important to first explain what high speed sync is. Essentially, each camera has a native sync speed of a maximum of 1/250th of a second, and if you go anything above that set number, your camera won’t be able to communicate with the flash. That is when the use of high speed sync comes in. Using this technique, it allows you to raise your shutter speed higher so the flash matches the ambient light. Just know that how high of a shutter speed you can go and still expose the subject correctly, will depend on the strength of your flash or strobe output.
The main objective when dialing in my flash settings was to match the exposure of the sun, hence the term “overpowering the sun”. I turned on the high speed sync setting on my camera and strobe, and raised the power of the flash to 1/1 power.
The Lighting
For the lighting in these images, I kept it relatively simple. To start, I positioned my subject with his back towards the sun, which served as a perfect backlight in the scene. Since I wanted the light coming from the strobe to look as natural as possible, I placed it four feet from my subject, and raised it about two feet above him. The harshness of the beauty dish light was the perfect style to match the sun. It is important to note, that I could have brought in a reflector to bounce light back onto the front of the subject, but the exposure of the setting sun was so bright (which meant I had to dial my ambient exposure way down) that it would simply not bounce enough light back onto the front of my subject.
Another way you can achieve this same effect of having the details in the sky still there and the subject exposed properly if you don't have a flash, is by doing an HDR photo. A normal HDR photo is a minimum of two separate photographs, one exposed for the ambient, and the other exposed to give a correct exposure on the face of the subject. These two images are then blended together using Photoshop.

The Final Images


Closing
The next time you're shooting at sunset, or you are presented with an array of magnificent clouds, cut down your ambient exposure to expose for the background and use a flash to fill in the shadows of your subject. It's that easy!
Do you have any photos you have taken using this technique? Leave them in the comments below.


Good post. Thank you.
Thanks for the kind words! Glad you got something out of it!
"The reality is you can't without the use of a strobe and high speed sync."
This is not correct. I've accomplished similar shots with a couple of speed lights, a 3 stop ND filter and standard sync speed of 1/200.
Using HSS is without a doubt easier, though.
You're right. My apologies for the typo. I do though allude to that later in the post by using HDR if you don't have flashes.
True. But it would be difficult with moving subjects. At the end of the day, though, I really love these kinds of shots that you did here. They may make those who put a premium on "natural" grit their teeth, but I still love them :)
I have a 600 ws HSS strobe that I use when I want to shoot at wider apertures and kill the sun/BG, but at smaller apertures, a speed light and a ND filter can work great if you can get the light close enough.
Yep you have a good point, I was just pointing out an alternative that could be done on the cheap, unless I assure you, someone would complain that I was only using expensive gear. I appreciate the kind words and am glad you got something out of it.
In regards to the aperture, In my work I almost shoot everything 5.6 and above, I guess it's just one of my things. I am saving up for profotos in the very near future for that reason :) But until then, I'll work with that I have.
Or he could have shot f/8 1/200. Not a huge difference in depth of field here between 5.6 and 8 on a wide lens like this. Not like he was shooting some extreme 1/4000 shutter speed and f/2
To be honest, since it was something that had to be done quick, I dialed in the settings until it looked right and just happened to come out to these settings. Both have the same effect. I always find that when high speed sync is enabled, it gives me more flexibility. Once I have my depth of field where I want it, I can simply adjust the ambient as it changes.
The white balance on your two final images is off considerably. One being blue and the other yellow/green making his skin look very displeasing in both. Not trying to be mean but trying to point out a very key editing flaw with many portraits I’ve seen in your articles.
Also, the main use of HSS is to enable you to use fast lenses at their widest settings (for example 1.2-2.8) so you can still have an extremely out of focus background while having the sun in your shot. As one of the other commenters pointed out, you didn’t need to use HSS at all in these shots to achieve the same results.
Thanks for the feedback. I'm still honing my color toning skills. I chose to have it cooler for the dramatic effect and might have overlooked the skin. It is something I will look into in my next posts. Perhaps I can add a note in the article about the point of HSS that you're bringing up.
There’s a lot of easy ways to do skin toning but by far the best I’ve seen is by PixImperfect on YouTube. His tutorial of how to adjust RGB to correct it with or without masking is awesome. Maybe something to look into for ya.
As for the lower F/stops, definitely try to use a higher powered flash/strobe so that you can achieve the look. I own the AD200 you used and even at 1:1 you won’t be able to shoot at 1.8 or lower but if you use two of them with the AD/B2 adapter you might get away with it. Ideally, the AD600 would be the go-to.
Good post regardless. Keep at it 🤙
This is at 1.8 at 2 in the afternoon so the sun was very harsh. 1/4000sec to enable the low F/stop.
Yep! For me though, i rarely ever drop below f5.6. So like I mentioned in a comment above, I use high speed sync for the flexibility it allows me to have. Once I dial in my apeture and depth of field settings, if my ambient is constantly changing, I don't want to think twice about lowering or raising my shutter speed.
It could just be my monitor :) Guess it's time to calibrate it! I'll look into that video though for sure.
Yep, I am saving up as we speak for a set of Profots to do just that! But until then, i'll make it work with the settings that need to be dialed in. For me, it's not an exact science, its whatever looks right, then I go wit that. I don't really think twice in situations like these that are fading quickly.
I completely understand the flexibility of HSS and agree. Most only use it for the low f/stop enabling but it has a variety of uses.
I’d save cash and definitely go with Godox if I was you. I’ve got all their flashes and strobes and saved myself a few grand. To each their own !
Thanks for sharing. The last image could have been improved by blocking the sun with the subject's body. It could give you some rim contour light, and the overexposed piece of light would not be visible. Human eyes first pay attention to the brightest parts of an image, - in this case the overexposed piece of light is taking attention away from the portrait, and spoil it. The vertical orientation of the same image does not seem to be working well - it is not comfortable to look at the image as it was shoot from a low level up using a wide angle lens, and composition makes human eyes jumping from top to bottom and back (not comfortable for most people). You may consider shooting on eye level, it would help creating a feeling of connection with the subject and avoiding an over dominating pose / distortion (body seems to be disproportional to the head, due to 35mm being used when shooting from a low angle on a close distance).
Thanks for your feedback. I appreciate you pointing what could be improved and how to improve it. Very helpful. In regards to the low angle it was something i was messing around with to give off a comedic character vibe.
You are welcome. Thank you for taking the feedback in a positive way:) To be honest, it looks a bit on aggressive side (due to over dominating pose) rather than comedic one. You may consider using a portrait lens to avoid body distortions, and having the subject look in the direction of a camera, which would help in creating a feeling of connection (the way the subjects is looking away or down at the viewer adds to a colder atmosphere).
Fair point. I guess comedic angles are higher up. I definitely wanted distortion in the image and was very intentional. But I do hear your point about the colder tone.
Does your subject like the way his body looks distorted? Think of other people who look at the photos of this man. Would the distorted body help him making a good reputation or bad one? They may not know anything about the way a lens may make a body look distorted, but they will judge you as a photographer by the quality of the photos they see. All the best.
He is very happy with them :)
The definition of "overpowering the sun" varies a lot on the world wide web. :-)
How would you define it as?
Well, when you say overpowering the sun what do you mean? If you use it as a rim/kicker along with fill flash have you overpowered the sun or is it still the brightest source in the frame?
My point is just that, it means something different to most people.
For sure. For me, really it means I have control over my ambinent light. I can make it as dark or bright as I want and still communicate with my flash. Control for me is where it's at.
I would like to suggest a new internet rule: You’re only allowed one photography article per year with the phrase, “How I” in the title and only if at least 20 people have already asked you how you did it.
Noted.
Great photos Eli, keep up the great work.
Thanks so much! Can't wait to get together sooN!
Good explanation. For our Nikon users, note that the high speed sync (HSS) for the shutter is located in the menu. Nikon has two shutter speeds that are designated HSS and they have an asterisk after them, 1/200* and 1/250*.
One can be picked in the setup and left selected all the time. Nikon compatible flashes, including 3rd party, will allow the use of high shutter speeds automatically with a compatible flash.
Thats good to know. Glad you got something out of it!
Nice results! Does the model now need to walk around with a guide dog, tapping his way along the street with a white cane? 😀
I think this article should be titled “how I filled in the shadows”. Overpowering the sun in my mind means you darken your exposure while simultaneously increasing the power to your flash/strobe until your flash/strobe becomes the brighter source of light on your subject. Essentially replacing the sun as the brightest source of light. Handy in situations when the sun is giving harsh, uneven lighting on your subject, and you replace it with a softer, more even/directional lighting. As the subject in this article is actually just backlit by the sun, you are just filling in the shadows.
Very simple and and guiding post. Very helpful. Thank you.