
Lighting can be a major pain in the ass and that is especially the case if you're not a technical person, like me. After picking up the camera 7 years ago I am still constantly learning about the many different aspects of lighting.
One thing I have definitely learned is that when it works well, it can work really well. What else have I learned in that time? That on the other hand it can be so much trouble!
I hope my "How I Shot This" series will be of help to you as I would have loved to have access to a more detailed set of information when I started in photography. So with that said, I'll do my best to share as much information as I can! What is the point of experience if you can't share it? Lets do this! 
This was a test shoot done a while back with a model from one of Singapore's top modeling agencies. I really wanted to shoot it with just hard lighting. Hard lighting comes with its own set of difficulties, the main one being that it is not very forgiving. As we all know, unforgiving light can bring out all the blemishes and flaws of the model. Pro Tip: Find gorgeous and perfect models that have no flaws! These humans exist, right? Right?! (Sometimes. I've seen them. They're hard for the ego.)
On the other hand, apart from it's unforgiving nature, hard lighting also can give a very interesting dramatic quality to an image.

Another reason I wanted to do this shoot was because I wanted to make my cat a star and let me tell you... he IS a star!

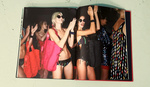
Reference Images
It's important to always walk into a shoot with at least an idea of what you want. Sometimes you get it, and sometimes you go with the flow and get something even better. Still, always be prepared! Your team can't read your mind and need a visual reference for what you're going for.
For me, I always go to a shoot prepared with a set of reference images and this one was no different. These are the set I collected for this shoot ranging between lighting, mood and poses. I feel like we captured what I was after and as always I'm grateful to the crew I was working with to bring it all together.

Equipment List
- Canon 5D Mark II
- Canon 85mm f1.8
- Canon 50mm f1.8
- Canon 35mm f2
- Profoto 7A & Pro Heads
The above gear is what I basically always have in my camera bag. Other than that, the lighting equipment was from the studio. Honestly, I would have just stuck with the 85mm the whole way through if I could but I had to adjust due to the limited studio size we were working with that day. The studio length just wasn't long enough for me to capture a full body shot with a 85mm. Even with the 35mm, my back was against the wall.

Lighting Setup
For this shoot, I knew that I wanted her to be lit with a little drama while having the image clean against a white background. Check out the below lighting diagram to see how I envisioned this whole thing working.

I used a total of 3 lights for this setup. For the main light, this was done with one beauty dish from the front, top down. One light was placed on each side of the model to light the background. One black flag was placed in between the background light and model on both sides so the background light wouldn't hit th model and they also help create more shadows on the sides of the model for added drama.
Check out the below image with strategically drawn red circles for visual aid!

As I mentioned above, I'm not a very technical person, so I unfortunately don't have the power settings for you. After base-lining my lighting settings at the start, I just turn knobs until I get what I want. Turn a little this way, turn a little that way... until it looks right to your eye.
What I learnt on this shoot was that this lighting can be quite difficult when the model has a very small area to work with. The amount of space she can move within, while still having the beauty dish hit her face in optimal lighting is not very large, so this is something to pay attention to. I had to remind myself to keep checking my tethered images to make sure that even while she was moving, she was still lit up well.
Camera settings : ISO 100, f/8, 1/160s

Post Processing
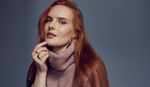
When I first started photography and scoured the internet for lighting diagrams and behind the scenes, I used to wonder why there was such a huge difference between what I shot from my camera and what I see from my references. I was never able to get anywhere near the feel and mood of the reference images, even though I followed the lighting diagram as closely as I could. Of course there were times where it was just figuring out how to finesse the light, but sometimes it's also learning what Photoshop and the many other image editing tools out there have to offer (I use Capture One and Photoshop.) It took me years to learn the magic of color grading and proper skin retouching techniques. I'm not going to touch on that right now as there are experts with better explanations out there. Here's the before and after of my Photoshop work so you can see how it looks straight out of camera, compared to my finished version!

Note that this model already came with fairly good skin. If her skin was not great, under this sort of lighting all her flaws and blemishes would appear which would mean a lot of post production time. Mainly for her skin, I used the clone tool and then dodge and burn to retain texture. I also brightened up the background to give the image as clean a look as possible!

(For this shot, I had to pull up shadows in Capture One for the lower part of her body as the light from the beauty dish didn't reach that far)
Closing
I really hope this has been helpful to you! If you have any other questions, please let me know in the comments and I'll try to be as transparent as possible. In the future I will take more BTS images and to write down settings even though if you ask me, "turn a little this way, turn a little that way" should still be your guiding principle!
Do experiments with this and make your own changes, I would love to see what you come up with!
Photographer: Shavonne Wong (@zhiffyphotography)
Stylist: Angela (@angela_wk)
Model: Lin Li/ Ave Management (@lilithyll)
Makeup: Michelle (@official_michmakeover)
Hair: Yuhui Aw (@yuhui_aw)


I'd hardly call a beauty dish at that distance hard light!
Hey John! Personally, I do think there is a range of what falls under "hard light" and vice versa for "soft light" but perhaps this is not the best example of hard lighting as it toes the line a little.
Thank you for your comment anyway!
The green dress shot is killer! Great work, Shavonne!
Thank you!!
Really good work, but calling it hard light? ;) I was barely satisfied with hardness on this one, and it was barebulb at 4 meters ;) https://fstoppers.com/photo/170659
Lovely shot!
Haha I guess to me, just because it wasn't the hardest possible light ever didn't make it .. not.. hard light. But feedback received!
That above photo from Konrad shot with a bare bulb, is exactly what i think of when hard light is mentioned- it definitely has the look of it, as if this was shot in bright sunlight. Using a beauty dish is not, nor what i'd ever consider, hard lighting. Specular, sure, hard, no, though on yours, i guess it could be, considering the model has heavy hotspots on her forehead and below her eyes on your 3 photos?
Well it does depend on how a modifier is used. A softbox could be used as hard lighting as long as it's far enough. If the ceiling was higher, I would have also moved the beauty dish higher to get a harder light.
In the end it all come to individual point of reference ;-)
PS. Love those shots with the cat - in the past we had a very specific cat and everyone wanted a photo with him :-P
I love it, nice job Konrad!
Hey Konrad, your work is super solid.
THAT is hard light!
Nice feature. Thanks, Shavonne.
Thank you Rex!
Did you shoot with the intention of making a pure white background? I think it would have looked better if you lit it that way to begin with.
To be honest, I just wanted a light background. I brightened it after playing around in post but even then I don't think it's pure white still.
Appreciate your thoughts anyway!
You did a great job! I would also call a beauty dish hard/harder light. People love to complain and look at the negative - it reflects more on them than your work. You went through all this detail to pass knowledge and people look for ways to undermine your skills. Your explanation was great and appreciated, and I doubt any of them would be brave enough to correct your work if it was in person.
Aw, thank you Walid! Really appreciate this (:
You're welcome! Can you imagine how much more successful we'd be if people said thank you for the information, incorporated what they loved and adapted what didn't fit their aesthetic instead of finding ways to correct the work?
Haha yeah everybody will share information! It'll be great! :D
Walid, I never said I didn’t like the images. They’re fine, but as a technical information site, having accurate title descriptions or not reflects more on the site editors and owners than any commenters questioning it! And I’d have no issues telling anyone in person either.
The shoot with the green dress looks great. Conveys a lot of confidence.
Just to nitpick: The backlighting is flattering for her legs, but her hairline looks funky. Maybe use more hair spray? Less power? Diffusor?
And the dress is a bit wrinkled at the bottom :D
Heh good point, will take note! Also, thanks for the compliments (:
Great article, and fantastic images!
Thank you Jenny!!
Haha and I wouldn't be surprised if someone said it! To be honest, it was choose to light the way I want or compromise for catchlights. Of course, I could have added catchlights in post too but eh! Hahah.
Love the shot in the green outfit
Thank you!! (:
very useful article.
Thank you (:
"How I shot this with hard lighting" Gives no info whatsoever save for a pull back of a stand and some foam core flags.
Hey Ryan, my aim was to show how I shot these images. Do let me know what other information you would like to know and I'll do my best to answer you. Will also keep them in mid for future articles!
Thanks for this article! I'm still sort of intimidated by lighting. But, just like you do, I work with reference images to help me deconstruct things. I also love your source for lighting diagrams: http://www.sylights.com/. Not only does it offer diagrams but the the resulting images as well. That's a great learning aid!
Haha yeah I understand, lighting can be quite overwhleming! And sylights has been very useful and saving how I light stuff. Sometimes I myself don't remember 😅
nice work
Thank you!
Amazing work Shavonne! Thank you so much for sharing :)
And thank you for reading! Hehe
Portrait photography is out of my league but I shoot one occasionally. This article is very helpful! I've seen your work on different Singapore local magazines and some from Canon SG websites. Keep up the good work!
Portrait photography is out of my league but I shoot one occasionally. This article is very helpful! I've seen your work on different Singapore local magazines and some from Canon SG websites. Keep up the good work!
Thank you Pichan! Very kind of you (:
Great shots...shows how having a great team makes for great shots... nice styling, model poses well, nice makeup and hair, and above all, the cat poses well 😉
I'd call a beauty dish without the sock a hard light too... not the hardest, but hard compared to a softbox. I love my beauty dish too ☺
Hehe thank you Ken! And yea, my cat's always posing hahaha (:
Like the photos really like the shadows. I have the same 35mm. How do you like it?
Thank you! Certainly have no complaints!
that cat is cute.
he is! :D