
Have you ever wanted to create a bright, sunny image, but it was rainy and overcast outside? In this article, see how I recreated the sun when I shot this edgy fashion editorial in my small home living room.
The Concept
Whenever I flip through fashion magazines, I'm always inspired by images that strike a balance between showing a lot of movement and a control of light. My goal was to combine both of those concepts. So, I went with an edgy outfit and simulated a sunny day outdoors. To accomplish this look, I had to make the most of the space I had, which was a messy living room in my house.
The Equipment
Avenger Turtle Base C-Stand Grip Arm Kit x3
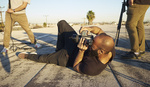
The Camera Setup
Since I was lighting all the shots with a continuous light source, my camera settings rarely changed and remained consistent throughout. My choice of camera and lens were the Canon 5D Mark III and Sigma 35mm f/1.4, because I wanted to be able to move around my subject and change angles without worrying about focusing or distortion. Using this lens helped reflect the edgy style of the shoot. Additionally, when using the 35mm lens, it also helped make the space I was in and the set I built appear bigger than it actually was.
The Settings
The camera settings I chose for this series were primarily based around the feeling I wanted to convey, which was a lot of movement and texture from my backdrops to contrast the smooth fabric of the models’ outfit. I started by bringing down my aperture to a deep f/8 aperture to achieve a more gritty and dramatic look, where everything was in focus. The other consideration I had was that I wanted to capture a sense of movement in my shots, and since I was using continuous lights, I wasn't able to freeze the action with my strobes. Given my lighting, I had to make sure that my shutter speed was high enough to freeze the model when she was in action. This brought my shutter speed to 1/500 s. To eliminate camera shake, I also shot on a tripod. Lastly, in order to compensate for the loss of light from the high shutter speed and deep aperture and still keep my ambient light bright enough where it looked like a sunny day, I had to raise my ISO to 1,000.
The Lighting
As you might be able to see, I chose to go with a continuous lighting setup, because what you see is what you get. This saved me a lot of time and allowed me to focus on the subject. It also provided me with consistent results across all the images.
The First Look

This is the first light test of the shoot. I wanted something punchy and contrasty, but with even shadows. By bouncing my 59-inch soft box at the eight-foot ceiling without the diffusion, it gave me the punchy light, but also a soft and even falloff.


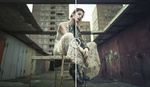
The Second Look
When I think of the kind of light that the sun outputs, I think of one small, undiffused light source. In order to replicate the kind of light that comes from the sun, the first thing I thought about was the direction of light and its shadows. For this setup, I kept both diffusion panels off of my soft box and placed the soft box two feet off the ground, angling it down at a 45-degree angle. I then placed the model inside the canopy of light that the six-foot soft box created, which gave me a gorgeous wraparound of light on the subject and created a perfectly even hard light. Since the light was placed a few feet above the model, it still created shadows on the model's face, so to soften the shadows subtly, I placed the backside of a Gravity backdrop on the floor (a white canvas), which bounced the light back onto the model. This provided me with a soft fill. For the light direction, I chose to place the light off to the right of the model to create a more realistic effect, as the sunlight is often casted at that angle. I kept it to one light in order that I wouldn't have conflicting second or third key shadows.


The Third Look
For the third look, I still wanted to remain consistent with the other ones, so I kept the light at the same angle as the first setup, which was the Aputure 120d placed in the center of the scene and a soft box pointed at the ceiling. But in this set, I wanted a softer fall-off and spread of light, as it was more of a classic headshot. I put back on the diffusion panels and placed a five-foot reflector to the model's right and a bounce card underneath. This provided the perfect amount of fill for the scene, but at the same time, allowed me to keep the same drama as the other shots.


Closing
At the end of the day, this shoot would not be possible without the amazing effort that the crew put in. Do you have any pictures where you recreated the sun indoors? Feel free to share your pictures in the comments below!
Team Credits - Photographer, Retouching: Eli Dreyfuss | Model: Alison Liquori | Makeup: Alison Liquori | Assistant: Chris Palma


The light's not really hard enough to be simulating a bright sunny day. This is...something else. Have a look at some of Herb Ritts' photos shot on his studio roof in the bright sun, and you'll see the difference.
Ok good to know. Thanks! Will check him out!
Your setup still looks good tho. I dig the results and will keep this setup in mind when planning my next shoot!
Ok cool! Glad you got something out of this!
I think you failed. The light would have to harsher for the angle that direction that it's coming from. Shadows would be deeper etc.
Thanks for your thoughtful comment.
I think that the octabox (or more specifically, the diffusion on it) did you in here.
Will keep in mind for next time. Thanks!
i think the title is more the issue than the content. it spurs the question of whether harsh sunlight is being simulated or trying to manage harsh sunlight-like lighting that's been artificially manufactured.
the title implies the former but the content really isnt the latter, either.
Thank you for your comment! I understand your concern, and I will see if I can change it. What do you think a better title would be to best suit the piece?
The title has been fixed. Sound better?
Being as nice as I can be in a comment that will be read however someone feels it should be: I have no clue why the title of this article matches the photos taken.
I don’t see harsh sunlight, bad global white balance, and no harsh shadows I would expect/want from harsh sunlight.
The first image you created your light, diffused it in a soft box and then diffused it further by bouncing it off the ceiling. I’m honestly confused at the title matching the photos because the steps you took to create “wraparound” and “fill” lighting in all the images doesn’t speak to me as “harsh sunlight” at all.
I understand your concern, and I am doing what I can to fix the title. What title would you recommend?
I just fixed the title. I think it's more fitting. Appreciate your comment!
The white balance is surely not the right one for a "sunny day".
This yellow cast makes me think more about a 2700ºK bulb…
Interesting point, and something I was not aware of before. I did the color grading to the warm side after the fact so maybe thats why it seems off. I will definitely know now for next time. Thanks for bringing it up!
You could also add a (very) light touch of blue cast in the shadows, using Lightroom's Split toning for example (or similar if you use other software)
I like the hard light you did there. It’s “sun like” but more controlled without those really deep shadows the sun makes. Cool.
Thanks! Exactly what I was going for! As mentioned in the preface that I wanted the contrasty light but wanted to control the density of the shadows etc
Ah well, Camera $ 3000.-, lens $ 900.-, stuff $ 1500.- total $ 5.400.- it should work.
It's not the gear, its the photographer ;)
Doesn't look like sunlight. Too soft and "harsh" light source feels small.
Good point and appreciate the comment. Thanks!
Yeh . . . I think you got in your own way a little bit with this one trying to be a little too cute with your lighting setup. Don’t know that I would do any better, but nothing really makes me think those images were under sunlight.
Everyones such haters... stop riding Herb Ritts dick and be yourself.
I appreciate the kind words! Yep! Exactly! If it dosen't seem to be working for you, then modify it to fit your needs! :)
The article is fine.
The shadows are not as photographically deep--that is, black--as we know unmitigated sunlight shadows reproduce on a sensor.
However, they are as dark as people perceive shadows by eye.
Most people also perceive direct sunlight as "warm" even though we photographers know the color temperature is "cool.' It looks like the photographer tried to achieve warmth by post-processing color balance. It would have worked much better to have gelled the light so that it was warm in the highlights and cooler in the shadows.
For a client, though, it would pass muster as "sunlight."
You make some great valid points and appreciate your knowledge! These are things I was not aware of before and in the future will be implementing those tips.
In lightroom or photo shop you could cool off the shadow for the same effect.
Were you using one light source? I sometimes use a large source either bounced or a 4x6 box with no gel, in addition to a more direct light like a gelled (1/8 or 1/4 CTO?) fresnel, open reflector or a bicolor LED tuned warmer coming from the same direction, in fact right in front of the 4x6 box works great.
Sunlight is not just the sun it's the sky too, and depending on the weather, altitude and time of day there will be subtle warm and cool light on the same subject.
Right! Yeah It was just not of my knowledge at the time. I actually shot it with a cooler white balance and according to what I was feeling or what I felt the image could feel like, that's why in Photoshop I added the warm tones. Both are valid I
think.
I was thinking more of a shadows cooler highlights warmer style as opposed to global warm or cool. But it's up to you.
Well I think it looks great and I appreciate the tips, Eli. Thanks for sharing.