Some of you may already know how big a fan I am of Capture One. Making the change to Capture One as the primary tool for my workflow has sent my productivity into hyperdrive, the photographic equivalent of adding NOS to my tank (or whatever it is they use to make cars fly in "The Fast and The Furious").
In this tutorial from Capture One's YouTube channel, moderator David Grover takes you through the basics of setting up a session in Capture One, and even shares a handful of advanced tips.
If you are new to Capture One, or tethering in general, it is a software program that essentially rolls many of the features of Lightroom, Photoshop, and Bridge into one, but it has made its name primarily as the industry standard for tethered shooting. I personally use it for around 90% of my workflow, only exporting images into Photoshop when I need to do fine tuning or plan on making major adjustments like composites. Once retouching is complete, I bring the images back into Capture One for exporting, final touches, and even cataloging (although Capture One's session workflow makes maintaining a master catalog less useful to me personally than in the days when I used Lightroom to manage my archive).
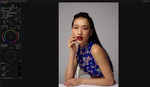
If you've ever been on a professional set and seen one of those bright orange Tether Tools cables hanging connecting a roving photographer to a workstation or a laptop surrounded by demanding clients, the odds are that Capture One is the program that they are all looking at. But how does it work? In the above video, David Grover takes you through step-by-step to creating and managing your own session workflow.

A few topics covered in the tutorial include setting up a session, naming files, and setting up personalized capture folders. That last bit is particularly useful if, for example, you are shooting a lookbook with multiple outfits, or a portrait session with multiple subjects, and you need to automate your file management to create an organized workflow. He takes you through the various ways to operate your camera from your laptop in live view. Let's say you have your camera in a position that is great for the final image, but not so easy to reach. In Capture One you can adjust your camera settings, refocus, or even check battery power without ever leaving the comfort of your chair.

Perhaps the biggest time saver for Capture One over other platforms is the ability to export multiple file formats into multiple customized folders simultaneously. This may sound small, but has already saved me hours of productivity. And speaking of productivity, one of the lessons David covers in the tutorial is how to work with overlays. If any of your are shooting for magazine covers, packaging, or any other predetermined format, the overlay feature allows you to pre-load an image of the clients cover art into the system prior to shooting. So, if, for example, you need to leave enough room for the Vogue title at the top and the article titles to the bottom sides, the overlay feature allows you compose your shot accordingly and see the result instantaneously as soon as you press the shutter.
For anyone new to the program or existing users just looking to improve your workflow, this tutorial is well worth the watch.


I read somewhere that I can adjust the image in capture one that was tethered in and then have all the future images ue the same settings. How do I do that
Depends on what you want to do. The most straightforward way is to shoot an image. Make your adjustments for color, contrast, etc. Then, when tethered, go to Next Capture Adjustments (under the icon with the camera) and choose Copy From Last. Then, the shots going forward will retain the same adjustments as the initial one.