
It's quite common to shoot photo sessions in unimpressive locations; it goes with the territory when shooting on-the-go and outside of a studio. Fortunately, we have options to help us transform boring locations into beautiful backdrops, and it’s easier than you think. Making simple light modifications and quick edits in post can mean the difference between creating average imagery versus creating imagery that impresses your clients.
One of my goals during each shoot is to create imagery in-camera that wows clients on location. These types of scenes provide opportunities for us as photographers to exceed client expectations. Their expectation is that nothing great can come from these conditions where we are dealing with poor lighting, bad environments, and a fast-paced on-the-go timeline.
In-camera transformations like the one below will amaze your clients giving them a story and an experience to share freely with their friends and family. In addition, for the client, it creates a secure sense of confidence and trust in your ability to create incredible pieces of art, regardless of the situation.
The following article contains excerpts from our video workshop, "Photographing the Couple," on SLR Lounge. In this Premium Workshop, we teach you how to move away from memorizing poses and to start directing, with an eye for the small nuances that can make or break a photo.
Here are some tips for transforming a boring scene with a simple, portable lighting setup.
1. Dial in Your Ambient Exposure
The first step for any scene when adding flash is to set the ambient exposure. An easy way to do this is to switch to live view on your camera so that you can see the exposure change as you adjust the shutter speed, ISO, and aperture. Deciding how much ambient light to preserve will depend on how unsightly the background is, and whether or not there are details worth keeping, such as an interesting texture.

While this room looks pretty terrible when brightly exposed, with a warm underexposed image, we can see beautiful dark tones and texture in the background which you will see above.
2. Control Light Spill and Color With Modifiers
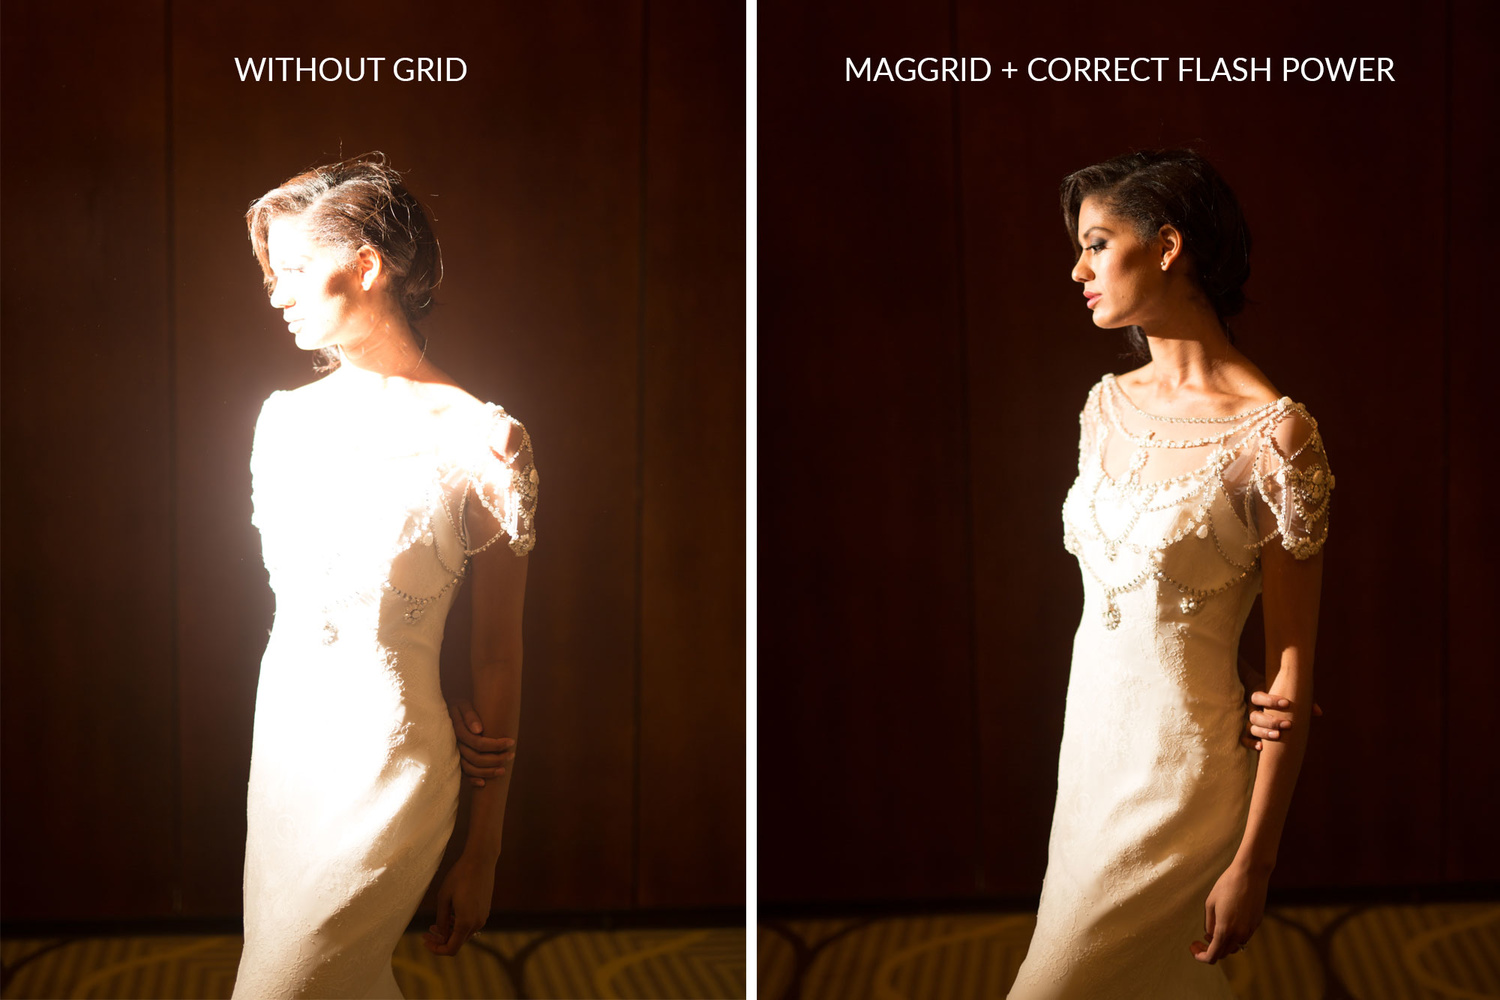
Currently, the underexposure is what makes our background look interesting. An unmodified flash will take us back to square one as it will fill the room and background with unwanted light.
Control light spill with a grid or snoot in order to place the light exactly where you need it. In the example above, we used a grid to minimize light spill and keep the light concentrated on our subject. We also modified our light color by adding a CTO to match the tungsten lights in the conference room.
3. Start With One Main Light
Another way to control the light we add to a scene is to add only one light at a time. It's difficult to know what lights are doing what when you try to add 2 or 3 lights at a time to a scene.
With the ambient exposure dialed in, I recommend setting up the main light first, and then making adjustments as needed. To create a more natural look, try directing the light top down, as bottom-up lighting can cast unflattering shadows on subjects’ faces.
4. Modify the Main Light for Specific Light Quality
There's no such thing as the right light quality. From diffused versus specular lighting, to soft versus hard lighting, everything has a place and a purpose. In this example, we are aiming for a soft and flattering image for a bridal portrait. Therefore, it's appropriate to soften and diffuse our main light.
When shooting weddings and portraits on-the-go, we don't have the time and resources to carry and setup softboxes or complex modifiers. So, here's a little trick that I will use to create an on-the-go softbox with a grid and a simple scrim using a 5-in-1 reflector.
Place the scrim between the flash and the subject. The grid will control the light from spilling outside the edges of the scrim when it fires. This, in essence, creates a softbox as we have directed the light to only hit the scrim, which then diffuses the light onto our subject.
Tip: the larger the light source in relation to the subject, the softer the light quality. Bring the reflector close to the subject, then maximize the amount of surface area used on the scrim by adjusting the flash distance as seen above.
5. Add a Second/Rim Light if Needed and Modify Accordingly
You may not always need or want to add a second light, but they can often help to separate your subject from the background and help define a subject’s form and features. Like the main light, use a scrim or other modifiers to modify the rim light to taste and get the light quality you desire.
We chose to leave the rim light unmodified as we were aiming for a hard-edged rim light to clearly define our subject's figure.
If you are an SLR Lounge Premium Member, you can see behind-the-scenes video for this image here.
Take a look at our image after basic Lightroom processing (below, left). We arrived at our final image after making two simple selections and using Content-Aware Fill in Photoshop to remove the background lines (below, right).

Camera and camera settings for final image: Canon 5D Mark III, Sigma 85mm f/1.4 at f/1.4, 1/50, ISO 100.
Images copyright Lin and Jirsa Photography and Line and Roots.
6. Consider Adding Special Effects to Conceal or Enhance
Some special effects tools like small LED lights work two-fold: they can be used to conceal unwanted elements in an unsightly location, or they can enhance the look of an otherwise so-so scene.
To learn more useful tips and strengthen your foundation of photography education, consider becoming an SLR Lounge Premium Member and receive access to hundreds of gold standard lighting, postproduction, and posing tutorials. The images used in this article are from our Wedding Workshop, “Photographing the Couple.”


Thanks for this BTS and tip!
Thanks Jaleel for the comment!
Just a question About The bokeh with The xmas lights.
What lens do you use to get The bokeh? Usually I use a 35mm...maybe you use a different focal length?
35 @ 1.4 is my fav, also a 50/85 wide open works well too.
This is great work.
Thanks Tim!