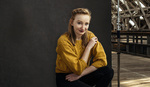
If you are looking to step beyond basic, one-light setups, it can be a little daunting at first. In this behind-the-scenes video, learn how effective a simple three-point lighting system can be.
Starting out in strobe lighting can seem like a mountain to climb with remotes, triggers, sync speeds, and so on. The truth is, once you have an understanding of the basics, it really doesn't get much more complicated. While a single light with reflectors can create incredible results, I have grown a little tired of the looks I create with that, and have aimed to add in more lights to my shoots. I don't necessarily use the same setup as John Gress does in this video, but many of the principles are the same.
I always start each shoot with a key light; I want to get that right and then see where the shadows fall and what needs accentuating. Then, I'll add in a fill light or a reflector to do the same job. I have a real fondness for rim lights for reasons I'm not entirely sure of. Gress uses a large strip box for a softer feel, I tend to gravitate towards narrow, focused beams of light as I prefer tighter crops to a subject where possible and they act as a hair light too. I then like to add practicals to the scene if it calls for it for overall interest.
This video is a great starting point but do not be put off if you don't have the same lights or lots of large modifiers. Start small, shape and adjust the light, and learn as you go.