
One of the most noticeable differences between portraits taken outside using natural light as opposed to artificial light is the background. Images using artificial light tend to have darker backgrounds. This is crucial in catching the eye of the viewer and allows him or her to focus on the subject. This article is a guide in achieving this look using natural light only.
In most cases when shooting portraits with natural light only, the background comes out very bright. Technically speaking, when taking a photograph using natural light, the exposure is generally set for the subject’s skin tone, which is typically darker than the background. If achieving that dark background and having perfect lighting on the skin is important, the key is to underexpose the image. This will not only result in perfectly lit skin but it will also help retain the most detail. It is a lot easier to recover shadows than highlights. Contrary to popular belief, bringing out details from an underexposed RAW file does not mean creating noise when it’s done properly. In this day and age, any DSLR on the market can handle bringing out details from the shadows without creating noise. Using the following steps, it is guaranteed to walk away with phenomenal results.

Before I get to the steps, it is important to address a popular concern. Have in mind when looking closely at the final results; the subject continues to look underexposed. Parts of the skin were lightened to make it appear properly expose. This draws the viewer straight to the subject’s face, as it is the brightest part of the portrait.

Why Not Just Get the Exposure Right in Camera?
Technically, underexposing IS getting it right in camera. If the goal is to achieve that dark background that generally only comes with artificial lighting, it is less work in post-production to lighten the subject. There is no argument here; the skin makes up 10% of the image and the background is 90%. Lightening the skin is undoubtedly easier than darkening the background in post. Read on to learn why.

When shooting, it is important to shoot RAW. This file type contains all the extra information in the shadows. It’s possible to using Adobe Camera Raw or Lightroom, to brighten the shadows and make light pop. Personally, the main slider I use is the Shadows, Whites, Clarity and Luminosity ones under the HSL tab. Remember that underexposing the image and not properly lighting the subject are two completely different things. In order for this process to work, it is essential that the subject is properly lit. If the light hitting the skin is soft and evenly, brightening in post will be absolutely no trouble at all. When capturing the image, stay conscious of the light and the direction it is coming from. Once the subject is properly lit, underexpose the image SLIGHTLY.

Underexposing an image is no specific science. It varies from image to image, subject to subject and background to background. The best suggestion is to look at the images as they are taken and concentrate on the highlights. The goal is to avoid any blown highlights. If the highlights are blown, you can kiss the skin detail goodbye. Unless having overexposed Barbie skin is the objective, blown highlights should be avoided at all cost. In some cases, the background might have blown highlights like a sun flare or the sky. In instances such as those, overexposed pixels are fine.

An underexposed image makes dodging and burning three times easier. It’s a lot simpler to lighten the highlights on the skin than to darken the entire skin. When working with a darker complexion, shaping the skin and structure of the face is so much simpler too. Dodging and burning is vital if you want to have the perfect light in the final results.

I find the best setting for this method is to use Aperture Priority. I then override the camera’s auto settings by using the exposure compensation and underexposing with a few clicks. Every DSLR has this setting. I prefer to concentrate on the composition, light, pose and expression instead of wasting time and effort shooting in manual.

Using strobes is a fantastic method for lighting. I applaud all those who do it and do it well. However, I believe that when using strobes there are extra complications that can override a lot of the creative process. There is always a time and place for strobes. But when using natural light there is no need for an assistant, time is spent on composition, expression and communicating with the subject. As always, the methods used depend on a variety of factors. With this method of underexposing, using lights, reflectors and assistants is unnecessary to achieve amazing results. Natural light is quite powerful, one must take their time to master it and apply the correct methods for mind-blowing results.
Other before/after combos can be found on Dani Diamond Photography


Great article!
Something I've been doing a few times without been conscious about what I was doing.
Perfectly summed up!
Thanks a lot for sharing:)
THIS IS GREAT!!! Advice, if yawl read the article.... the key word the writer used is "SLIGHTLY underexpose".. this dose work, if done right, I have used method, lots.... Set your self up right and it works. Different times of the day and location surroundings will make things change and a light or reflector "may" be needed. Stay in control of "YOUR" shoot! You are the photographer.
I am agreeing with you on what is throwing people off is the term "SLIGHTLY underexpose". Also it is not the best term, because what you really have is the average between the subject and the background. With digital you roughly have .5-1f/stop latitude on the highlights, 2-3f/stops of latitude with the mid tones and 3-3.5 f/stops of latitude with the shadows.
If you look at his exposures most of those images are in those images are still exposed in those ranges. What I think most people tend to forget is camera meters are optimally designed for flat even lighting, that is not necessarily best lighting for a photo.
I just have a few questions.
The point of this post is to show how you do not have to use flash to bring the subject up to the ambient or background luminance. That you can shoot the background to a darker exposure and then raise the subject from it.
But other than the woman and the boat, i see no evidence at all of that technique being used.
Ih the shot of the girl in green coat, the background is not "underexposed" to pull it in, the whole photograph is underexposed... and the whole photograph is then lightened with a bit more on the face. How does this figure into the technique?
Girl in white tee shirt, the whole photograph is lightened, not just the subject, so the whole photograph could have been shot a stop brighter with minor adjustment on the face. Right? What was gained in this photograph by 'deliberate' underexposure?
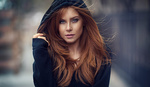
Ditto with redhead in gray sweater... simply a raise in exposure with a bit more attention on the face... same as anyone would do if fixing a mistake.
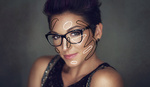
Headshot in blue. Explain WHY the image is underexposed... I thought the whole idea was to do this when the background was too light? This is a black background and a totally unexposed image. Period. Bringing it up with the exposure slider is something that seems a bit normal. SHOOTING it a stop dark does not.
Girl with white shawl... whole shot is underexposed and background is dark... so explain why this technique is cool in this shot? The whole image is raised about a stop. A little added to the face, of course, but couldn't that have been done with an exposure that was closer to what the goal was?
Girl in hoodie... the entire shot is one stop under and lightened. Why not shoot it one stop brighter? Seriously... why not?
I understood the original formulation of the post and the postulations that shooting the bright background and lightening the subject would be possible without strobes, but most of these shots are simply underexposed and globally lightened. I am not getting the point.
You can get a similar effect exposuring correctly and using the radial filter in LR5. I usually shoot 1/3rd stop over and just bring it down in post, especially when shooting over ISO 800.
The quote at the end... "With this method of underexposing, using lights, reflectors and assistants is unnecessary to achieve amazing results. Natural light is quite powerful, one must take their time to master it ..." This article is not an example of mastering natural light, its how to shoot for post production when you don't have the tools needed to create an image in camera. Any real world photographer would tell you that statement is bonkers.
Nice article. Even though some may not use it, learning other tips and styles is never a bad thing. I will give them a try.
This is a great article. I am now a Fstopper and a follower. Thanks!
Great article Dani and I really like your work. I've started to move in this direction as well - it can really be a challenge in bright Hawaii sunsets to not blow the background sometimes - finding a shady spot really helps, but for stunning sunsets I think you still need a strobe or the dynamic range is just too much - you can see a few examples here http://www.bhcportraitphotography.com/19-dec-family-portraits/
I used to shoot a little underexposed when digital photography was starting to become popular. I used to shoot with Nikon and these camera metering used to favor the highlights Dynamic range and noise from underexposing was very bad back then. I've been afraid of underexposing ever since and have learnt to use flash well. I have been following you for some time and had no idea you were underexposing and recovering shadow detail. I will give it a try sometime.
What about catchlights??? Did you add them in pp? Thanks for the nice article...
Hey I wanted to thank you for this article. Though I can't say I agree with shooting dark because from what I've read, shooting to the right is better. At the same time what you talk about with dark backgrounds and bringing the viewers eye to the subject is a great reminder of using light to guide the eye. Keep writing good stuff.
Thanks for the article. It's a great read and I also appreciate the great debate. Not seeling my strobes yet, but will quicker to experiment more with low light situations.
Lots of things I might have wanted to contribute have been said already: comments have been made about the excellent dynamic range of camera's these days, and about the science of ETTR... One comment I'd still like to add is that some of us live in places where the amount of light just doesn't allow for ETTR, and slight under exposuere is a necessary thing. I ive in Northern Europe, and four months of the year (like right now) I'm grateful that LR/PS still allow me to get descent results out of a sligthly underexposed shot (and by slightly I mean a third, or thirds of a stop, max of one full stop). Would I like to ETTR? Sure; but I'd rather keep my ISO down and only introduce a little bit of noise into the shadows, than introduce noise into the whole image.
This has been a trip reading all the comments. Interesting opinions. I have read a lot of ETTR articles, scratched my head a bit, and for the life of me I can't see any real difference between ETTR and the old zone exposure methods. Understanding the basics of exposure and image production is critical for photography, regardless of what you are doing or trying to accomplish. And there is also the old saying that the "correct" lighting and exposure is the one that the photographer wants.
always great to read your articles Dani! Thanks a lot!
This is great and all, but if you have a "bad" model, your pictures won't pop as Dany's examples on the article. The technique is very good, specially if you're using a Nikon camera (last models from D600/D7000 onwards). Shadow recovery is great on the D800/D600 cameras, and i bet it will be a lot better on the D750.
On the Canon side (where i am), i'd rather go ETTR, or i'll just get damaged pictures by noise and muddy textures, for me this is a No Go technique, but those using Nikon/Sony sensors give it a go, works like a charm. :)
Dany, nice work there, can't cease to be amazed when looking at your shots.
My personal summary that solves the contradiction of the previous comments:
If I have time to set-up exposure properly (landscape) it is better to make a right-shift to maximise brightness of the pixels and thus to minimize noise.
If I have no proper time to set-up the correct exposure (action, fashion, street, sport) it is better to set a slight underexposure. Important motive parts are mostly bright and not dark so this reduces the risk to have cut-offs in important areas.
Photos look good to me. I just think it's about the same as using a reflector or flash with HSS. :)
Great article
Great article!! Do you illuminate the person in post? with dodge and burn? You are a daily source of inspiration man!
I am a speedlights kind of guy. I moved back to Australia a few months ago and found that I got so much light around that I should not feel the need to carry my flash guns anymore but i still do because of the the background problem. I really can't wait to get out there and give this a good go like we say DownUnder. Good on you mate for this piece.
Hmmmm... food for thought, will definitely try this.
It would be cool if you did a video showing how you achieve these results.
Great article however, I like using my strobes. It gives me the ability to work more artistically. Take for instance if you want your light source coming from a different angle to create mood. Without strobe then you are stuck with natural light and you would have to move your subject for the light to be where you want it. Even then it might not be what you want to set the mood. Dont get me wrong. This is a great article and i do shoot without strobe at times and use all of the techniques that you use here but, there are times when available light just wont work.
Just read this article for the 3rd time and I picked up yet another point. Thanks for your help Dani!
My first attempt using this technique ended with this awesome portrait.
Solid advice. Thanks!!
Interesting. I'm going to have to try this. I'm really not very good at the whole dodging and burning thing. How do you add detail without noise though? Simply through D and B?
You did all this using just " Shadows, Whites, Clarity and Luminosity ones under the HSL " ? Or did you do some dodge n burn?
Awesome post. Thank you. Good things to keep in mind. I have been shooting with a Tiffen 0.6 ND filter and have loved the colors I am getting out of it, in all lighting settings.
Great article thank
Excellent article. To complete your technique you could also play with the point exposure measure and the AE-L command. On my cameras (D4s, D800 and D800E) I have set up the two buttons on the front as such : the bottom one moves from scene measure to point measure and the top one is AE-L. That way I can select a spot of skin and set my exposition on it, lock it and then shoot. Darkened background guaranteed !
Very nice tip here, I'm definitely going to give this a try. A few times I have done this accidentally and fixed my images without knowing what I was achieving
First i would never underexpose an image on purpose since i am stuck with my canon 5D3. Second i would try to bounce some light to the face to get the shot as near as possible to where i wanna go in post.
While i can love the look of natural light and flash photography; you cut yourself short by not learning flash. Creative control is a powerful thing.
All well & good but if you have to shoot a client in harsh sun without any available shade, portable lighting is needed. A good article for natural light shooter's but I won't be throwing away my strobes.