
Capture One is one of those programs that, once learned, is hard to do without, but due to the common experience of learning post-processing software within an Adobe ecosystem, anything different like Capture One can appear less intuitive or more challenging, even if it isn’t.
If you’re reading this, the likelihood is that you’re a new Capture One user or someone who is considering becoming one and like most people are perhaps a little intimidated or overwhelmed at learning new software. No worries, we’re here to help.
Certainly, there are advantages to be had through the rigor of some kind of highly structured curriculum, but getting through such a syllabus isn’t always practical. However, it is possible to feel much more familiar, comfortable, and effective in Capture One with just a few key tips that not only will have you using Capture One more fully, but significantly more efficiently as well.
Over the past few weeks and in the weeks to follow, we’ll continue creating Capture One content that is dedicated to provide just that, so check back often.
*For the power users out there, what you’ll read here may be nothing groundbreaking, but for the rest, the beginners, the intermediates, or those who just don’t quite wield Capture One like they invented it, here are three simple tips geared to utilizing Capture One better, and will speed up your workflow.
If you don’t have Capture One, this is the perfect time to try it, and you can click here for a 30-day full trial of Capture One Pro so you can follow along.
Toggle the "Viewer"
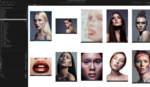
Perhaps one of the most pervasive myths about Capture One is that it doesn’t have a viewer mode akin to Lightroom’s Library Module where many images can be seen and scanned at a glance, but it does.
For those familiar with Lightroom who are used to the "module" way of doing things, Capture One operates quite differently, but instead of constantly switching modules as in Lightroom, you can either go to View>Viewer or hit Alt/Opt+Command+V to toggle the "viewer" on and off.
See the image below for a view of the viewer off and then on.


Crop Tool: Defining the Aspect Ratio and Applying the Crop
The Crop tool can be found in the Lens Tool tab or the Cursor Tool Bar, and the identifying icon will be familiar to anyone who has used post-processing software before. However, where other software will let you drag the crop parameters and then hit "enter" to apply the crop, this is not how it’s done in Capture One.
To apply a crop after you’ve made your selection, you need to select another cursor tool, and as soon as you do this, the crop will be executed. I typically just hit the "V" key, after which selects the pointer selector tool and applies the crop. If you make a selection and would like to cancel it, just click anywhere outside of the selection, and you’ll see it vanish.
Also, to set specific crop parameters and adhere to specific aspect ratios simply long-hold the crop tool button and a selection of options will cascade down from under it. The same behavior can be found in other tools with the small arrow beside it. Click the image below to enlarge.

Set Preview Image Size
Out of the three tips we’re dealing with today, this is the one that will be least obvious, and thus requires a little background, but the point of changing this setting is to make Capture One run as fast as possible.
It must be understood that Capture One will generate preview images for every image in a catalog or session, and the larger the preview image size, the more space it takes and vice versa. One might be tempted to think then that the smaller preview size is best, but it’s not so simple. If you’re working on a large and high-resolution monitor, the size of the image displayed needs to be appropriate for your display, and if the preview file is too small to display correctly, then Capture One will need to read the original raw file, and that is taxing on a system and hinders performance. This is what we want to avoid.

So, since the preview size can regulate how often Capture One would need to read the original files during editing, it’s considered best practice to set the preview image size to the size of your display area or slightly larger. While the larger previews sizes mean larger preview files, it also means less chance of the software needing to read the raw file, and so things will be much snappier.
Luckily, the preview file sizes can be determined by the user, and you just need to go into Capture One Preferences > Image Tab > Preview Image Size and choose the appropriate setting for your monitor. If you have a 4K monitor, go with 3,840 or above.
Conclusion
Hopefully, this will make your C1 journey that much more pleasant and productive. Of course, there is a lot more to Capture One than is listed here, and hopefully, this has piqued your interest. Over the next few weeks, we are going to teach you how to use Capture One from the ground up, right to the edge of the envelope, so check back often.
And if you want to jump-start and learn immediately, there is already a bevy of tutorials on Capture One’s YouTube channel, and you can download Capture One here with a 30-day free trial.
If you're looking for a quick and effective way to learn Capture One, check out The Complete Capture One Editing Guide in the Fstoppers store.


I used to use C1 as it was the only way to handle the old Phase One digital backs.
I moved away when the Phase One went, honestly, I’d be totally lost in it now I think. I hear lots of good/bad about it but yeah, in that adobe Ecosystem of getting taxed monthly for the use.
I quite enjoy the small monthly Adobe tax knowing that I won’t have to shell out a few hundred bucks every couple years to keep whatever program I “bought” updated and working with my system (and get all the latest additions, etc.)
That's right. Wouldn't go as far as saying I enjoy it though. :)
Whats wrong with the crop tool? If anything that stands out as annoying to me in C1 it's the laggy free rotation.
Just the opposite, I am so used to the Capture One crop tool that cropping in Photoshop feels clunky.
Another tip for new Capture One users. You can create a custom tool tab with just the tools you use the most. This way all of your favorite tools are in one location and don't need to jump from tool tab to tool tab when editing.
I love that, I have like 3 tabs now where I process every image in the same order with the right tools in the right places. Process recipes are great too although I imagine lightroom has those anyway.
Hi Pat, I've not done it myself, but I believe that you could put a copy of a customised workspace in the cloud, say dropbox/google drive etc., then you just download it and add it to any other workstation. Once you have finished on other workstation, just delete it.
The problem I have had is that I create a custom then C1 upgrade wipes it all out and not only wipes that custom tab out but resets all of my default layouts. I'm guessing there must be something I can do to prevent it but I haven't figured it out yet.
if you delete the "press enter" to apply crop from your muscle memory you can engage a super fast workflow.
just make the crop with the mouse/tablet and press the arrow key to go to the next image - so much faster than in Lr.
just hard to overcome your muscle memory
Every year I start trying to dig into C1 and force myself to learn. I do not know why C1 is so difficult for me. I can run Lightroom with my eyes closed ( so to speak)..I like the RAW conversion for SONY much better than Lightroom
Almost as good as Aperture but can't export metadata which is a killer