As a commercial photographer, I specialize in product, food, and architecture. One of the products we've been shooting a lot of lately is jewelry, specifically jewelry for catalog use. In my opinion, jewelry is one of the hardest things to photograph, and many photographers don't know where to start. Whenever we're tasked with photographing shiny, reflective, spherical objects, our studio sounds like a group of sailors on leave with all the profanity flying around (often times strung together to make complete sentences). We push on, moving through a series of techniques that yield the results we're after and we make mental notes for the next time we're presented with a similar challenge. It's how we better ourselves as photographers, and it's that challenge that gets me out of bed in the morning. In this video, I wanted to share some of the techniques we use to photograph those shiny, reflective, spherical objects for catalog use.
We approach catalog photography a bit differently than "hero" or advertising photography. The images are generally going to be much smaller and need to be consistent with work either from the same batch, or previous shoots. When it comes to catalog photography, the goal is to be efficient. We want to present a clean, uniform look that allows the client to use any of the images interchangeably. We also want to show as much of the product as possible to give the viewer a solid idea of what they're potentially buying. With catalog photography, the attention to detail is typically not as critical as advertising imagery, nor is the retouching as refined (efficiency is key), therefore the budgets are typically smaller per image. Another thing that keeps the cost down is the limited usage, typically licensed for just catalog use, whereas a hero image could be licensed for magazine ads, website, billboards, etc.
We don't use light tents, instead we prefer to build our own sets based on the specific characteristics of the pieces we're photographing. I find that by customizing the set, I get a lot more control and can create a better looking image for my client. We generally shoot like-items in series so we don't have to change the set around as often between pieces (efficiency is key). Working with very shallow DOF, we often use a technique called "focus stacking" to blend multiple expsosures into a single image using Helicon Focus, specialized software designed to find the sharpest portions of a group of images and blend them together.
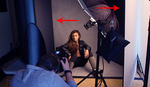
In this video I'll walk you through the gear we use (who doesn't love a good BTS), some of our easiest techniques to capture simple jewelry images for catalog use, and show you how to fashion some of your own props to assist in those captures.


I've never used Helicon. You say it does a better job in the video. I'm curious in what way?
PS does a decent job, but we found that we had to go into each layer and refine the masks a bit on almost every round. Helicon typically nails is first try.
For one if your shooting with a dslr it can automate the multiple frames. you set up in live view, set the start and end focus points and it does all the work for you :)
what dslr automates focus shifting between shots?
I imagine any when using helicon, but It works with all of my canon bodies without fault
Step 1: Turn down the job!
just kidding lol. Product photography is truly painstaking work. Thanks for sharing your process!
Sintra or PVC board is awesome stuff. It can be heated (boiling is better) and shaped into a desired result. After shaping you then cool it (the molecules expand then retract tighter), the result is a pretty sturdy, molded shape. Very popular in movie model sets, props and prop replicas and Cos Play.
I freelance in a studio where a fair amount of jewelry is shot. Although they already know the score, you can always still hear the air being sucked out of the room when emeralds and sapphires are converted to CMYK. Rubies hurt when going to sRGB for the web. At the end of the day everyone sucks it in and out goes the job. Never fails to amuse me how they complain about the same thing every time however. :-)
Really digging your behind the scenes Tony! I had one quick question about the focus stacking. I have the 120mm Macro and a focus rail but by moving it on the focus rail you're essentially getting closer or getting further away from the subject and changing the size of the subject in the frame. Does Helicon match the scale AND blend focus? If I focus using the focus ring on the lens it adjusts in and out as well so I've never messed with any focus stacking software. Anyway, keep up the great work man!
Yes! Helicon will blend size and focus. It's pretty great software. PS does a decent job, but we found that we had to go into each layer and refine the masks a bit on almost every round. Helicon typically nails is first try.
Maybe its my ignorance at play here as i don't shoot products at all
But wouldn't shooting at a high aperture save you the need to focus stack?
Again apologies if this is a super dumb question
when shooting product with a macro lens even with a high aperture the depth of field is still extremely shallow. With jewelry the client wants extreme focus throughout everything. With a macro lens you take a shot and it looks in focus, but when you zoom in part of the diamond is extremely sharp, others parts are sharp, other parts are out of focus.
It doesn't matter if you shoot products or not, it's a photographic technique you may want to consider when shooting macro. Even at your minimum aperture you would still have limited depth of field. More importantly however you would suffer from lens diffraction being closed down to your smallest aperture. You can see an example of both of these in the images below. One was focus-stacked at an optimum aperture, in this case f/8, and the other one is a straight shot taken at the minimum aperture of the lens at f/22 (note, those are two different bills shot).
You can not only see the limited depth of field fully stopped down, but the loss of image sharpness at the focus point from image diffraction. I also, for some reason not clear to me, got some flare in the fully stopped-down shot, but that's beside the point, you can still see the loss of image quality. Of course, you can also see the advantage of focus stacking in the maximum sharpness your lens can give you, as well as essentially unlimited depth of field. Both of these shots were taken with a reversed 20mm f/4 Nikkor Ai on a fully extended bellows attachment.
Hope this clarifies things for you. :-)
What he said ^. The sweet spot for this lens is f/12. Stopping down would gain a little DOF, but compromise sharpness.
I really like these videos. If I could make a request, it would be to see how the image comes together one light at a time, even if it's not entirely focus-stacked.
I've actually been interested in a macro focusing rail. Is there a lower-priced one that works well? I'd be using a 5D/6D with 100mm macro lens, so I don't know if I need something as hefty as the RRS one. Or is this one of those situations where you end up buying the RRS one anyway because the cheaper one is too compromised?
Manfrotto makes one at a fraction of the price. I hear it's good as well, although I've never used it. I have a RRS head and the Arca-Swiss style mount on the RRS rail was a plus.
Michael, I'm scheduled to shoot a product photography tutorial in November (including jewelry). Just follow my social media links to stay in the loop.
Great video Tony! Thanks for sharing
Thanks for this Tony!
Nice tips. I'll use the clothes pins to board idea. Currently my stylist tapes it to a C-Stand boom arm, this should save a lot of time, she can do a bunch in advance.
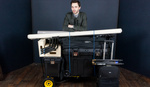
For lighting, I continue the sweep on to the table rather than have it come straight down. I have the 3x4 softbox above the jewelry and angle it into the sweep with hole in it, it fills everything in nicely.
I never understood that D4 on a cost perspective, though it is more convenient when adjusting exposure. You can buy 4 Acute 2 1200s for the price of one D4 4800 and still have money left over to buy the lights.
No idea how this focusing rail is so cheap, it has great reviews too: http://www.adorama.com/MCFRS1.html
Fine for DSLR, but I wouldn't put a medium format rig on it.
Robert, the big advantage of the D4 is color consistency across the entire power band. You can go from min power on one head to max power on another have have very minor variation (if any) in color temp. This is AWESOME when shooting product and well worth the cost for me. And yes, I used to own Acute packs. The other great thing is that the D4 will power either Acute heads or Pro heads. I have both as I use the Pro packs for shooting splashes because of their fast flash duration.
Loving your videos, Tony!
Really informative. I've used a similar set up in the past, but I found it made the jewellery some what flat. Any suggestions for introducing more dimension?
Ish (can I call you Ish), that's the main reason I don't use light tents. They're pretty bland. You can modify this technique by replacing one of the white sintra bounce cards with a silver card. That gridded light from the front also helps add sparkle and make the image less flat.
Ish is what they call me :)
and I will keep that in mind. I never thought that a silver piece of card would introduce more punch in the metals and stones. Thanks for the advice!
ISH
Really enjoyed the walkthrough. Love the trick for necklaces. I was using a bust and tape. What a pain in the ass.
If only my clients' budgets were greater than $20 per finished shot I'd be able to imitate this setup. Instead using cheap led, speedlight, occasional flashlight, ikea products, and no macro lens. However, with focus stacking and cropping down to 450x450 for web catalogs my process "works."
Great article/video Tony! I started shooting jewelry for catalog use a few months back and it is a pain, but I picked up some great tips here that will make my life a little easier. Thanks!
Really helpful tips thanks..
Killer tutorial
Fantastic BTS, thank you Tony!
Were do you pick up your PVC board?
Do you find that the mat frame ever causes unwanted reflections/lines in your jewelry? Wouldn't a similar setup with plexi glass be better?
Do we get to see a file of the final image?
Sintra board is available at most photo labs or places that sell photo mounting supplies. Plexi works too, but you have to have someone else cut it for you usually. The final image is at the end of the video.
Great tutorial! I always enjoy seeing how other photographers solve problems shooting jewelry as it is a whole different beast in studio photography. Something I was wondering is how you keep the edges of the piece from having light wrap. I typically have to use a grey or black cards behind the piece off to the left or right in order to achieve nice hard edges. How are you keeping the edges so crisp with so much light bouncing around? Is that just a function of using the grid spot?
James, if you're getting light wrap, whether with jewelry or people, it usually means you're background is either too hot, or too close to the subject (sometimes both). Try moving the product about 10' away from the background if you can. It'll still be pure white. In this case, I'm obviously not 10' from the background, so I used a grid to help minimize the spread of light, even though it's going through a diff panel.
What is the differences of doing the focus stacking in photoshop than the Helicon Focus software?
Chris, I've explained in the comments above. If you need additional info, I'm happy to try and elaborate. I encourage everyone to try Helicon Focus, I think you can download a trial version. It rocks!
How does one keep the pendant from pendulating? There seems to be so much emphasis on not disturbing the camera so as to keep the focus tack sharp, but it appears like the pendant's position could shift from the slightest vibration in the studio (certainly a bag of marbles hitting the floor would do it).
Easy, in most studio that would be the case. However, when I had this studio built, I intentionally kept the concrete floor, just for that reason. I've spent enough time in studios with hardwood or other floors that move as you walk around and disturb the camera and/or set. It's a real pain when shooting composite imagery to have the camera or product move between shots. Once the pendant stops moving initially, it normally stays pretty still.
Ahh... thanks for the explanation. I always thought that people were affixing the chain somehow, but your video showed that it was just planning and patience. Now all I have to do is to figure out how to make our studio more solid without putting in a concrete floor.
I got a picture frame from the 99cent store. I could have used the frame to hang the necklace from as Tony had done in his video but I actually just used the glass int he same way, standing it up using A clamps, giving it a light tilt backwards and draping and clamping the necklace to the glass. I am backlit so there is no reflection from the glass. So there is no swaying of chains as it lays against the glass pane at a very steep angle. I use the actual frame to shoot hoop earrings where I use clear thread to hang the earring and another clear thread inside the hoop and affixed to the bottom of the frame to keep it still and frozen in place.
I just bought 'Gravitis lightbox studio' for not too expensive and it makes my photos look amazing, I don't have to worry about any lighting anymore, the box does everything for me. my photos are done in 10minutes and I don't even use Photoshop anymore to get rid of the blue color I use to get before.
link to the studio https://www.amazon.co.uk/SANOTO-Professional-Gravitis-Enterprise-Sanoto/...
I would not be able to sleep tonight without registering to this site and expressing how perfect this video is and how much it helped me. Top level production and explanation. Thank you. Chris Cornell would be so proud.
Hi Tony, thanks for the video - very helpful. I'm trying to shoot a spherical silver pendant and it's picking up the reflection of the camera lens. Any ideas how I can prevent this so I don't have to do it post shoot in photoshop? Thanks so much.