Every well-rounded photographer needs to be able to tell a story in three images or less. This is particularly important when shooting editorial content for online publications and in print magazines. On today's assignment, I explore three different focal lengths to capture a well-rounded story of a local musician.
I'm often asked by other photographers: "should I first buy a prime or zoom lens when getting into photography?" While I think prime lens have a lot to offer, especially with their fast apertures, my personal go-to lens is almost always a fast f/2.8 zoom lens. The reason I like an f/2.8 zoom is that it allows you a ton of flexibility both in having a lot of composition options as well as making your workflow quicker than having to change between a bunch of lenses.
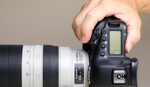
For this particular photoshoot, I wanted to use the new Sony A9 mirrorless camera we were testing in our office. Since we currently shoot on Nikon DSLRs and Panasonic micro 4/3rds cameras, I wanted a single lens that fit the Sony E Mount. Tamron recently released their 28-75mm f/2.8 lens for Sony, which seemed like an interesting lens to pair with the mirrorless camera. Since I knew I was going to be shooting an editorial shoot, having a wide angle lens that also zoomed into 75mm would be a perfect all-in-one lens that was slightly weighted heavier on the telephoto side. I'm not exactly sure why Tamron decided to stray from the more typical 24-70mm zoom lens range, but since I rarely shoot portraits at 24mm and often want more reach than 70mm, I think this lens is a great option for anyone shooting environmental portraits and editorial work.
A Standard Focal Length
For the first photograph, I wanted to capture Keith in his home surrounded by all his vintage audio equipment. Keith used to own a well-known recording studio in Charleston back when Hootie and the Blowfish and Jump Little Children were still breaking out of the local scene, and so I thought it would be fun to capture this side of Keith's history. With over 1,000 vinyl albums, an 8-track recorder, and multiple vintage receivers and tuners, I was instantly drawn to this cozy corner of Keith's living room.
The light in this section of his house was actually very pleasing photographically. I placed Keith on his coffee table so that he was wrapped with nice, soft window light from behind and camera right. My initial test photo showed that even with the nice side window light, Keith's face was simply too dark to create a nice exposure. To brighten up his face, I boomed one small Profoto B10 light on a Kupo 40" arm (make sure you get the arm with the hex end) just above and in front of Keith's face. I wound up using a small Profoto Umbrella as the light modifier so that the quality of light looked similar to the soft light coming from the right side window. Adding artificial light from the same side as your natural light source is a technique I learned from Clay Cook during the production of his Fashion and Editorial Photography Tutorial. As you can see from the photos below, I also placed the light very close to my subject so that the fall-off was more intense and the image had more shadows than if it were placed a few feet extra feet away.

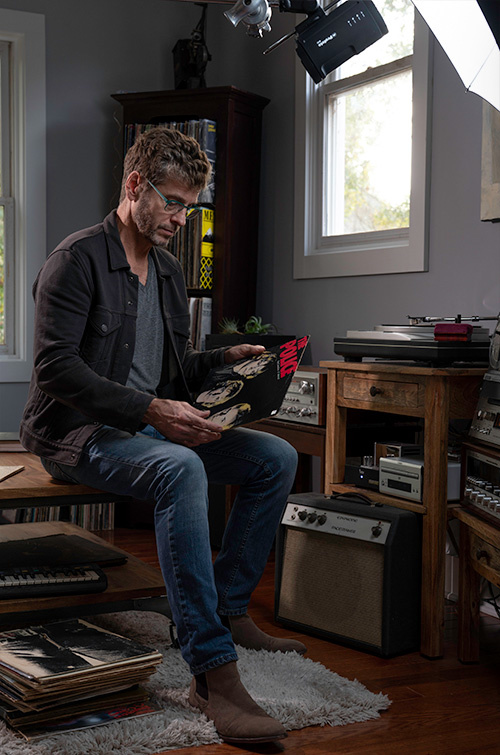
As you can see in the video, I also used a second light, a Profoto B1, behind Keith and to the left of the camera to help give some of the rear window light a bit more punch. This kicker light helped edge Keith's jacket out from the background and added a bit more contrast to the scene. Backlight is always a sure way to add some drama to your images, and if you can fool your viewer into thinking the light is coming from a natural light source, that's a nice extra bonus. For the camera settings, I wound up shooting this image at 45mm, which is a great photo journalistic field of view, and I also stopped the lens down to f/4.5 to add a bit more depth of field.
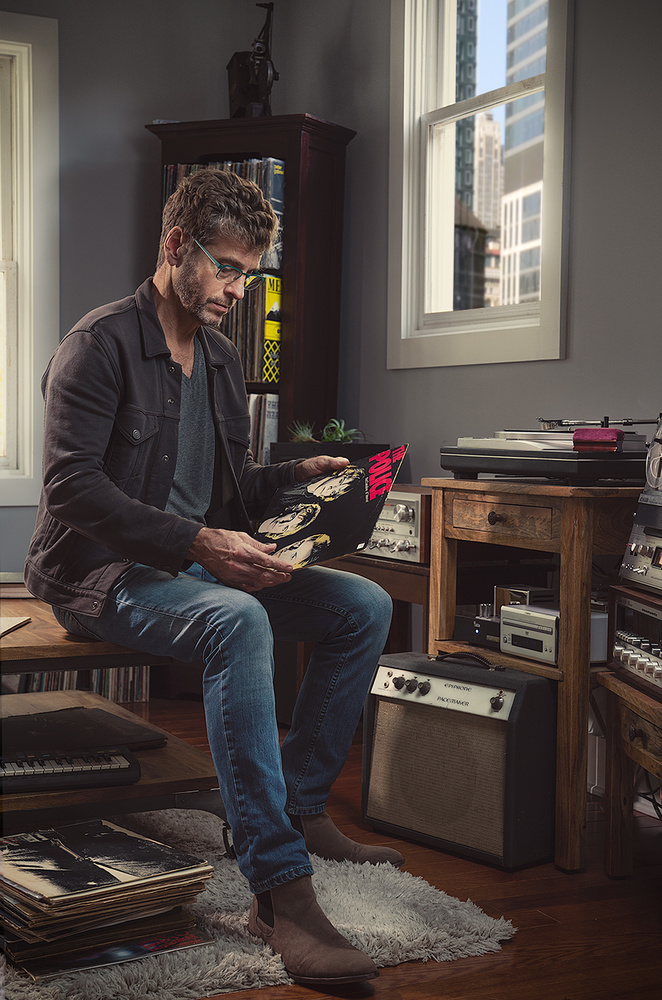
Tamron 28-70mm lens at 45mm and f/4.5
For the final photo above, I processed the edited image through Alienskin Exposure to give the final photo a film look and also composited in a more interesting skyline in the back window to give the image a more commercial feel.
Shooting Telephoto
Before I show up to any location to photograph someone, I always know that nine times out of ten, I'm going to have to take some sort of headshot of the person. A good headshot is an easy, safe shot that any publication can use to go along with their story. As photographers, we usually get super excited about the new and unique environments we are shooting in, but it's important to always have that tried and tested backup plan in your back pocket. For me, that image is a simple headshot with a beauty dish.
For this particular image, Keith had a few clean, off-white walls that allowed me to capture him against a simple background without having to bust out the rolls of paper or set up a fabric backdrop. When shooting against any bright surface, it's important to decide how light or dark you want the background to be in your photo. For a bright background, you can simply place your subject next to the wall and the light exposing your subject will keep the background light and airy. If you pull your subject a few feet off the wall, you can make the background turn a medium gray color. If you want a completely dark background, you can darken the wall even more by making your subject stand 8-10 feet away and placing your light closer to the subject's face. For this shot, I had Keith about three feet from the wall, and I placed my Profoto Beauty Dish directly over my camera about three feet away from Keith's nose. Once again, having a nice boom arm is crucial in achieving this light setup without having your light stand in your way.

Tamron 28-75mm at 75mm and f/2.8
I personally like to shoot headshots at longer focal lengths, so for this image, I zoomed the Tamron lens all the way to 75mm. I also opened the aperture up to f/2.8, which allowed his back shoulder and jacket to go out of focus while most of his face was sharp. Sometime's, it is nice to shoot at f/8 and capture a razor-sharp image front to back, but I really like how this shallow depth of field look works for this particular setup. Finally, instead of shooting Keith straight on like you might do for a traditional headshot, I tried to capture an image with more of a candid feel by having him look down towards the ground.
Going Wide Angle
For the final photograph of this editorial series, I wanted to capture Keith, the musician. When I first met Keith, he was a guitarist in a local cover band that played six nights a week, and he did that for over 10 years. He's opened or played with some impressive artists, such as Bob Dylan, Ben Folds Five, Chris Issac, and Darius Rucker, to name a few. Keith is an absolute badass guitar player, but now owns and runs an audio and video company here in Charleston. When I pulled up to Keith's amazing house, I noticed a small, cluttered side garage that was full of all sorts of tools and abandoned machinery. Instead of photographing him in front of a bunch of amps and typical musical gear, I thought it would be interesting to put him in this grungy work shed and create something much less polished than the previous images we had created.
In order to capture more of the environment, I wound up shooting this image at 28mm. I used the same Profoto B10 and beauty dish lighting setup, which produces that soft yet slightly hard-edged light I love so much. Like the first image in this series, I also used a tripod for this photograph because I wanted the option of light painting the scene. After a handful of portraits were taken, I had Keith step out of the scene, and I fired off about 10 additional frames where I lit the background at different obtuse angles. I wasn't sure exactly what little accents I wanted to include in the final image, but this technique gives you the ability to paint in just the perfect amount of light into the scene later in post-production. For this particular image, I wound up just adding a little highlight behind Keith to help bring out the random items in the background without making the overall scene too bright.

Tamron 28-75mm at 28mm and f/4.5
I really love this grungy image, but in hindsight, I wish I would have taken a few wide angle photos of Keith much farther away from the background. Perhaps I could have kept the busy, cluttered vibe I wanted while also blurring out some of the details that make the scene look like a shed. Either way, I really like the way this final image turned out, and it's a nice play on the common idea of guitarists practicing in their woodsheds.
Conclusion: Make Your Images Your Own
Shooting editorial work is some of the most fun you can have as a photographer. I love getting to meet interesting people with fascinating stories while faced with the task of capturing them in a unique way. The further I get into my career, the more I also appreciate packing a lighter camera bag. I was surprised at how small the Sony A9 camera was compared to my larger Nikon D850, and pairing it up with a versatile lens like the Tamron 28-75mm f/2.8 made the entire system super easy to use while also covering a lot of ground creatively.
I know a lot of photographer purists will still argue how sharp their favorite prime lens is or how much they enjoy blurring the background with fast f/1.4 apertures, but for me personally, I still prefer the flexibility a good zoom lens can offer. This is especially true when you are forced to shoot a bunch of completely different types of images as quickly as possible. At the end of the day, what is most important is that you enjoy the gear you use, and it inspires you to create images only you can create. One of the most important things about being a creative photographer is not allowing yourself to get too comfortable with your work. Don't let yourself get too locked into any one genre, focal length, camera system, or lighting style, and most importantly, always keep learning your craft.


NIce. Thanks for sharing! I like watching others work and talk through their thinking.
Fantastic content. This could be my favourite video and article from Fstoppers yet.
I don't understand Tamron going with 28-75. I can't imagine anyone would notice the 5mm difference on the long end but that 4mm at the wide end jumps right out at you. Absolutely agree with the conclusion, aside from the brand comments because, you know... I'm a Nikon guy! :-)
Feels like sponsored content.
A little bit but it's well done anyway and not annoying.
I agree. But this is how sponsored content should actually be done!
Sponsored by Fender :)
I'm still looking for idea lens for cats.
Cool. Sorry for stupid question - Is it common to shoot horizontal picture with subject in the middle for editorial in u.s.? It seems like you end up cropping it after anyway (which seems like a designers nightmare :) ).
Also for a shot in the garage, an diffused umbrella on top, and a beauty dish with grid (or use ucf ver) slightly down from a side probably would free you from a lot of post work, giving you enough light for background, nice fill for face and a catch light. But its a matter of taste i suppose...
When I do editorial (for example, without a layout) I try to give options to the designer. Subject centered but also some with subject on right or left side. Leave room for copy ot headlines...
These days you can shoot horizontal and they can crop a vertical for a cover, if you have the right camera.
I would say more designers like having option when they can.
Lighting in woodshed looks good to me. I may have done it differently but I am not there. :)
Fantastic video and article. I want to see more content like this.
Yes, and it’s not the one you own!
My main wonderment is how you get all that stuff to the location, including that beauty dish.
It really wasn't that much stuff. I use a Think Tank production manager bag that fits most of it. Really all I used was a camera, a lens, a tripod, one lightstand with a grip arm, a small Profoto B10, larger Profoto B1 (someone else was using the other B10), and the beauty dish. It also helps to have a truck or SUV.
I have a couple big long-throw reflectors I use for sports and there is no container that will hold them. And the clatter.
Sir Patrick, I just realised you remind me of that other guy from "An American Werewolf in London", Griffin Dune. I think this is important somehow. Maybe don't go backpacking in England. And avoid Lee if he does.
Informative video, thank you. Picked up a couple of new things to consider and love the head shot @ 75mm - captures his personality just right. Just an observation on safety, especially in a clients residence, recommend when using a boom that you place the boom arm on the right side of the boom-knuckle (too much weight may loosen the knuckle and come down on client or damage strobes etc.).
Thanks Murphy. I believe the light was placed on the right side. The knuckle tightens by twisting it clockwise and the light is tightening by pushing downward in the opposite direction. Even though I have no doubt the B10 is not heavy enough to loosen the knuckle, I joked with Keith that I have to get it right or people online will call me out. I'm 100% sure it was done correctly in this video. As long as both arrows point towards each other, the downward force should tighten the knuckle.
I did do one on Exposure X4 a few months ago. It's one of my favorite pieces of software ever