In this video tutorial, watch as Abbey Esparza shows you how she creates fantasy skin tones in Photoshop. This is a very versatile trick that can be used on a number of different types of images.
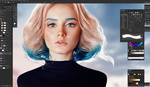
In the video, Esparza starts by showing the color grading she had to apply first, as it is very important to the workflow of the fantasy skin technique. The ingredients of the color grading are a mixture of color lookups and selective color. It is very interesting to see so many color adjustments used together, as I only use around two. As the actual main technique gets rolling, Esparza uses color swatches.
As Esparza continues, we see how she uses a brush set to a very low opacity and starts painting in a very methodical way around the highlights and mid-tones. It may look random, but it is not. My favorite part of the tutorial is when Esparza explains why she has around 800 layers per image, and being a Photoshop manipulator myself, I know exactly what she is talking about. It can be a pain navigating through all those layers, so I always make sure to label them as best I can. Finally, Esparza adds some cool glitter to the color.
This tutorial is great for intermediate Photoshop artists who want to start having a go at more advanced Photoshop photo manipulation techniques. Using the brush tool with blend layers is always a good way to paint colors, and this is one color technique I have not seen before.